Veeam Software Appliance Boot Failure – Emergency Mode Recovery

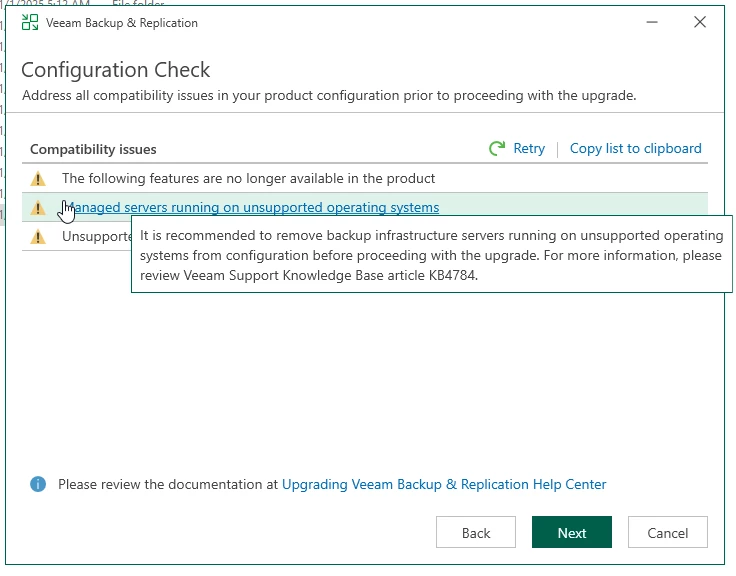
Recently, I was involved in a production support case where a Veeam software appliance deployed on physical hardware failed to boot after an unexpected power interruption.

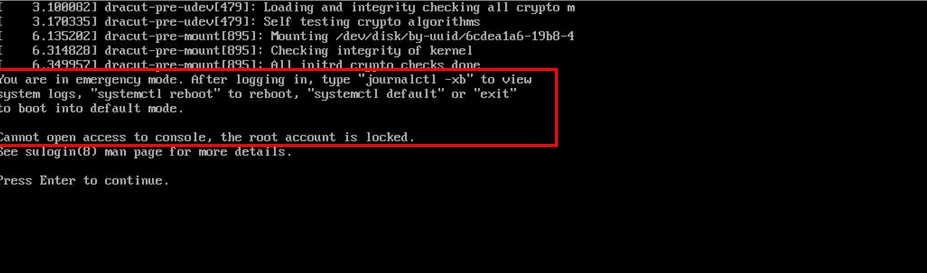
The system dropped directly into:

“You are in emergency mode. Cannot open access to console, the root account is locked.”

At this point, many administrators assume the appliance is corrupted or that Veeam needs to be reinstalled. In this case, the backup administrator had already reinstalled VBR once, and the issue happened again.

This is not a Veeam software issue. The problem occurs at the Linux storage layer, specifically with LVM and XFS.

The Veeam appliance is built on LVM logical volumes formatted with XFS. During boot, Linux must detect storage, activate LVM volume groups, and mount all filesystems defined in /etc/fstab before any services start.

If any of these steps fail, the system enters emergency mode to protect itself. This is a safety mechanism, not a catastrophic failure.

Understanding this boot sequence makes troubleshooting much easier and avoids unnecessary reinstallation.

Common Root Causes:

  • Abrupt shutdown / forced power off
  • Host crash
  • Storage delay during boot
  • XFS journal corruption
  • LVM not auto-activating

In environments without proper UPS or graceful shutdown, this is more common than people expect.

Recovery Procedure:

Step 1 – Boot into Recovery Mode


At GRUB:

  • Press e
  • Add at end of Linux line type : rd.break
  • Press Ctrl + X

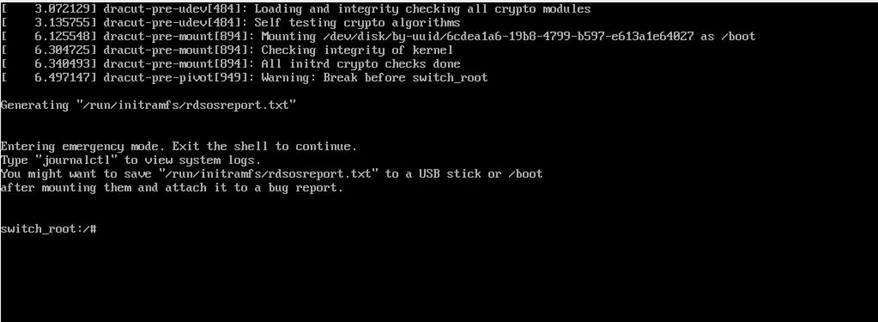
This boots the system into a minimal emergency shell before the full system mounts.

Step 2 – Mount the System and Enter Installed OS

Once inside the emergency shell, the root filesystem is mounted read only. We must remount it read write and enter the installed system environment.

Run:

  • mount -o remount,rw /sysroot
  • mount -t proc /proc /sysroot/proc
  • mount –rbind /sys /sysroot/sys
  • mount –rbind /dev /sysroot/dev
  • chroot /sysroot

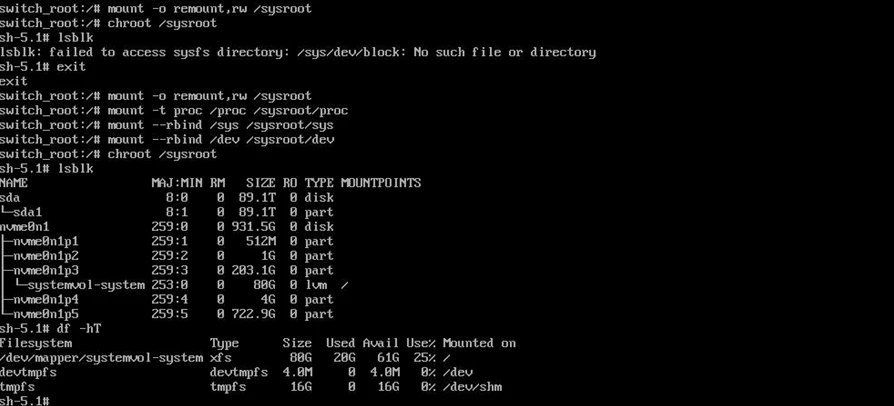
Now you are operating inside the actual installed OS.

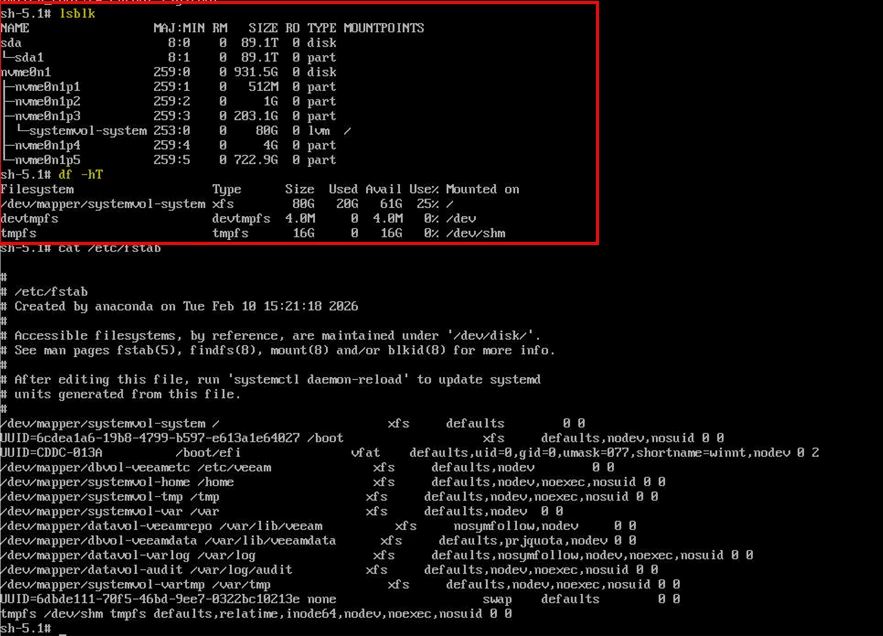
Cross verifies if all the volumes are visible in the df-hT or lsblk

If logical volumes are missing or inactive, move to the next step.

Step 3 – Activate LVM

In many cases, LVM simply failed to auto activate during boot.
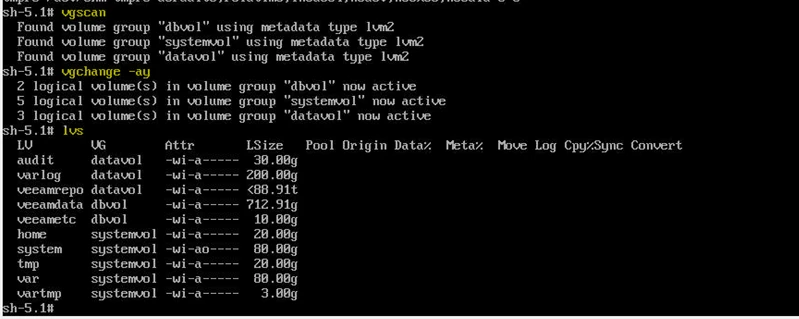
  • vgscan
  • vgchange -ay
  • lvs

Confirm all datavol and dbvol logical volumes are active.

Common volumes in Veeam hardened appliance include:

datavol-veeamrepo
dbvol-veeamdata
datavol-varlog
datavol-audit

If volumes activate and mount successfully, exit and reboot. In a large percentage of cases, this alone resolves the issue.

Type exit and reboot.

Step 4 – Repair XFS (If Mount Fails)

If you encounter errors during mount such as :

Cannot read superblock
Structure needs cleaning
Mount failed

Then XFS metadata corruption likely occurred during abrupt shutdown.

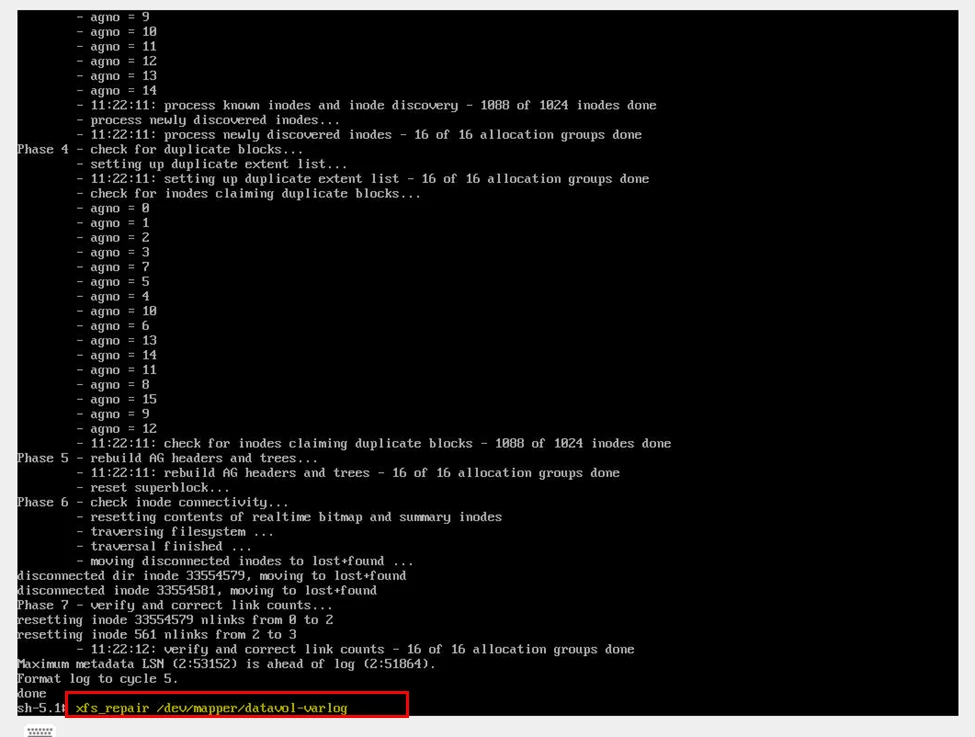
From the chroot environment, after activating LVM, run:

xfs_repair /dev/mapper/<logical_volume>

In our production case, the affected volume was datavol-varlog.

Allow the repair process to complete. Depending on volume size, this may take time.

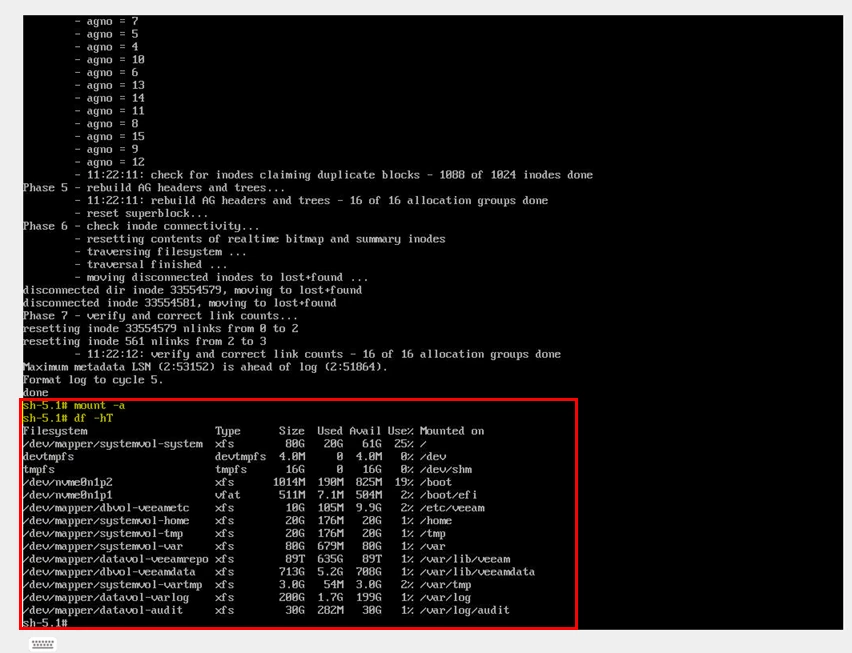
Step 5 – Mount All Filesystems:

After repair:

mount -a
df -h

Confirm all filesystems mount correctly.

Step 6 – Rebuild initramfs

If LVM activation failed during boot once, it can fail again. Rebuilding initramfs ensures storage drivers and LVM modules are correctly embedded.

  • dracut -f -v

This regenerates the boot image.

Verify that a new initramfs image is successfully generated.
 

Step 7 – Enable LVM Monitoring

One of the most overlooked steps in Veeam appliance deployments is ensuring lvm2-monitor is enabled.

  • systemctl enable lvm2-monitor
  • systemctl start lvm2-monitor

Without this service active, LVM auto activation during boot can behave inconsistently, especially on physical hardware with delayed disk initialization.

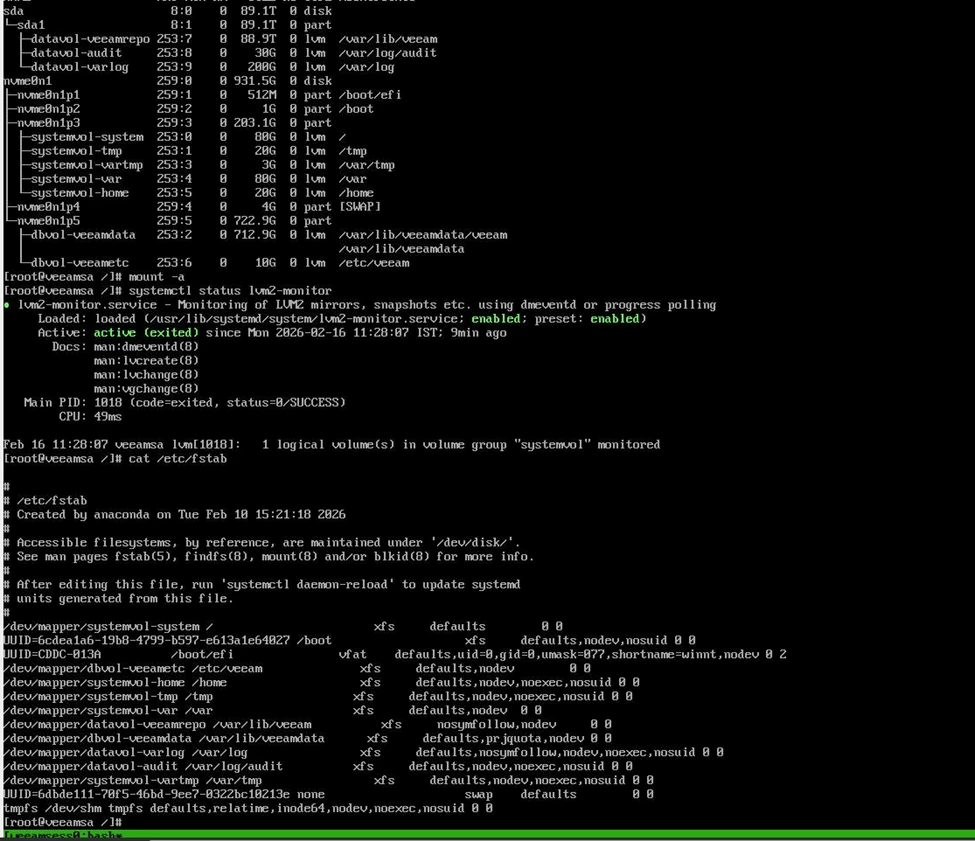
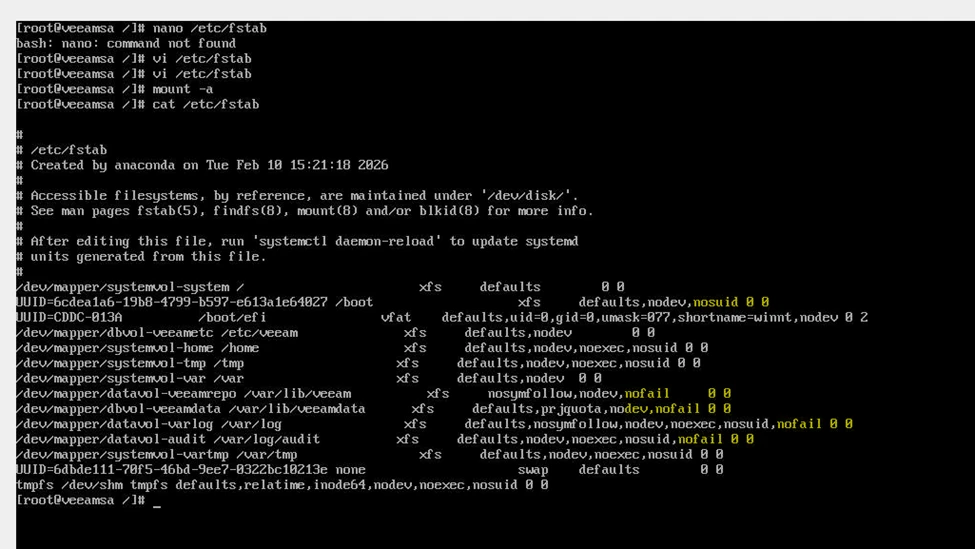
Step 8 – Harden fstab to Prevent Future Lockouts

This is a key operational improvement.

If non critical volumes are defined in fstab without nofail, any mount failure will force the system into emergency mode.

Add nofail to non-system LVM mounts:

Example:

  • defaults,nosymfollow,nodev,nofail
  • Apply only to:
  • datavol-veeamrepo
  • dbvol-veeamdata
  • datavol-varlog
  • datavol-audit

Do NOT modify systemvol entries.

This ensures the OS will continue booting even if a secondary volume experiences issues.

Step 9 – Reboot and Post Recovery validation 

Run:

  • mount -a
  • lsblk
  • systemctl status lvm2-monitor
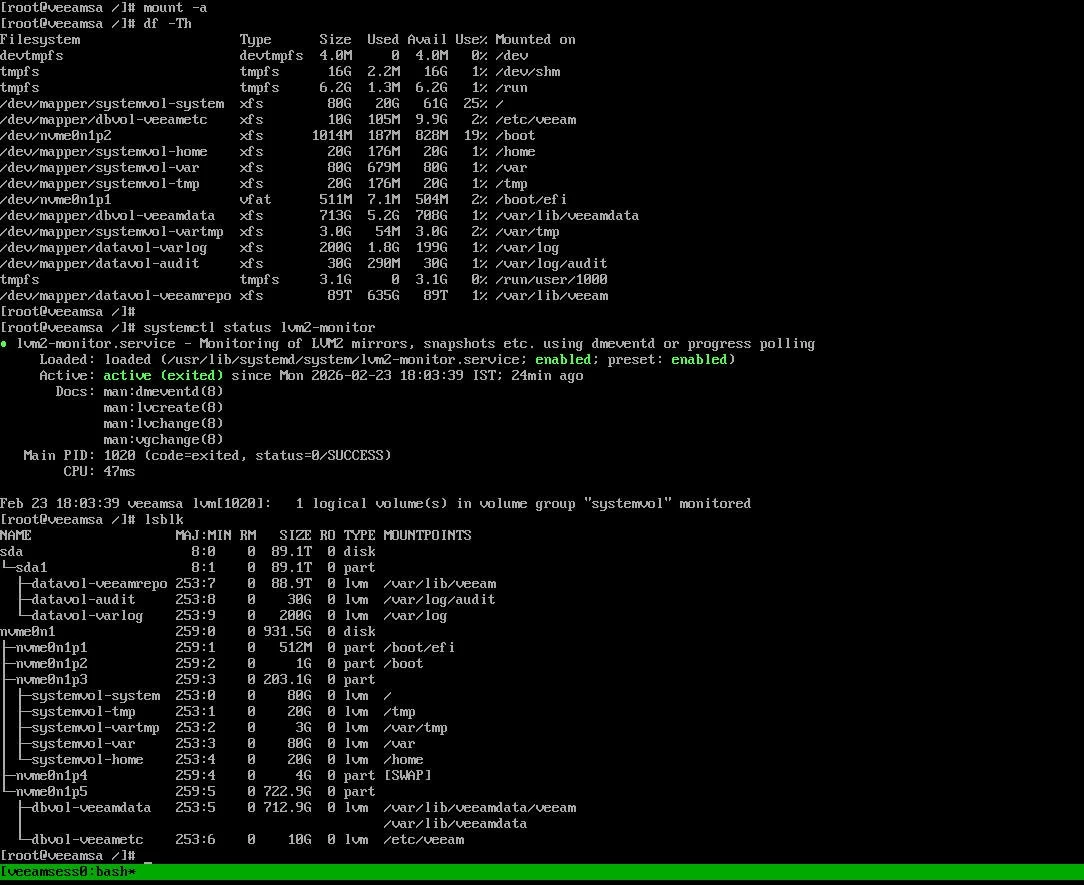
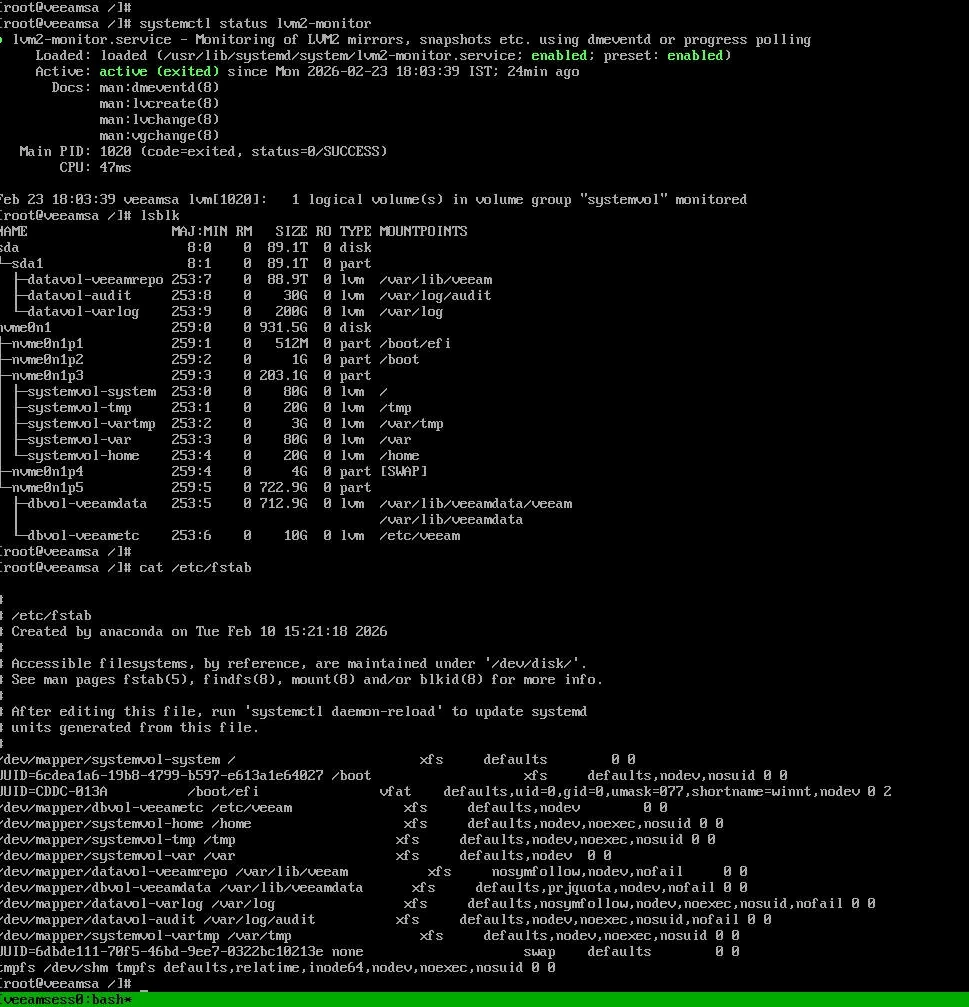
Confirm:

All logical volumes are mounted
No degraded state exists
LVM monitoring service is running
Veeam services start normally

Important Lessons

This incident highlights a few important points when running Veeam appliances on physical hardware.

First, this was not a Veeam issue. The problem was at the Linux storage level. Reinstalling VBR will not fix an LVM or XFS issue. Understanding that saves time and avoids unnecessary rebuilds.

Second, power protection is critical. Backup appliance without proper UPS and clean shutdown policy is exposed to filesystem corruption. 

During boot, LVM must activate before disks mount. On physical servers, especially with RAID, disks may take a few seconds to appear. If that process fails, Linux enters emergency mode to protect itself.

Finally, if your backup strategy depends on Veeam appliance, the backup team must understand the basics of Linux recovery and be comfortable checking storage and repairing filesystems when required.

Veeam Cloud Connect Upgrade to V13 Step by Step Service Provider Guide

Veeam Backup and Replication v13 is now in the wild, and for service providers running Cloud Connect this is not just another point upgrade. It is a major platform refresh that touches the core backup server, gateways, explorers, agents, and the tenant facing control plane. With v13 bringing stronger security defaults, modernized components, and several legacy features finally retired, VCSP partners should plan their upgrades early so tenant adoption is smooth from day one.

I recently upgraded my Cloud Connect environment from 12.3 to v13. In this post I will walk through the upgrade flow exactly as the wizard presents it, with short practical notes at each stage. The focus is simple. What to verify, why Veeam is asking for it, and how to avoid tenant impact while moving your Cloud Connect stack cleanly onto v13.

Preparing for the upgrade

Before starting the upgrade, there are a few best practice steps you should complete across your VBR and Cloud Connect infrastructure. These include:

  1. Verify system compatibility
    Confirm supported operating systems and system requirements are met for all Cloud Connect components, including the Cloud Connect server, gateways, repositories, and database hosts.
    https://helpcenter.veeam.com/docs/vbr/userguide/system_requirements.html#backup_server_windows
  2. Take the VM snapshots with application consistent 
    Create snapshots of all critical servers such as the Cloud Connect VBR server, cloud gateways, and database servers. This is strongly recommended in production as an extra rollback layer.
  3. Back up the Veeam configuration
    Export the VBR configuration from the Cloud Connect server. This is your primary rollback safety net if anything unexpected happens.
  4. Back up the Veeam database
    Take a full backup of the VBR configuration database.
    • If using PostgreSQL, take a full pg dump.
    • If using SQL Server, take a full SQL backup.
  5. Confirm tenant version readiness
    Make sure all tenant VBR servers are on the minimum supported build compatible with Cloud Connect v13. Tenants on older builds will fail after the provider upgrade. You will also see the tenant list during the Configuration Check stage.
  6. Put Cloud Connect into maintenance mode
    Once preparation is complete and your maintenance window begins, put Cloud Connect into maintenance mode so tenant activity is controlled and predictable. Maintenance mode lets any in flight backup or backup copy task complete cleanly, so data already being written to cloud repositories is not cut off mid stream. After that, new tenant jobs cannot start and any new attempts fail fast with a clear maintenance message

This gives you a safe upgrade window. You avoid partial restore points, prevent new sessions from landing on services that are about to restart, and tenants see an explicit notice that the platform is under scheduled maintenance instead of random connection errors.

To enable Maintenance Mode from the VBR console Right Click on the Cloud Connect top level tree item and click on Maintenance Mode

Read the message and click Yes

Once completed you should see the following status in the Cloud Connect menu tree

Starting the upgrade

The setup wizard prompted to update Microsoft .NET Hosting 8.0.21.

After .NET 8.0.21 installed successfully, proceeded with the upgrade.

Read and Accept License Agreement

Provide License File

VBR 13 simplifies licensing during upgrade. Instead of manually downloading and uploading a license file, you can sign in to your Veeam account from the wizard and install a license directly.

You can still browse and install a local license file if required. Just ensure the license matches the correct product version.

System configuration check

At the System Configuration Check step, the wizard verifies required software components. If anything is missing, the setup installs it automatically. After installation, a reboot may be required. Click Reboot, then restart the setup and continue.

Once the VM is rebooted and online, Start the VBR setup again, Accept the agreement -> License details -> Perform Configuration Check

Configuration Check

During Configuration Check, VBR scans your environment for anything that will not survive the move to v13. This helps prevent breakage after the upgrade.

Pay close attention to warnings about removed features.

Deprecated features

  • Restore point based retention
    Earlier you could set retention as “keep 30 restore points” instead of “keep 30 days.” In v13, you cannot configure restore point based retention for new jobs. New jobs must use time based retention.
  • Reversed incremental backup mode
    This mode kept the most recent backup as a full, with older restore points as incrementals. In v13, you cannot create new jobs with reversed incremental mode. Existing jobs may continue to run, but plan to migrate to forward incremental with periodic fulls.
  • Single storage backup format option
    Earlier you could choose the older single chain format at repository level. In v13, this format is no longer available for new repositories or jobs. The supported default is per machine backup chains.
  • Active Directory based authentication for new Cloud Connect tenants
    Earlier tenants could authenticate using AD users and groups. In v13, AD based authentication cannot be enabled for new tenants. New tenants must use local Veeam accounts or other supported methods. Existing AD based tenants are not forced to change immediately, but no new AD based tenants can be created.

Discontinued features

These are fully removed.

  1. Universal Application Item Recovery wizard (U AIR)
    The generic multi app item recovery wizard is removed. Use application specific recovery options instead.
  2. Starting restore by double clicking VBK or VBM in Windows Explorer
    This shortcut is removed. Restores must be initiated from the Veeam console.
  3. Burning Recovery Media to CD, DVD, or BD
    The built in burn option is removed. You can still create ISO or USB recovery media and burn using another tool if needed.

Unsupported operating systems

The Configuration Check also flags managed servers running unsupported Windows versions. Upgrade or remove those servers first, then click Retry to confirm everything is compliant before proceeding.

Unsupported tenant versions

Unsupported tenant version is one of the most critical checks in a Cloud Connect upgrade because it directly affects tenant backup continuity. Tenants on old builds cannot communicate with the provider once you move to v13. After the upgrade, their backup copy jobs, backup to cloud repository jobs, and restore portal operations will fail until they upgrade. This impacts all Cloud Connect traffic, including agent backups, Cloud Connect backup, and Cloud Connect replication if used.

Export or copy the tenant list and contact each tenant to confirm their current build, then schedule their VBR and agent upgrades as soon as possible.

Cloud Connect v13 is backwards compatible with the following tenant versions:

• Veeam Backup and Replication 12.3.2.3617 and later 12.3.2 builds
• Veeam Agent for Windows 6.3.2 and later
• Veeam Agent for Linux 6.3.2 and later
• Veeam Agent for Mac 2.3.1 and later


Review the list of Veeam components and plug ins that will be upgraded, then confirm before clicking Upgrade.

Select Update remote components automatically if you want gateways, proxies, and repositories upgraded automatically after the core server upgrade. Otherwise, VBR will prompt you to update them at first launch.

Upgrade execution

You will see the upgrade progress through six stages:

  1. Upgrading Veeam Backup and Replication Server
    Updates core VBR services, binaries, and configuration.
  2. Upgrading Veeam Backup and Replication Console
    Updates the admin console to match the server version.
  3. Upgrading Veeam Explorers
    Updates application explorers like AD, Exchange, SQL, Oracle, and SharePoint.
  4. Upgrading Veeam Agents redistributables
    Refreshes Windows and Linux agent packages available for push install.
  5. Upgrading plug ins for Veeam Backup and Replication
    Updates platform and integration plug ins such as VMware, Hyper V, Nutanix, Entra ID, and others.
  6. Finalizing installation and starting services
    Completes cleanup and restarts all Veeam services on v13.

Upgrade completed successfully.

Launch the V13 console 

View the certificate and install them locally 

I really love the new UI look! 


Post upgrade checks

After the upgrade:

• Confirm all Veeam components, including gateways and repositories, are updated and online.
• Verify all Cloud Connect services are running.
• Disable Cloud Connect maintenance mode.
• Confirm gateways are online and listening on required ports.
• Spot check repository writes and metadata updates.
• Run a tenant backup through a gateway and confirm a new restore point is created.
• Perform a restore test from Cloud Connect backups.

Hope this walkthrough helps you plan your v13 Cloud Connect upgrade with confidence and minimal tenant impact.