Protecting Azure Virtual Machines Using Veeam Service Provider Console

As more organizations move workloads to public cloud platforms, protecting those workloads becomes just as critical as protecting on-premises infrastructure. Veeam Backup for Public Cloud is a native, Azure-aware backup product that integrates directly with Microsoft Azure through the Veeam Service Provider Console (VSPC) and Veeam Backup & Replication. 


In this blog, I will walk through the complete, step-by-step process of configuring Azure VM backups using Veeam Backup for Microsoft Azure from the Veeam Service Provider Console. This guide is written primarily for tenants, end users, and backup administrators who want a practical, hands-on understanding of how Azure backup works inside VSPC.

Prerequisites


Before you begin, make sure the following are in place:

  1. Access to the Veeam Service Provider Console (VSPC) with tenant credentials.
  2. An active Microsoft Azure subscription.
  3. A Global Administrator or Owner role on the Azure subscription — required to create the Microsoft Entra service principal during account registration.
  4. Azure Blob Storage containers already provisioned by your service provider (Veeam uses these as backup repositories).
  5. The Veeam Backup Appliance deployed in Azure and assigned to your tenant account by the service provider.

Part 1: Accessing the Veeam Public Cloud Portal

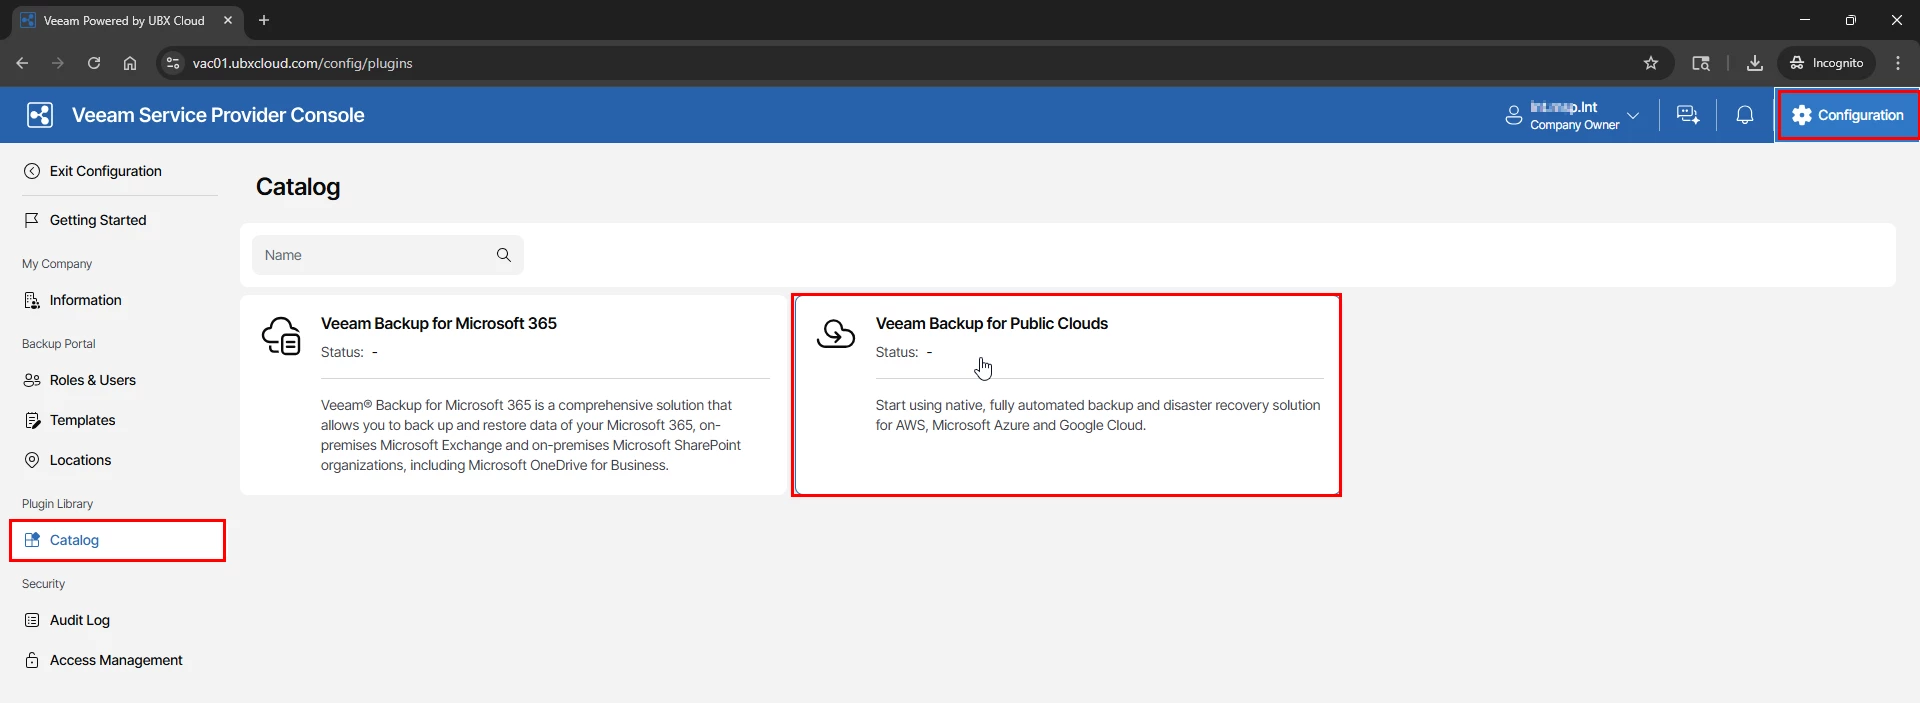
Log in to the Veeam Service Provider Console using your tenant credentials. In the top-right
corner, click Configuration. In the left sidebar under Plugin Library, select Catalog. You will
see the available plugins — locate and select Veeam Backup for Public Clouds
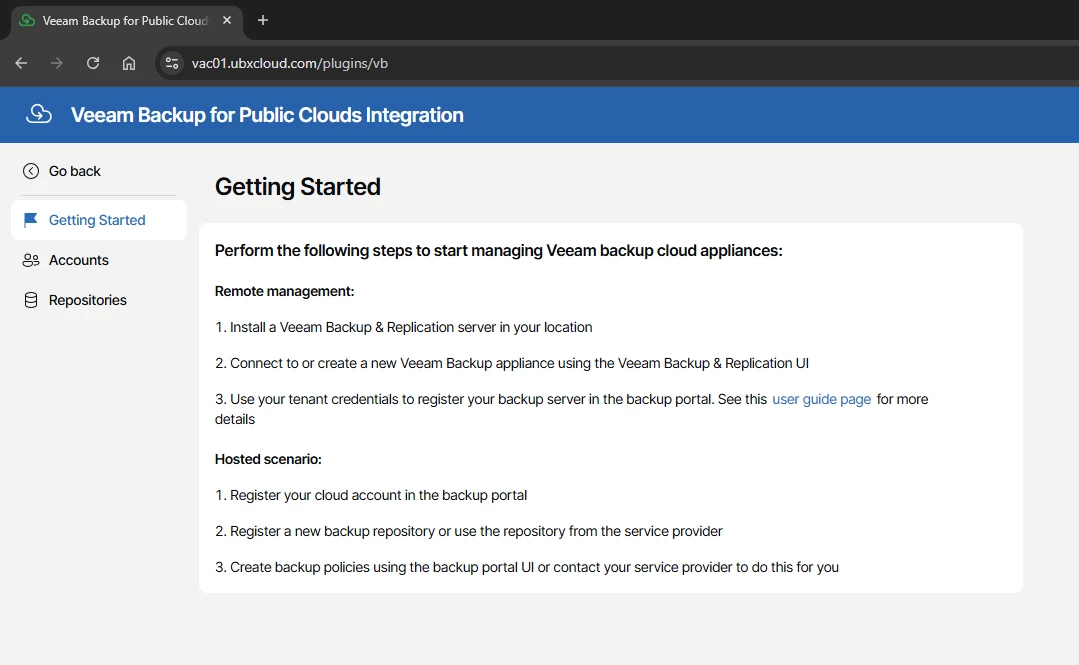
The plugin opens the Getting Started page, which presents two deployment scenarios:

Remote Management — You have an on-premises Veeam Backup & Replication (VBR)
server and want it to manage an Azure backup appliance. This is typical for hybrid environments where centralized control from on-premises is required.

Hosted Scenario — Your service provider hosts the backup appliance for you inside Azure.
You register your Azure account in the portal, select a repository, and create backup policies. This is the model used throughout this blog.

For the Hosted Scenario, the three setup steps are:

  • Register your cloud account in the backup portal.
  • Select a backup appliance and repository provided by your service provider.
  • Create backup policies to protect your Azure VMs.
Part 2: Registering Your Microsoft Azure Account

The first real configuration task is connecting your Azure subscription to the Veeam appliance. This is done through the Add Account wizard, which automatically creates a Microsoft Entra (formerly Azure AD) service principal and assigns the required Azure RBAC roles — no manual work in the Azure portal is needed.

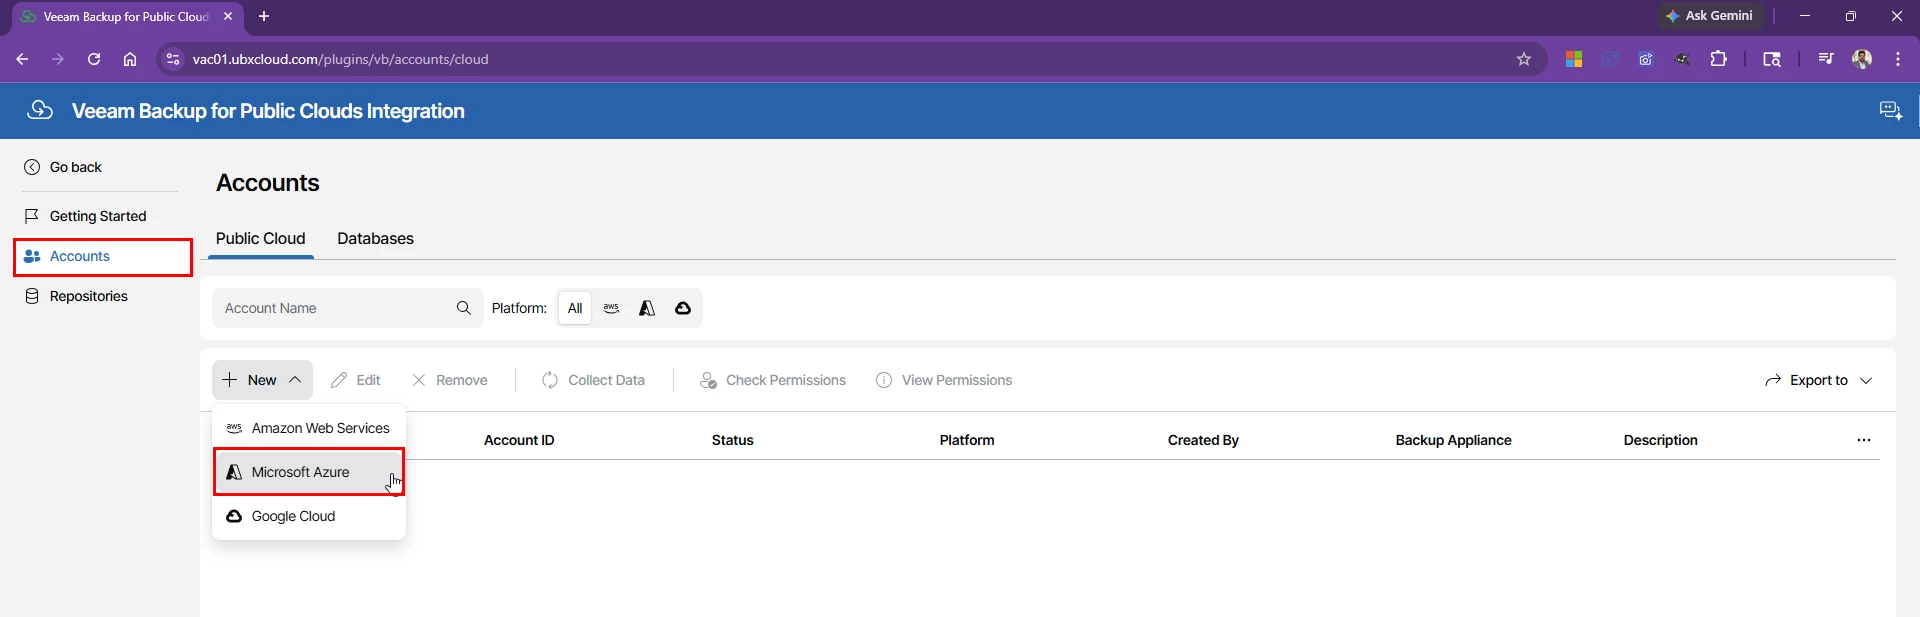
In the left sidebar, click Accounts, stay on the Public Cloud tab, then click → Microsoft Azure
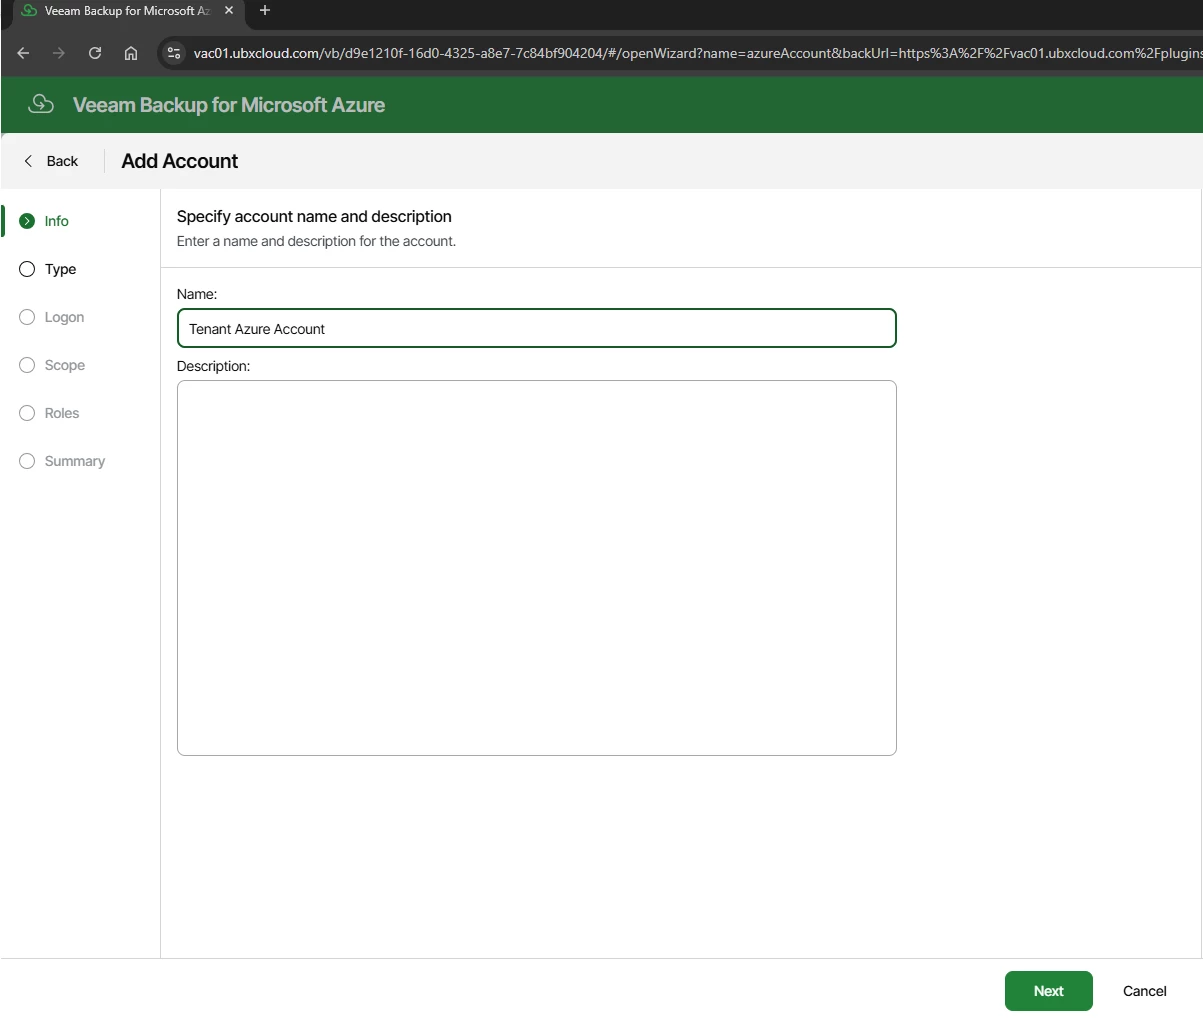
Enter a meaningful display name for this account. This name is used throughout the portal, so choose something that clearly identifies the tenant or Azure subscription
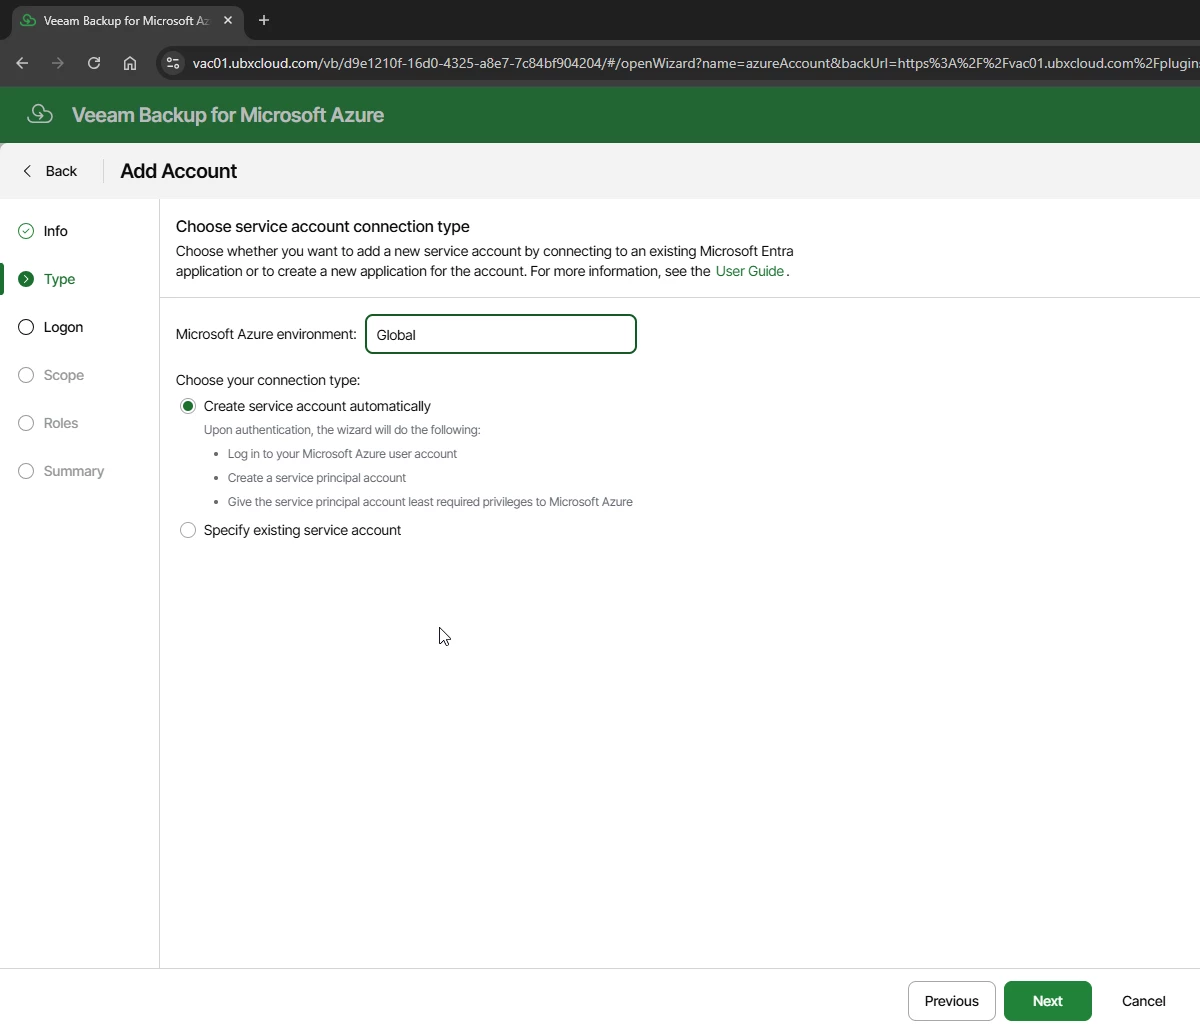
On the Type step, set the Microsoft Azure environment to Global (or the appropriate sovereign cloud if applicable).

Under Connection Type, select Create service account automatically. This option signs in
as your user account, creates a service principal in Microsoft Entra, and assigns it the minimum
required RBAC roles all without any manual work in the Azure portal. Click Next.
Authenticate to Azure Using the Device Code Flow
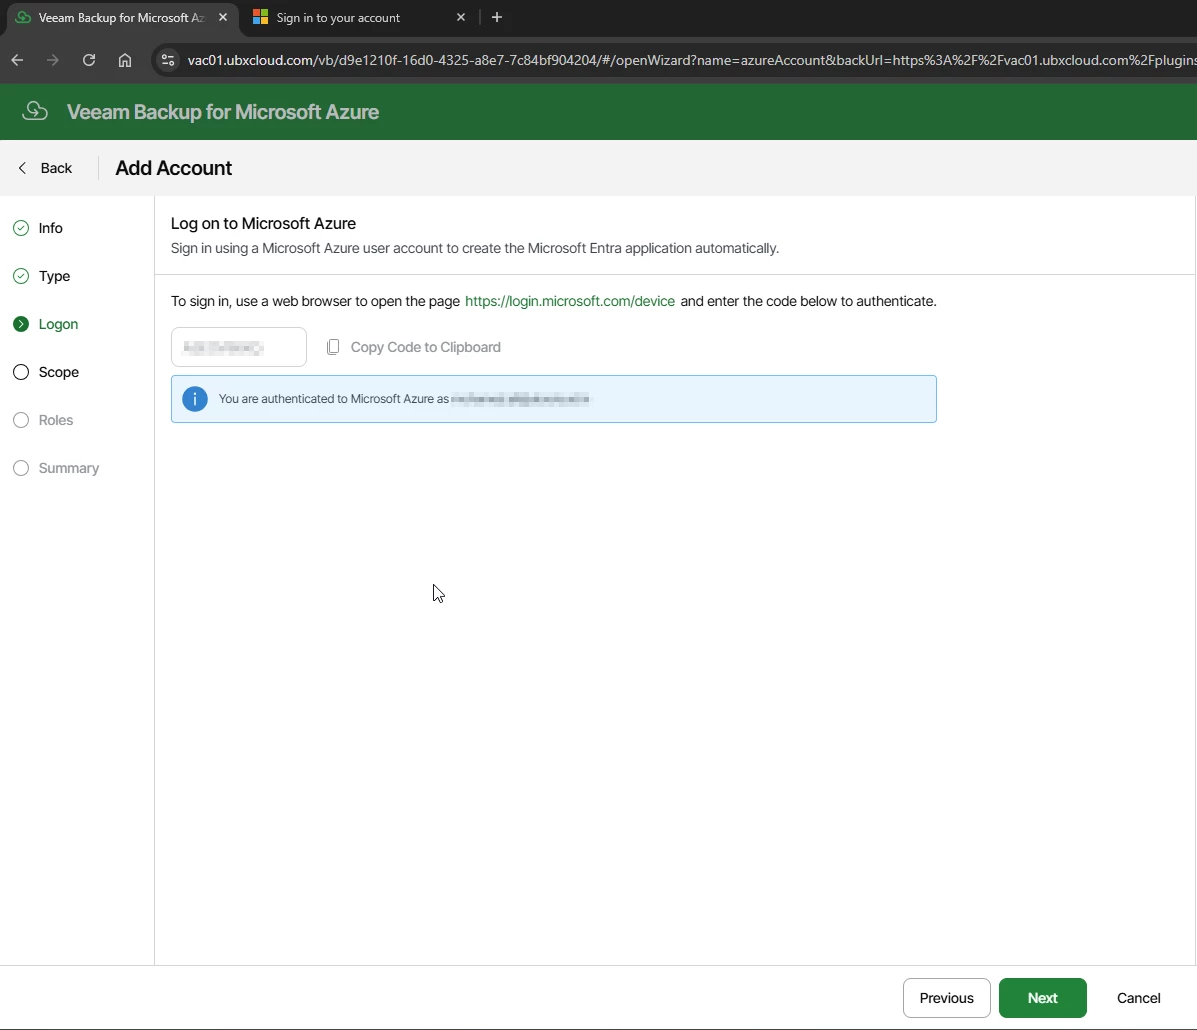
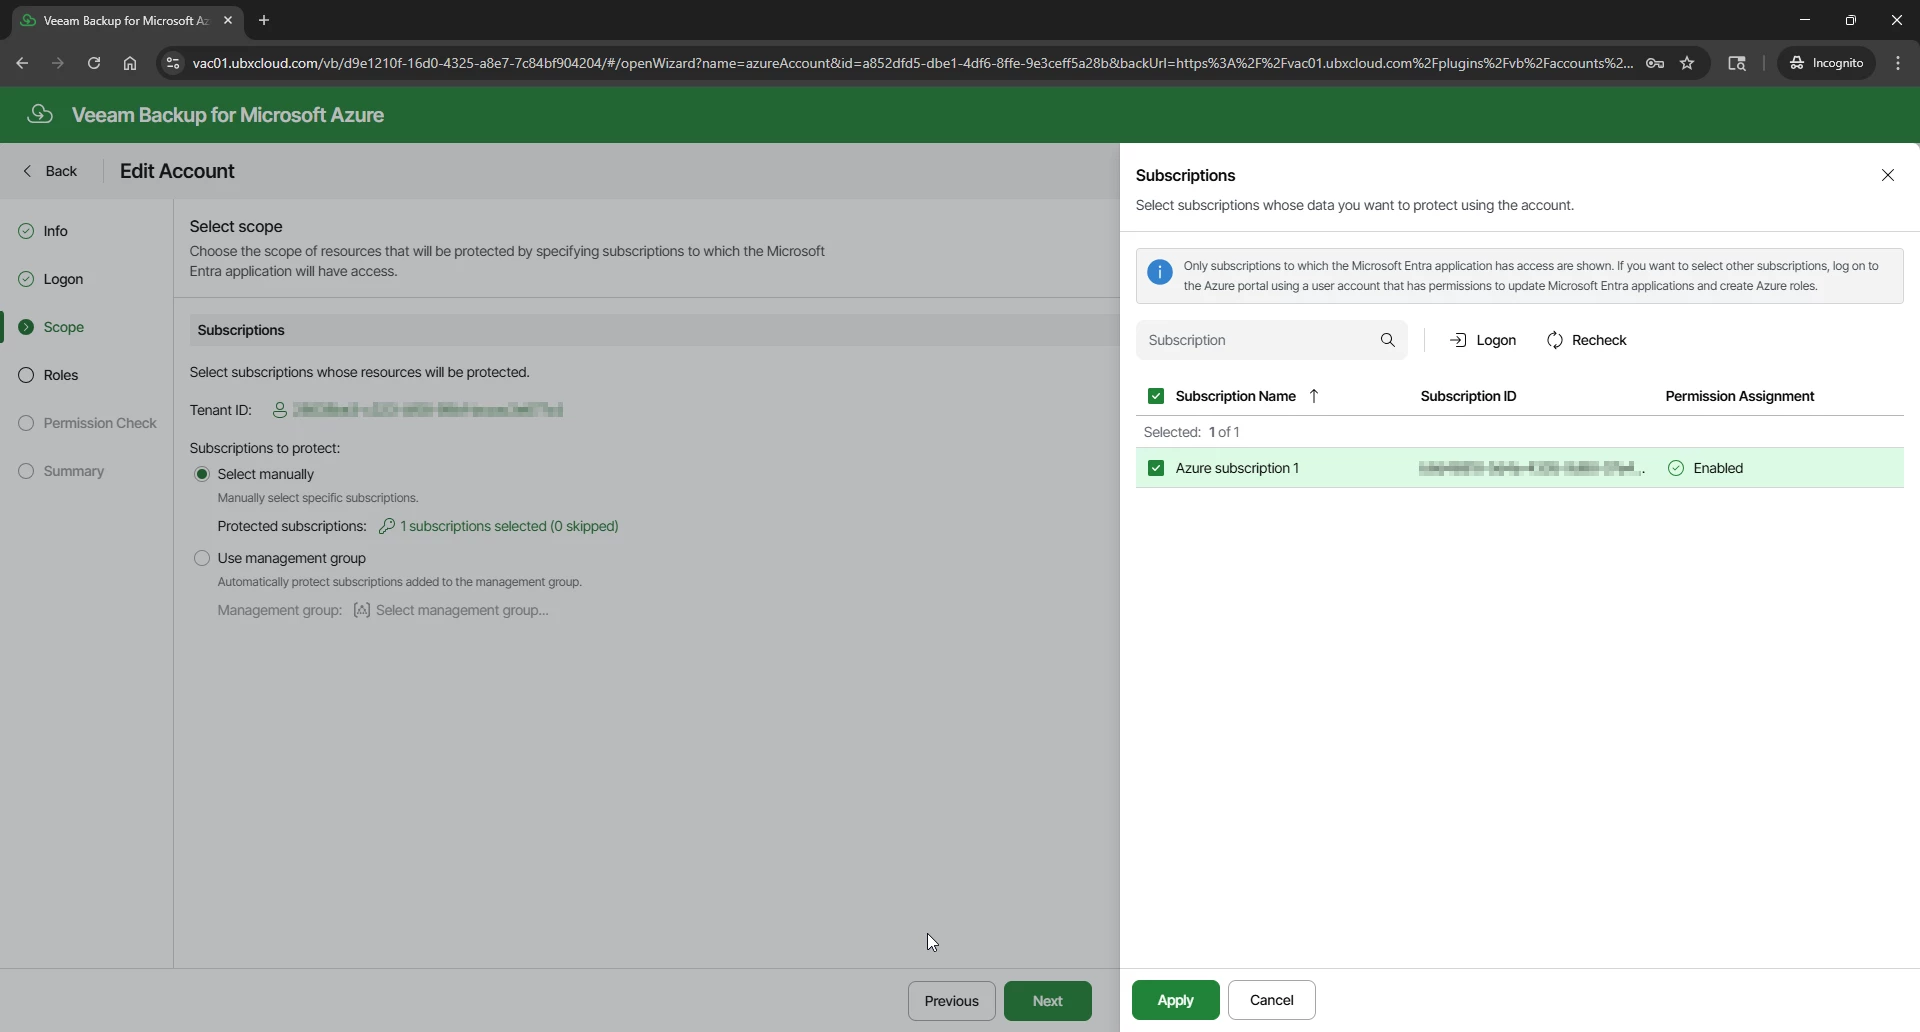
Once logon authorization completed. The Scope step displays all subscriptions accessible to the authenticated account. Select the subscriptions this account should manage. Two options are available:

Select manually — Check individual subscriptions. Recommended for environments with a defined set of subscriptions.

Use management group — Automatically includes all subscriptions within a management group. Useful when subscriptions are added dynamically in large enterprise environments.

Select the target subscription and click Apply, then Next
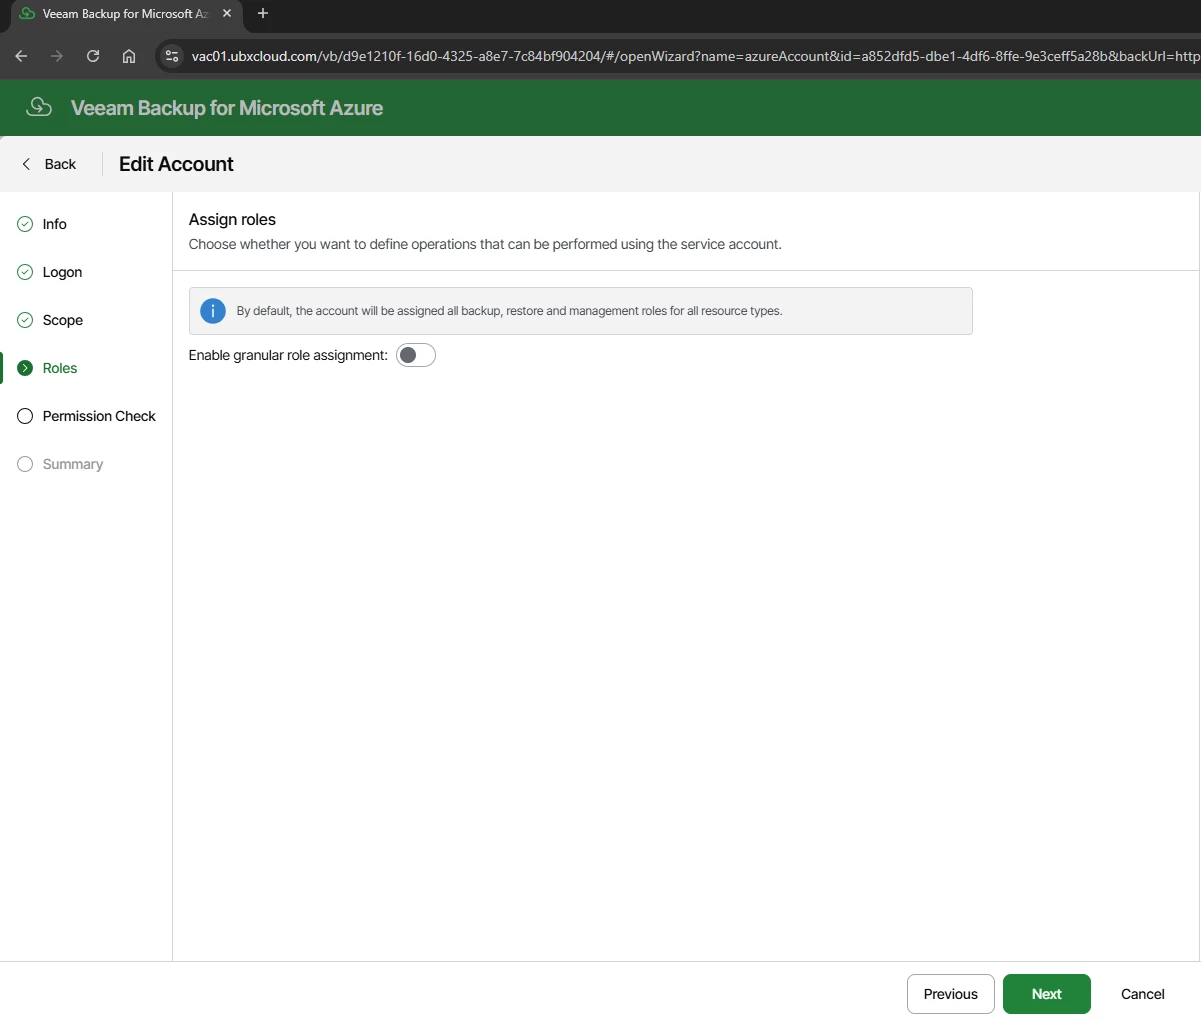
The Roles step controls which operations the service account is permitted to perform. By default, Veeam assigns the full set of backup, restore, and management roles across all supported Azure resource types: Azure VM, Azure SQL, Azure Files, Virtual Network, and Cosmos DB.


Leave Enable granular role assignment turned Off unless a specific security requirement
calls for restricting the account to a subset of operations. Click Next
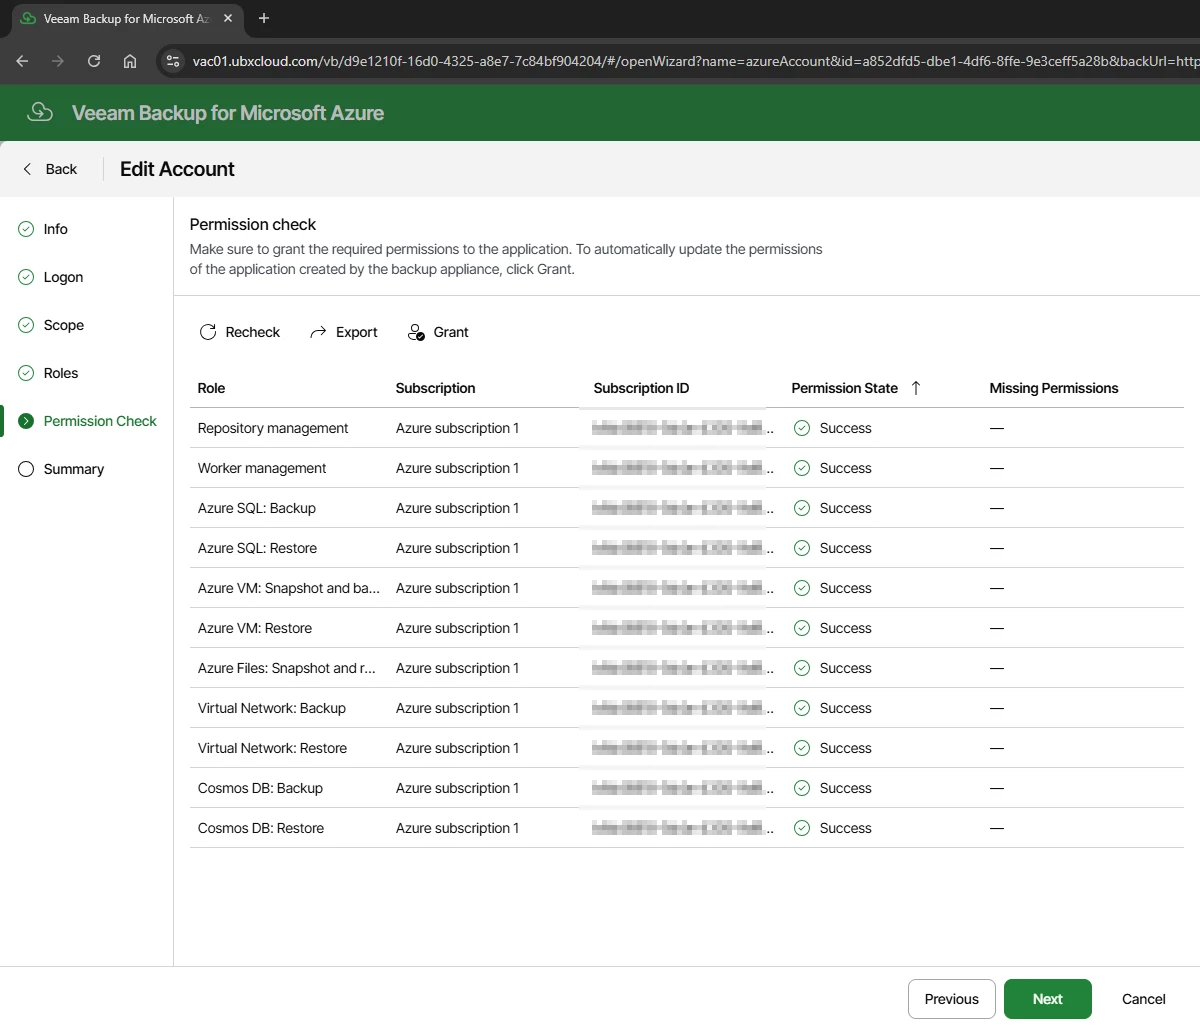
The Permission Check step runs an automated audit of the service principal against the selected subscriptions. Every role should show a Success status, including: Repository management, Worker management, Azure VM Snapshot and Backup, Azure VM Restore, Azure SQL Backup/Restore, Azure Files, Virtual Network, and Cosmos DB. 
 

If any role shows a missing permission, click Grant to apply the required RBAC assignment before proceeding. 
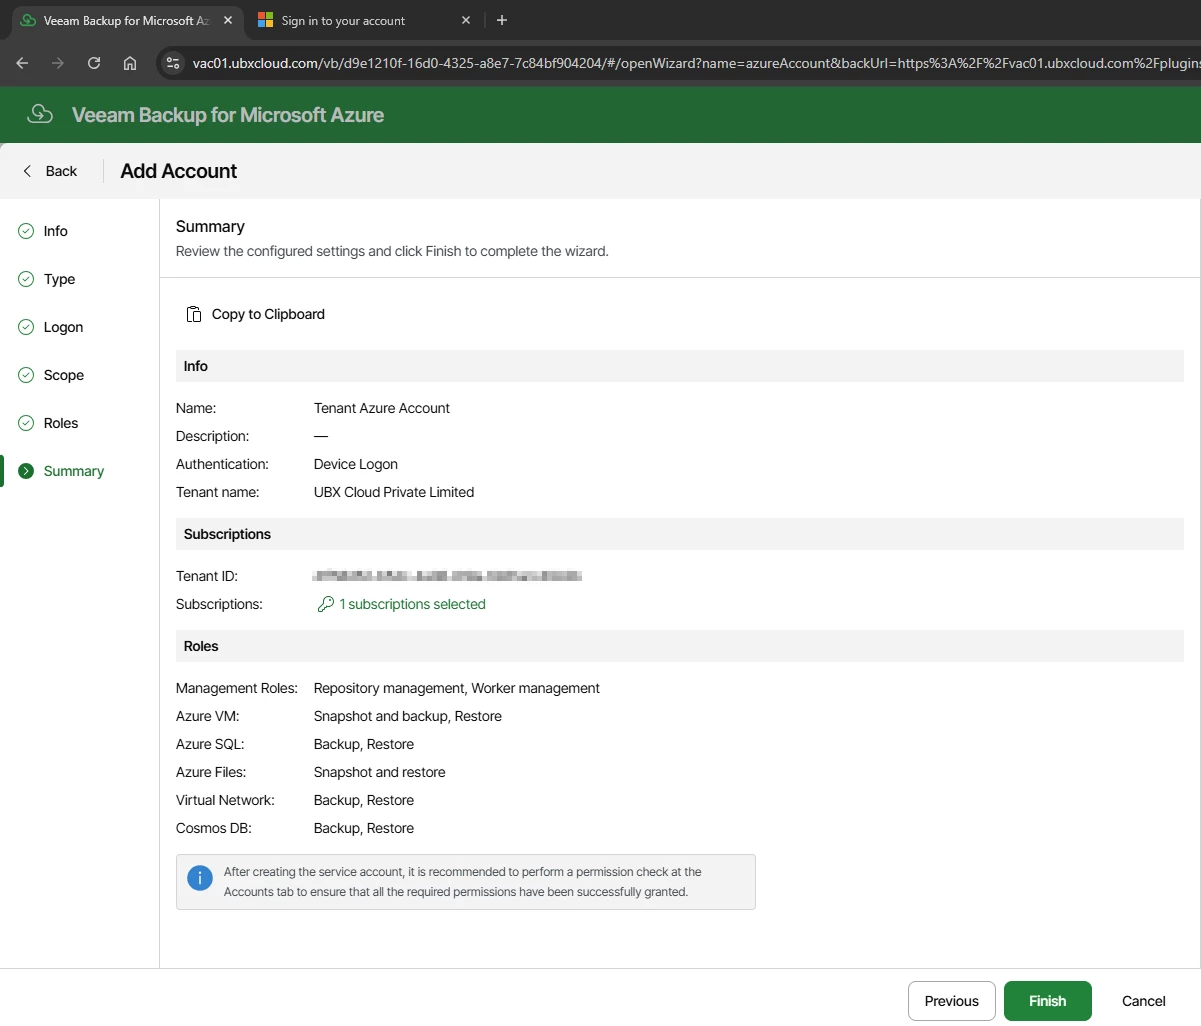
Review the Summary and Click Finish
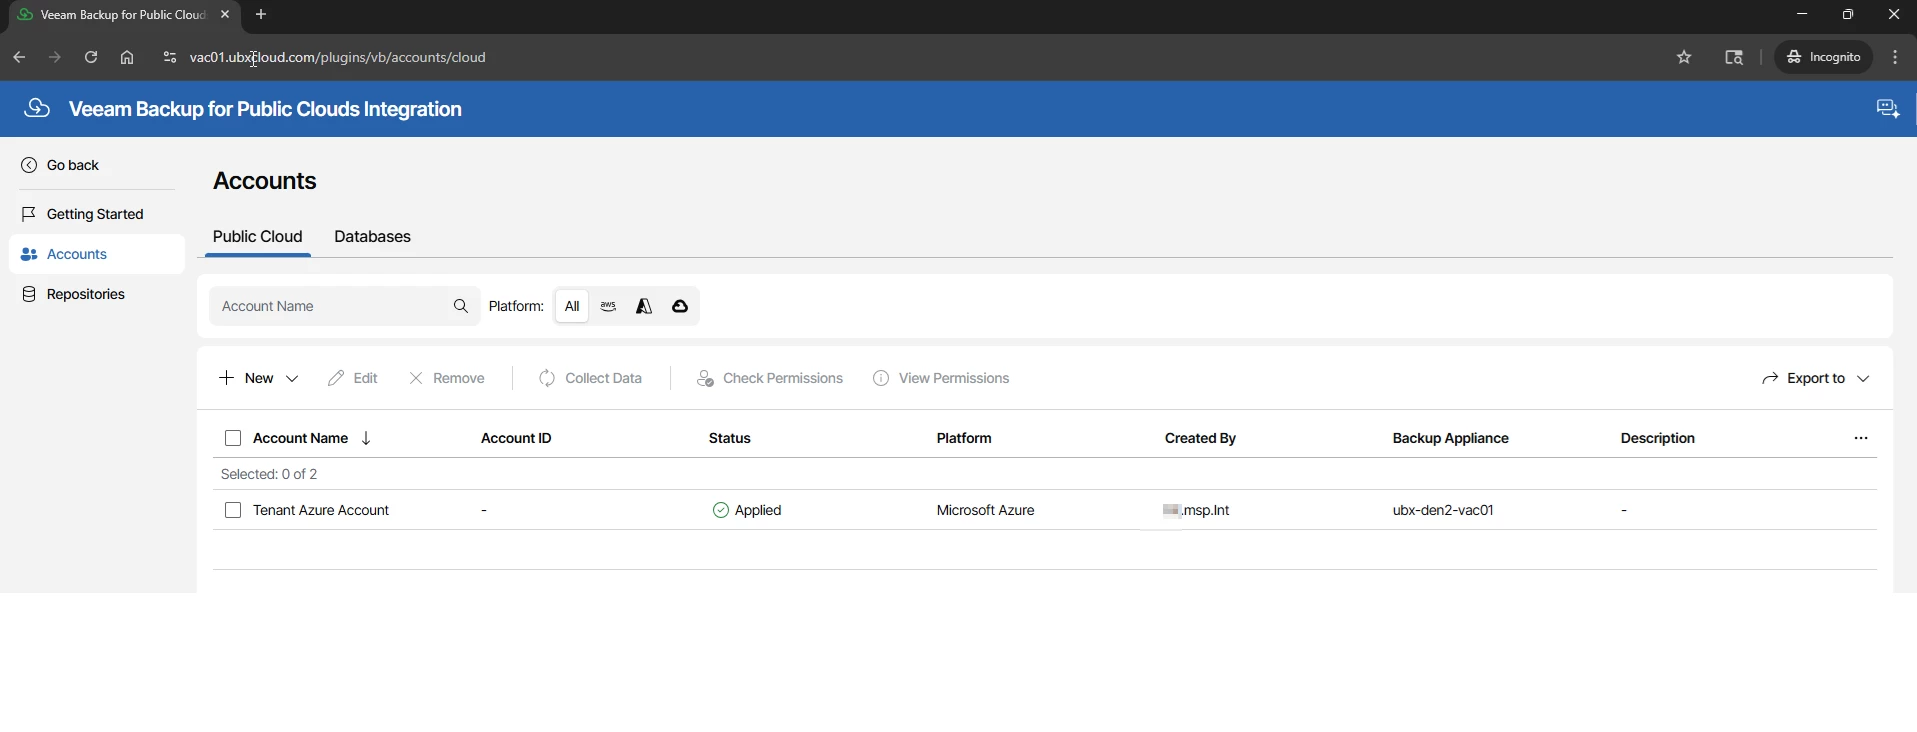
After the wizard completes, the portal returns to the Accounts list. The new account should
appear with a status of Applied and ready.

This confirms that the service principal is active in Microsoft Entra, the required RBAC roles are assigned to the subscription, and the Veeam appliance has validated connectivity.
Understanding Backup Repositories and Storage Tiers

Before creating a backup policy, it is worth reviewing the repositories that your service provider has made available by the service provider.

Click → Repositories in the left sidebar. Veeam stores backup data in Azure Blob Storage containers, and the storage tier you assign to each backup schedule directly impacts both cost and restore performance.
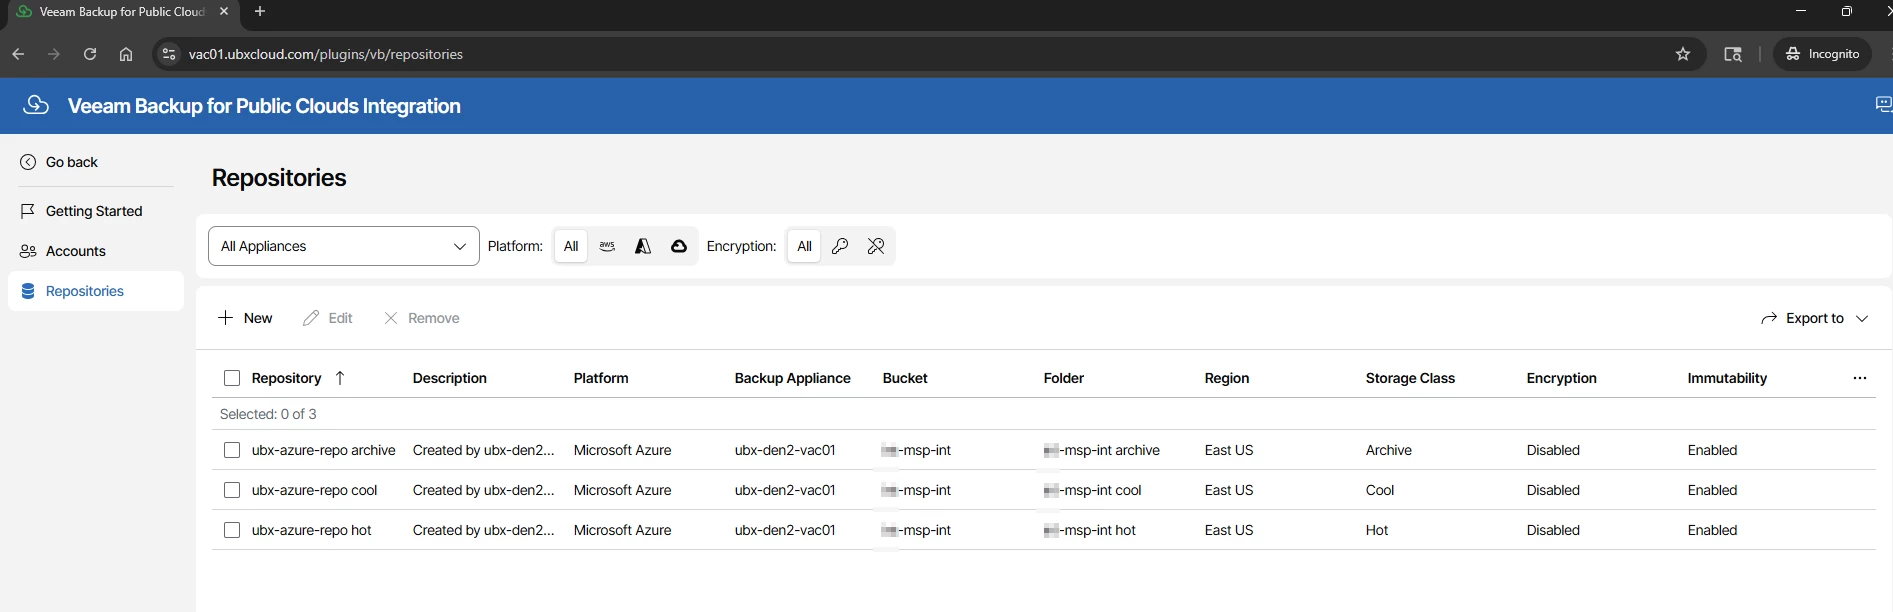
Azure Blob Storage Tiers for Veeam Backup Repositories

TierStorage CostRetrieval CostRetrieval SpeedMin. RetentionBest Use in Veeam
Hot~$0.018/GB/monthFreeInstantNoneDaily backups — fast restores
Cool~$0.010/GB/month~$0.01/GBMinutes30 daysWeekly backups — occasional restores
Archive~$0.0018/GB/month~$0.022/GBHours (rehydration)180 daysMonthly/Yearly — long-term compliance

Part 3: Creating a VM Backup Policy

A backup policy defines which Azure virtual machines to protect, how to process them during backup, when backups run, and where backup data is stored.

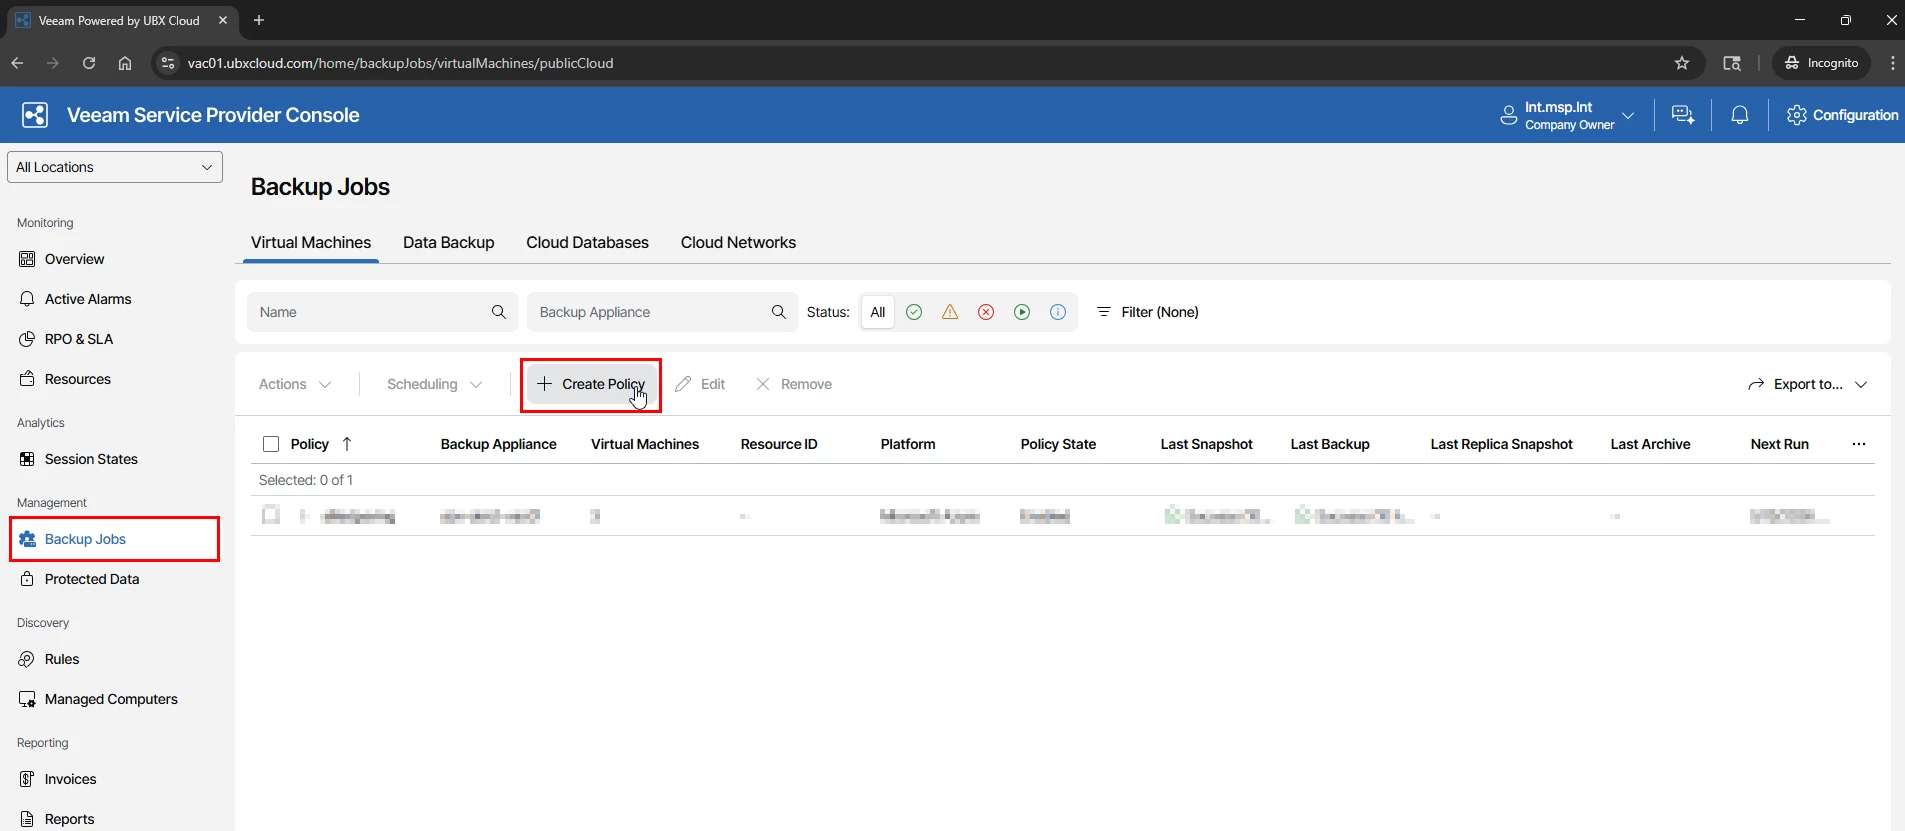
In VSPC home console, navigate to Backup Jobs in the left sidebar, select the Virtual Machines tab, and click → Create Policy
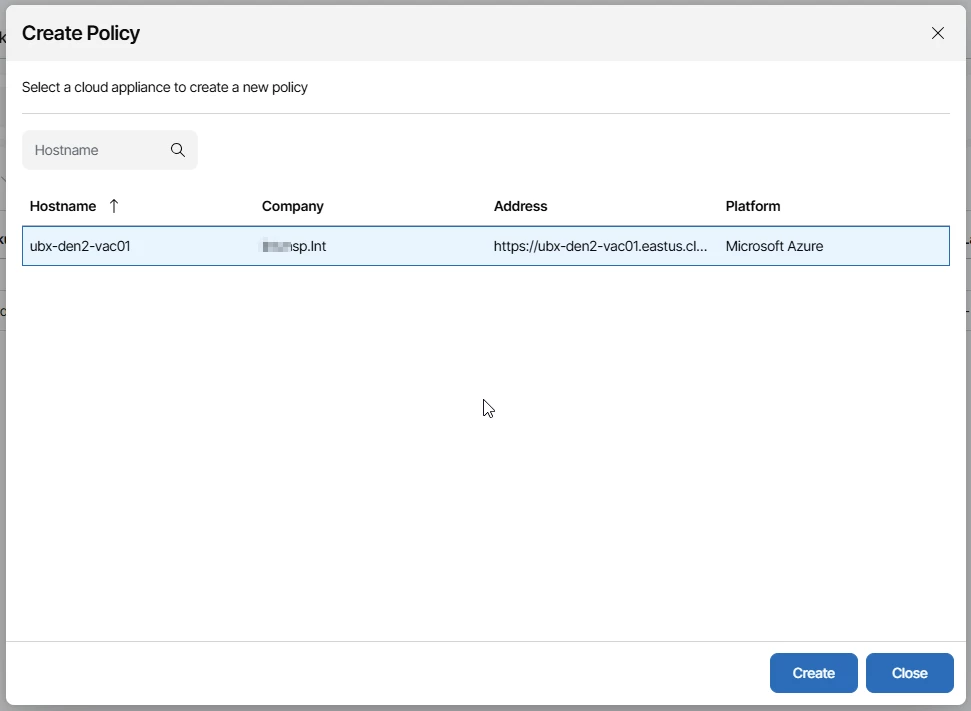
Select the Azure appliance (Assigned to your tenant by the service provider) and click Create. The Add VM Policy wizard opens directly on that appliance

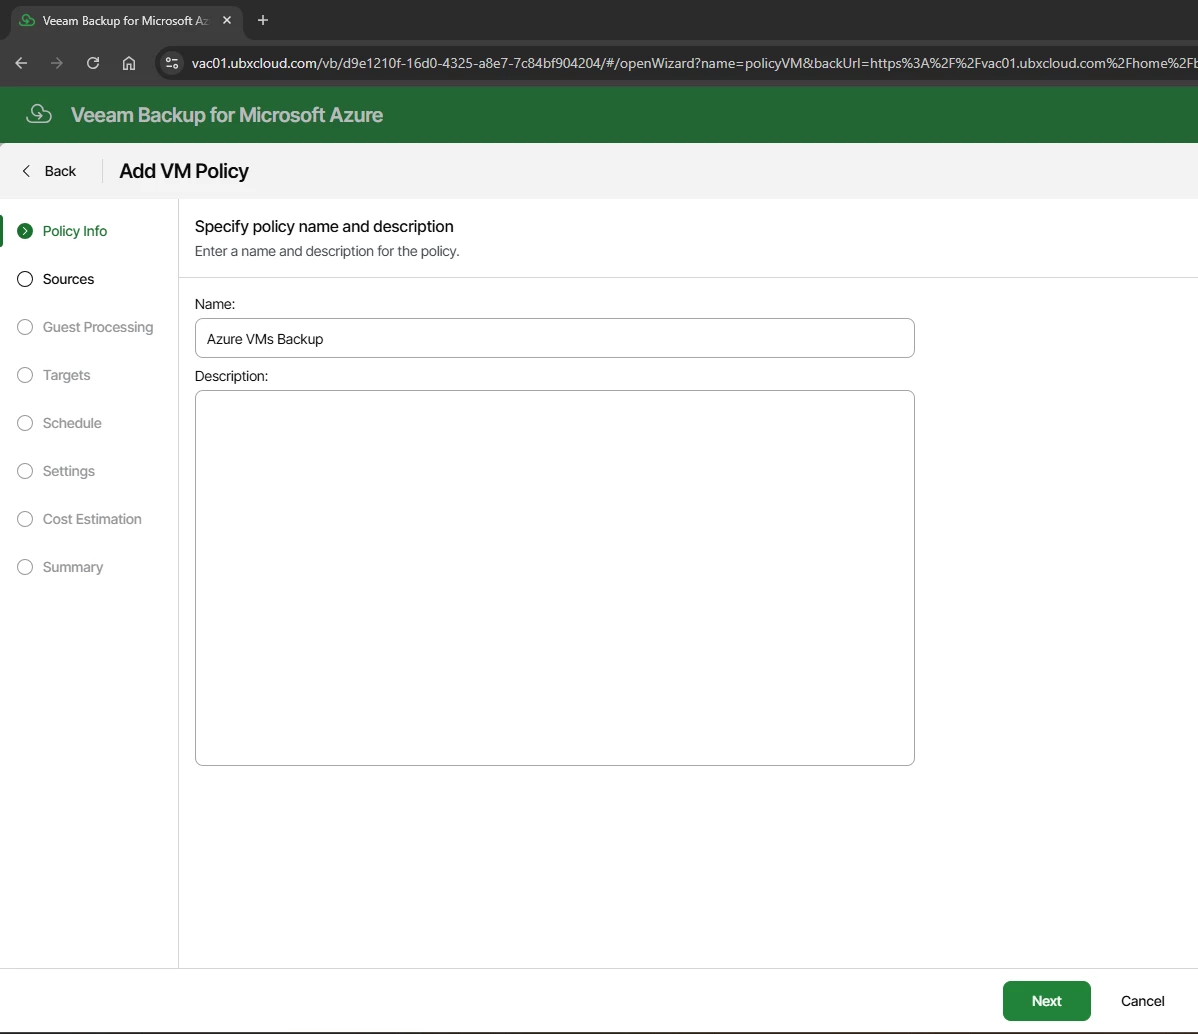
At the Policy Info step, enter a name and optional description for the policy
 

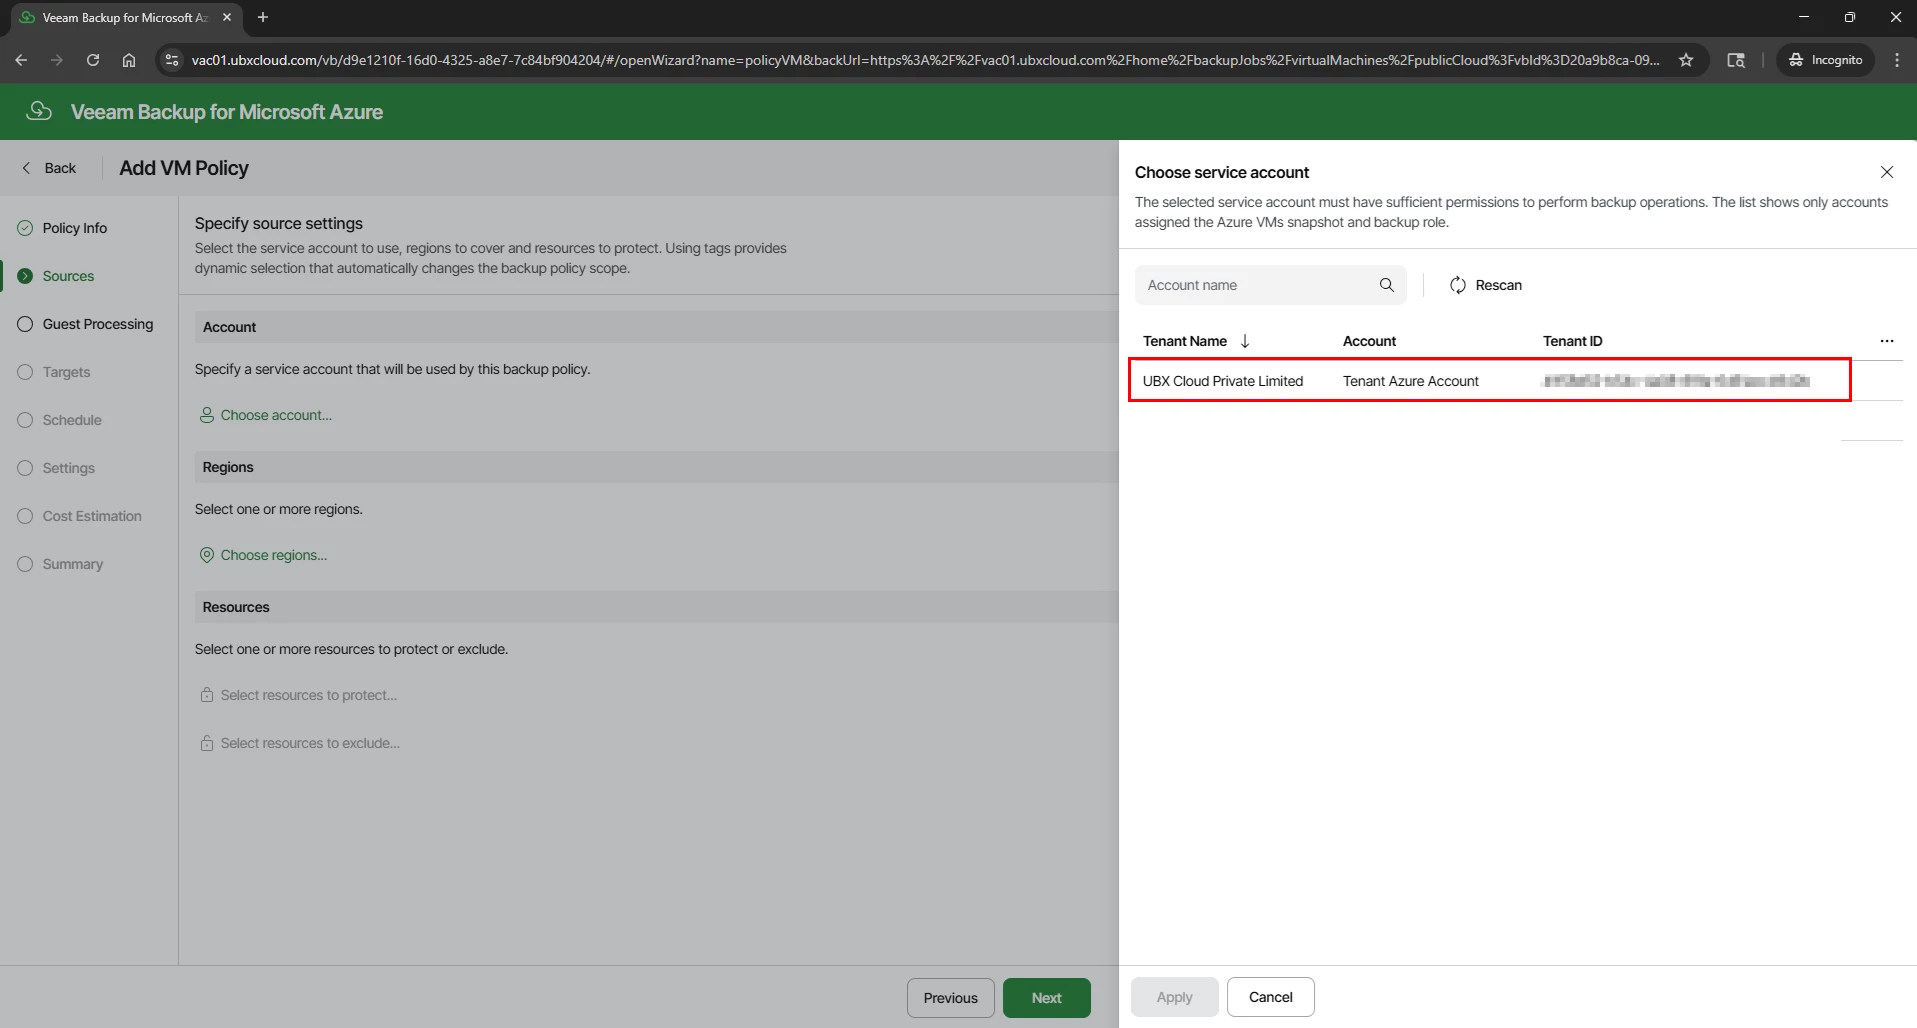
The Sources step has three sections that together define the full backup scope:

Account: Click Choose account and select the Azure account registered in Part 2. This determines which Azure tenant and subscription the policy operates in. 

Regions: Click Choose regions and select the Azure regions where the target VMs are located. You can select multiple regions if your VMs span more than one.

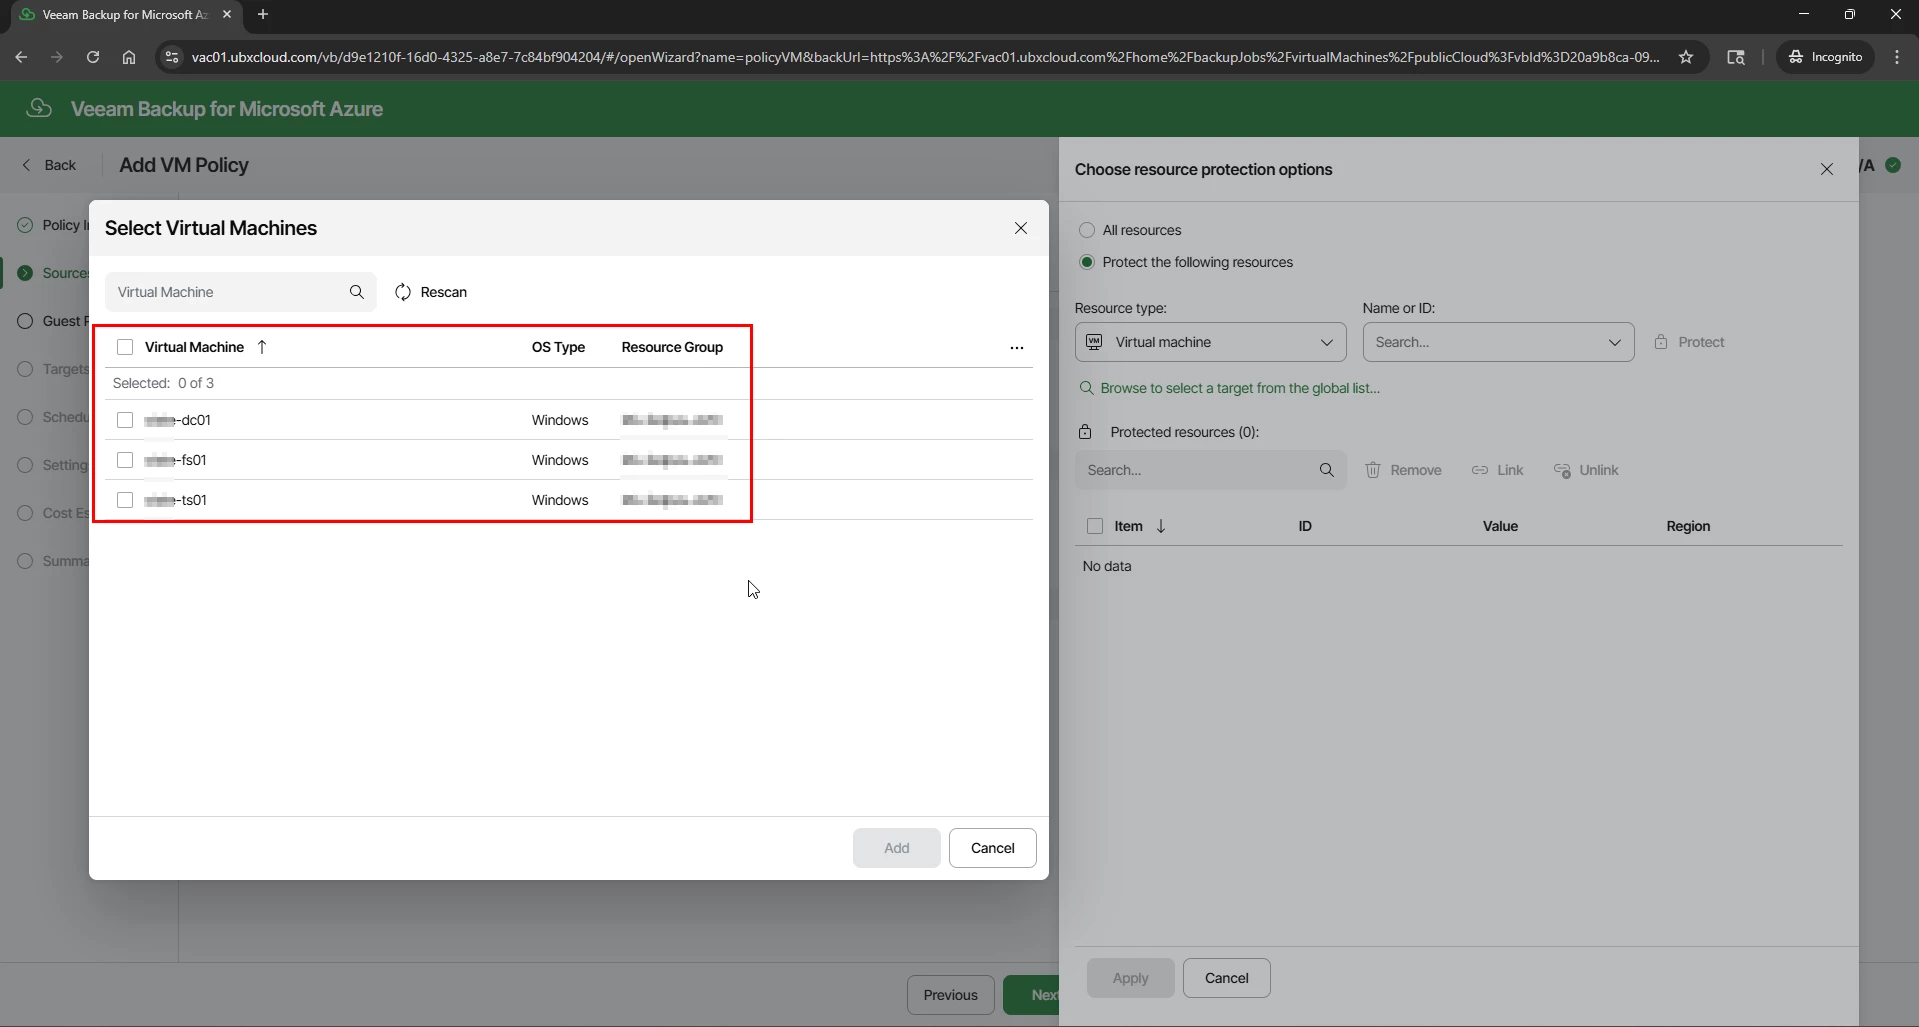
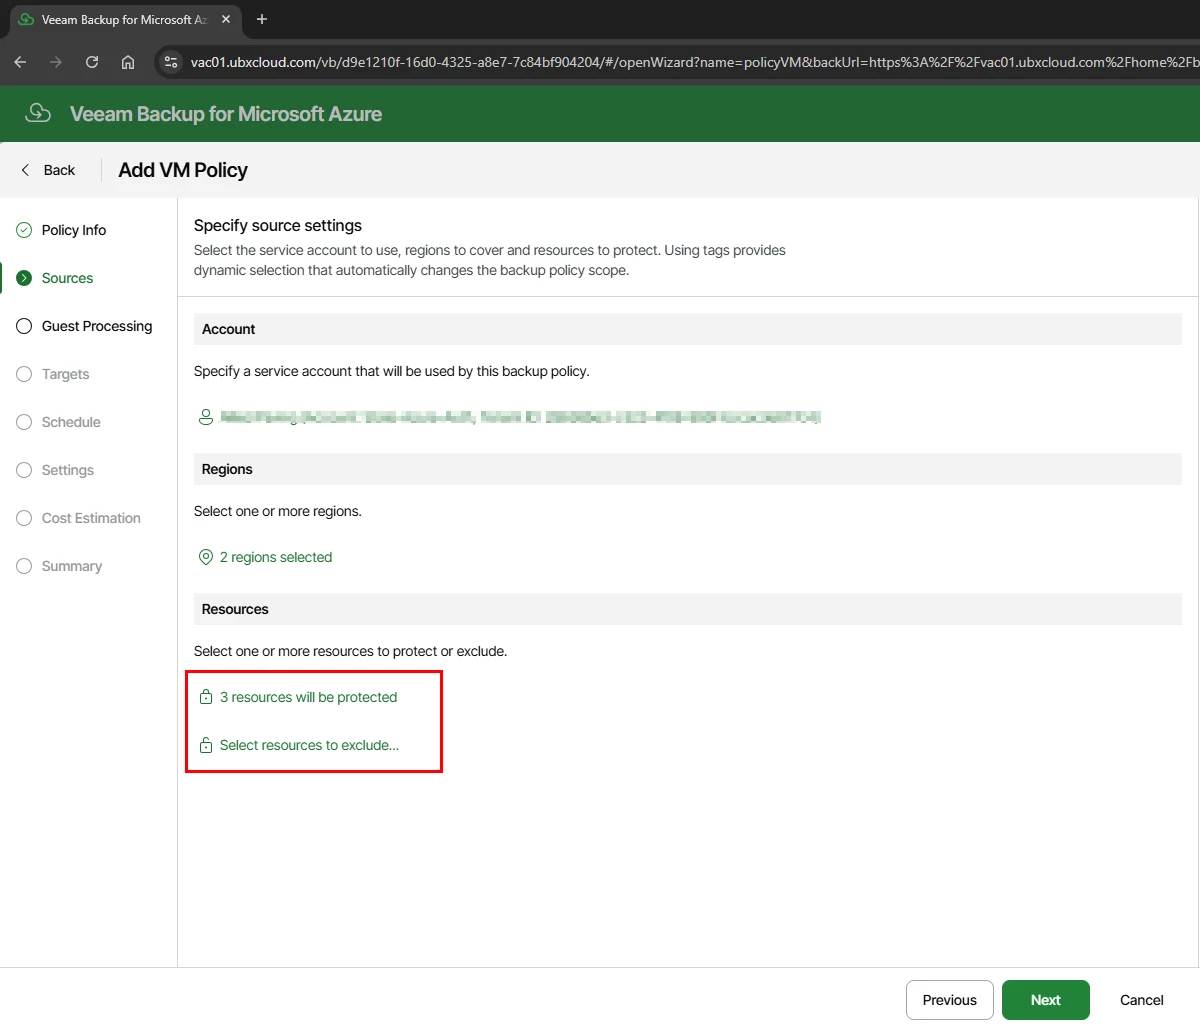
Resources: Click Select resources to protect to open the VM picker. You can select individual VMs by name, or use resource tags for dynamic scoping. Tagged resources are automatically included in the policy whenever new VMs with matching tags are created in Azure — this removes the need to manually update the policy every time a new VM is deployed.
After selecting your resources, the Sources page confirms how many VMs will be protected and provides an option to define exclusions.
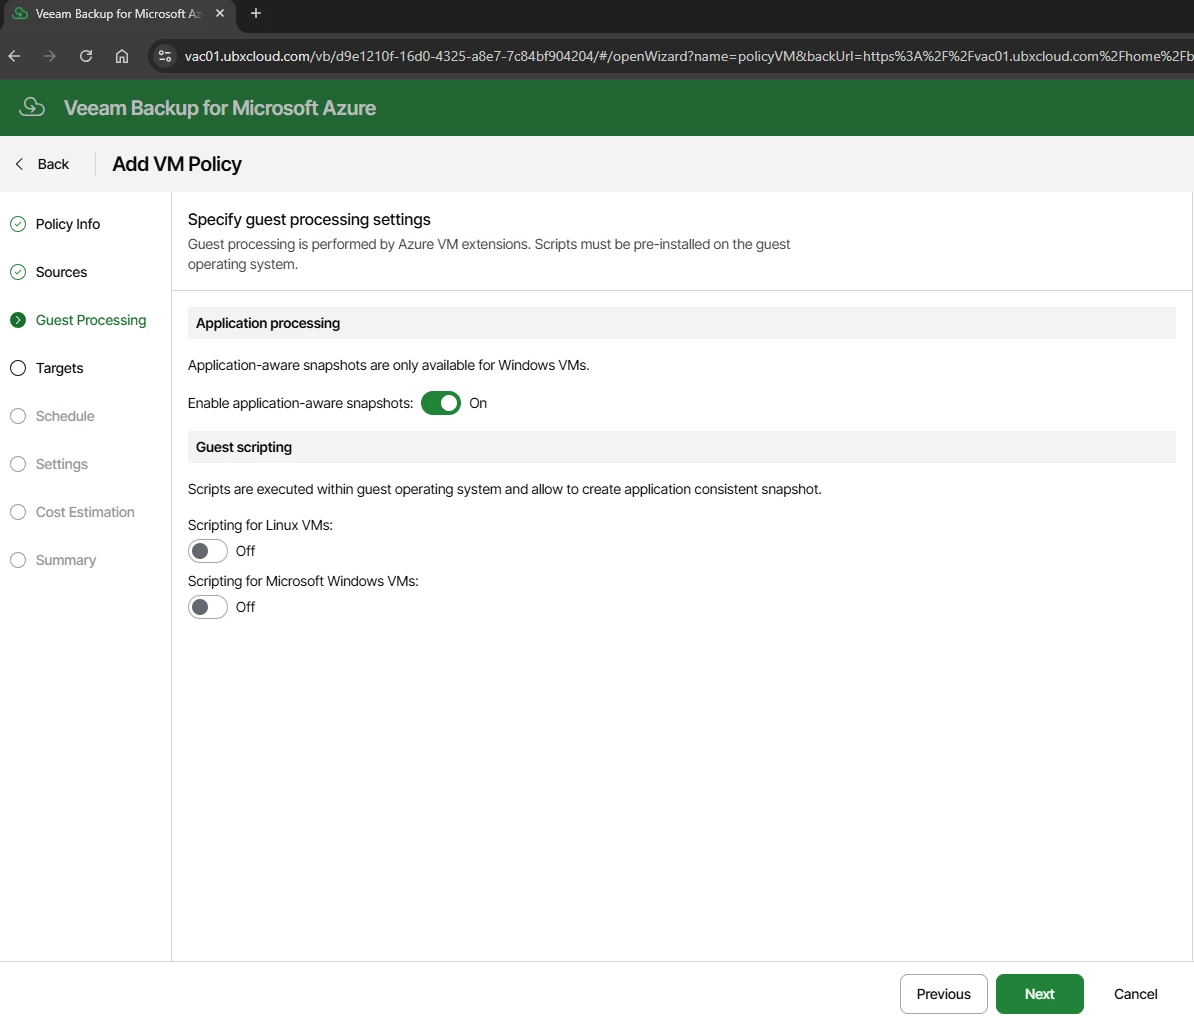
The Guest Processing step controls the internal consistency of each backup:

Application-aware snapshots — When enabled, Veeam uses Microsoft VSS (Volume Shadow Copy Service) on Windows VMs to quiesce applications before the snapshot is taken. This produces application-consistent backups that are safe for workloads such as Active Directory, SQL Server, and Exchange. Enable this for all production Windows VMs.

Guest scripting — Allows custom pre- and post-snapshot scripts to run inside the VM’s operating system. Enable this only if custom application quiescing logic is required and the scripts are already installed on the guest OS.
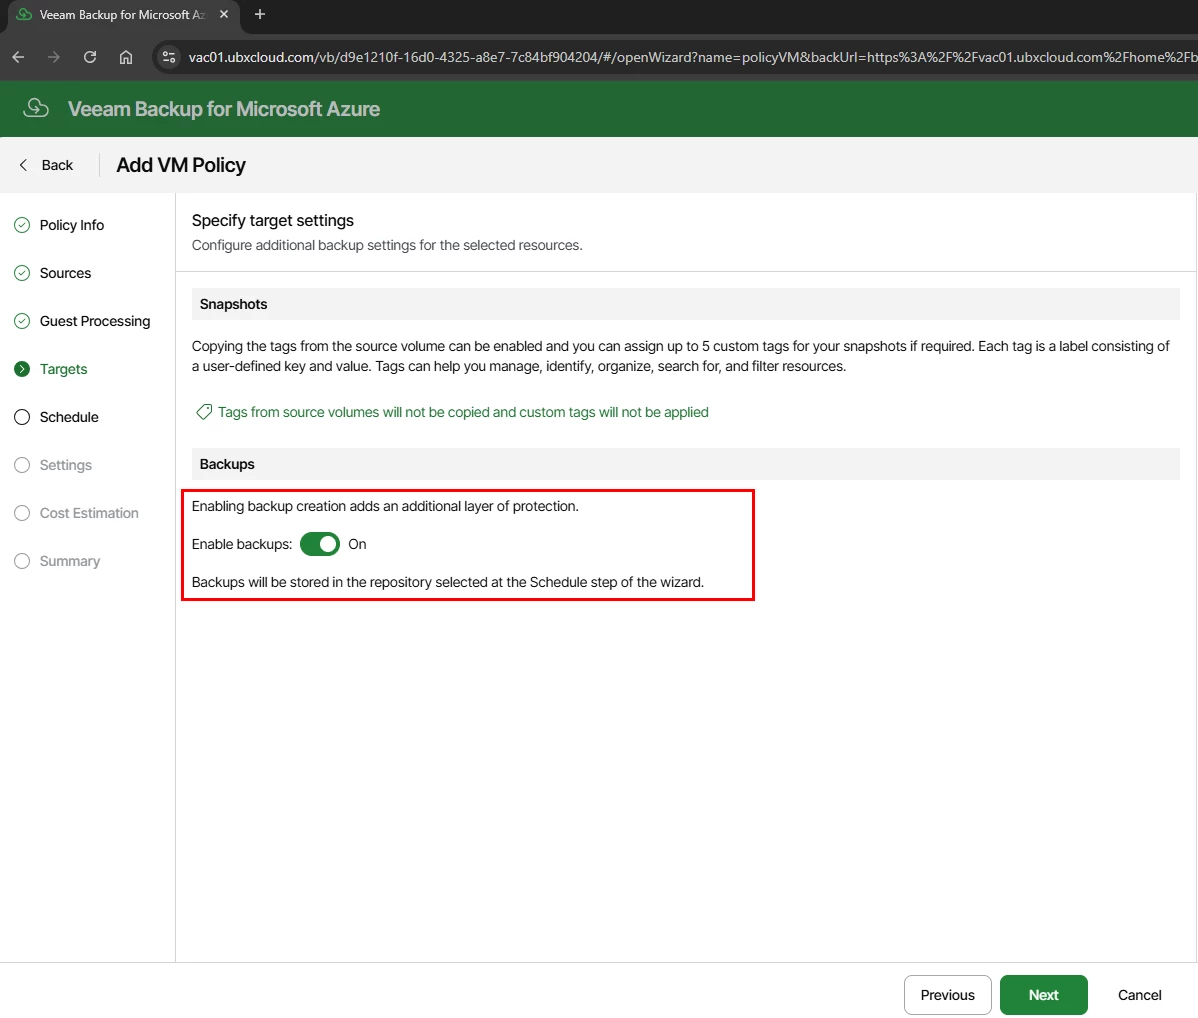
Targets — Enable Backup Storage

The Targets step contains two key sections:

Snapshots: Azure-native snapshots are always created as part of the backup process — Veeam requires a temporary snapshot before it can transfer backup data. You can optionally copy Azure resource tags to snapshot metadata and assign up to five custom tags for organization and filtering.

Backups: Toggle Enable backups: On. When enabled, Veeam copies the snapshot data into a Veeam backup files are stored in Azure Blob Storage. This is what enables long-term tiered retention, cost-optimized storage, and granular file-level restore.

Note: Without enabling backups, the policy creates Azure-native snapshots only. Native snapshots reside on Azure managed disks, cost significantly more per GB than Blob Storage, and do not support file-level restore or long-term tiered retention. Always enable backups for any policy that requires retention beyond a few days.
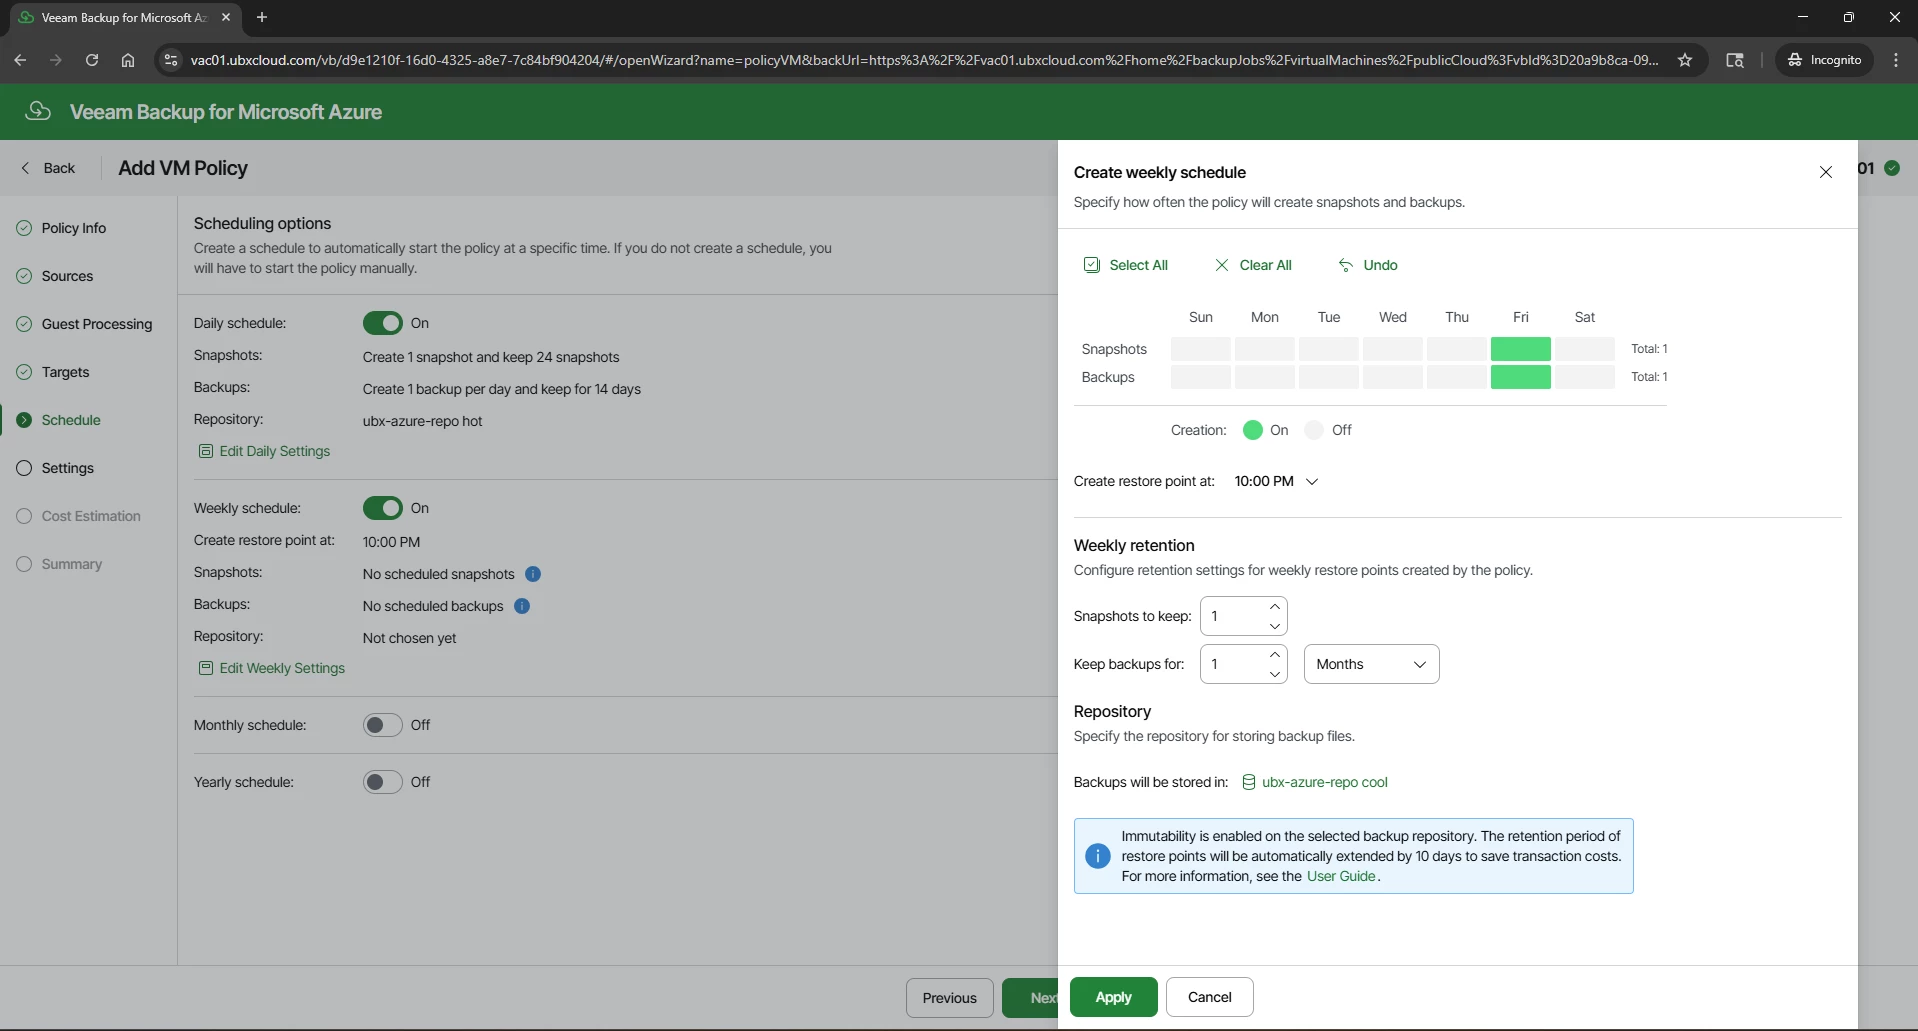
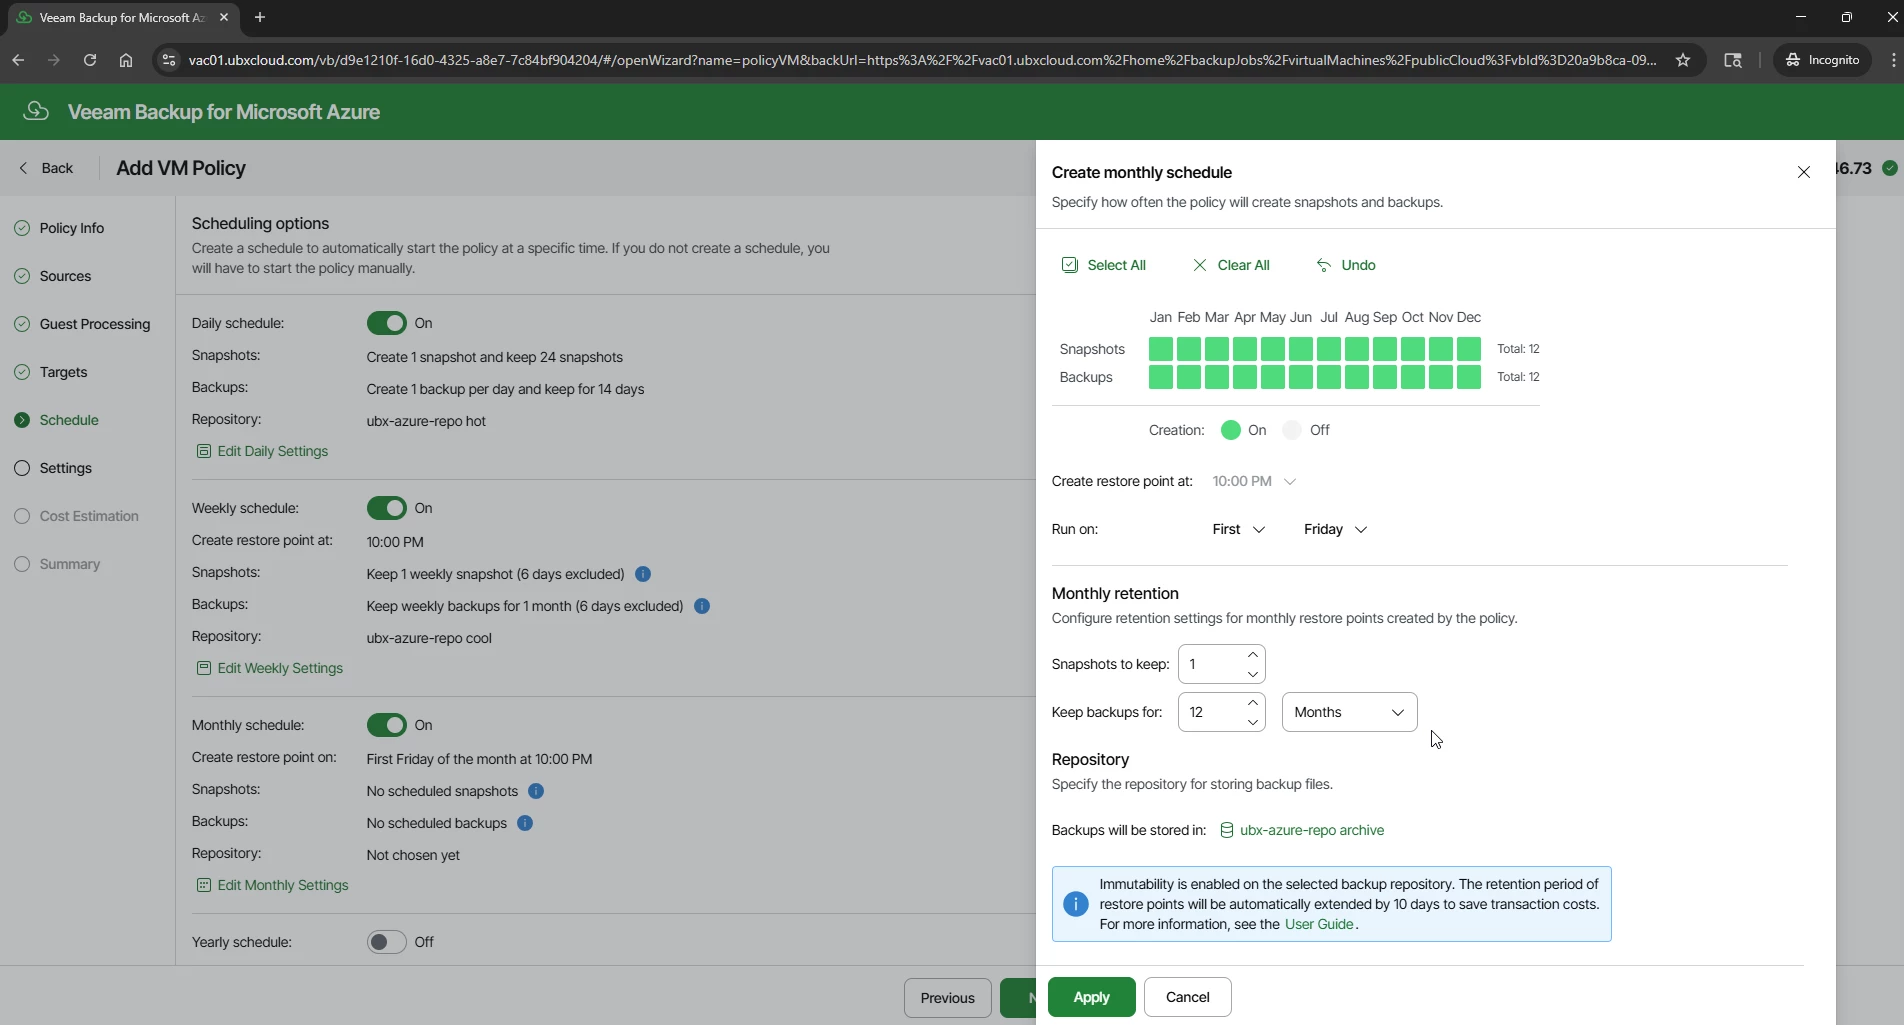
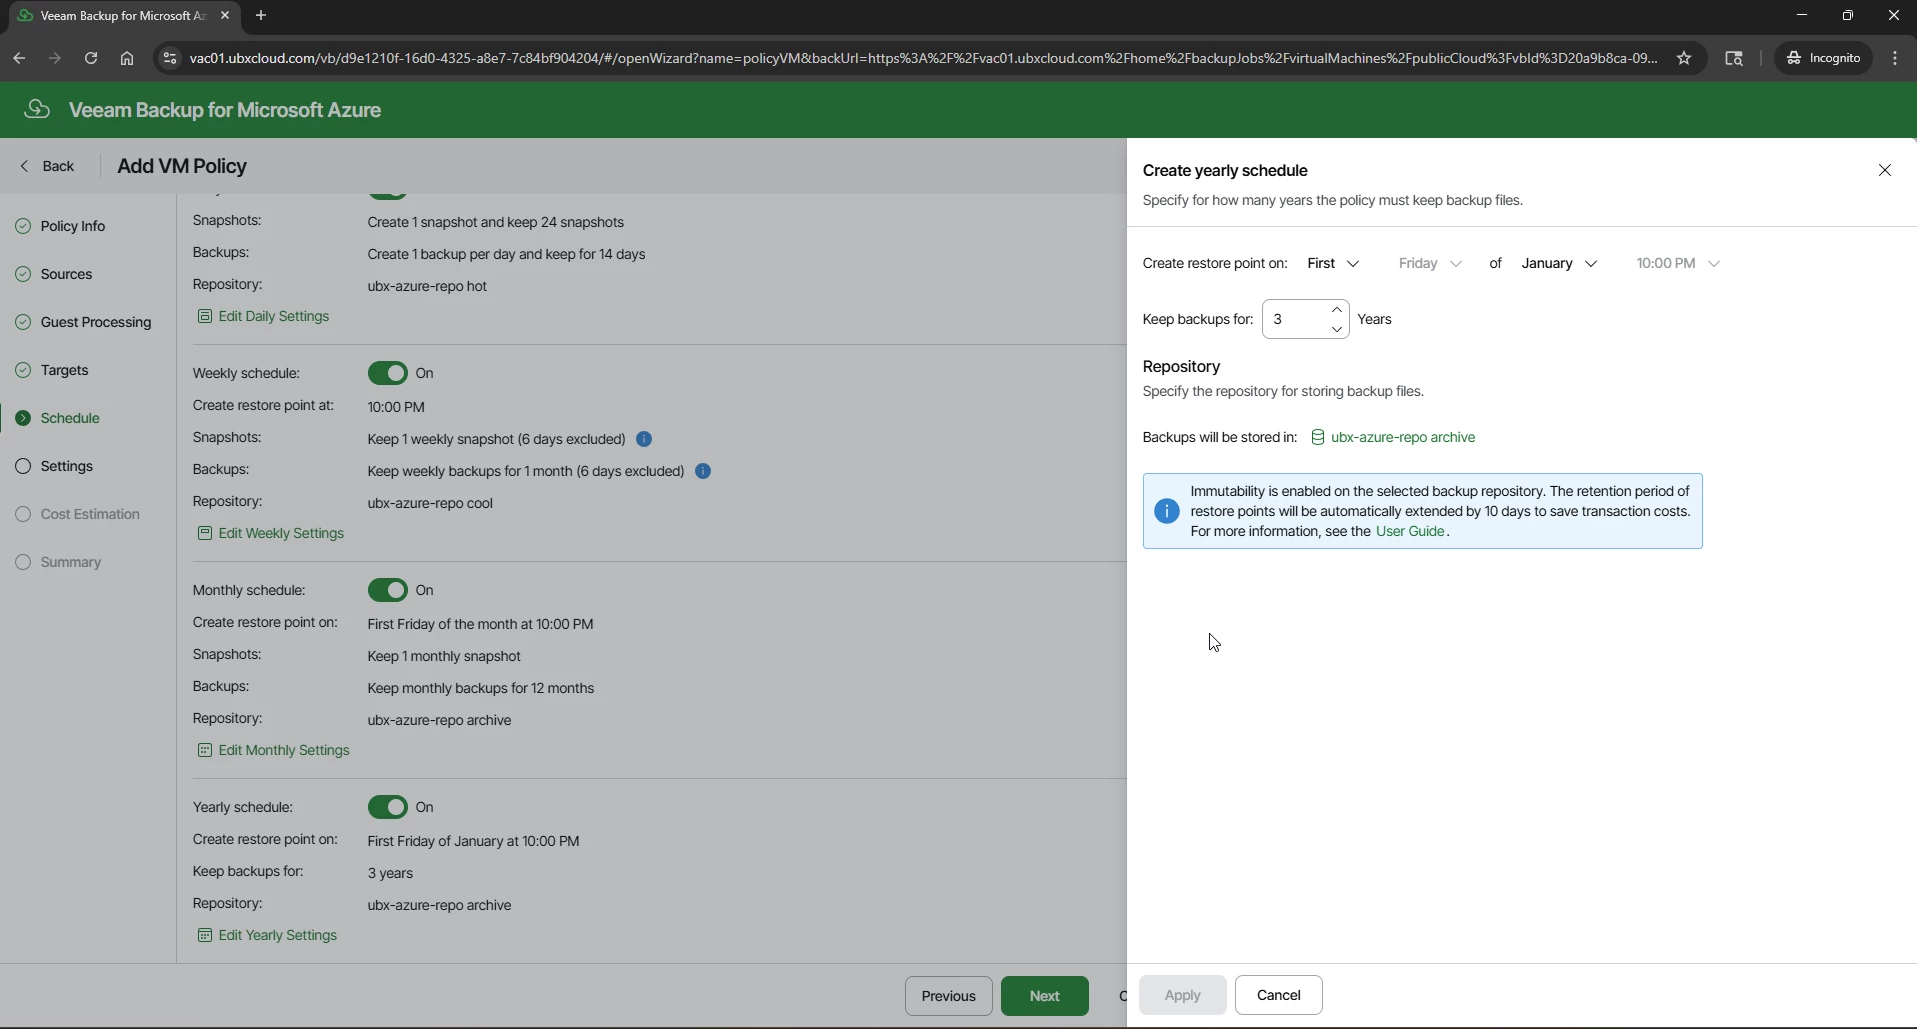
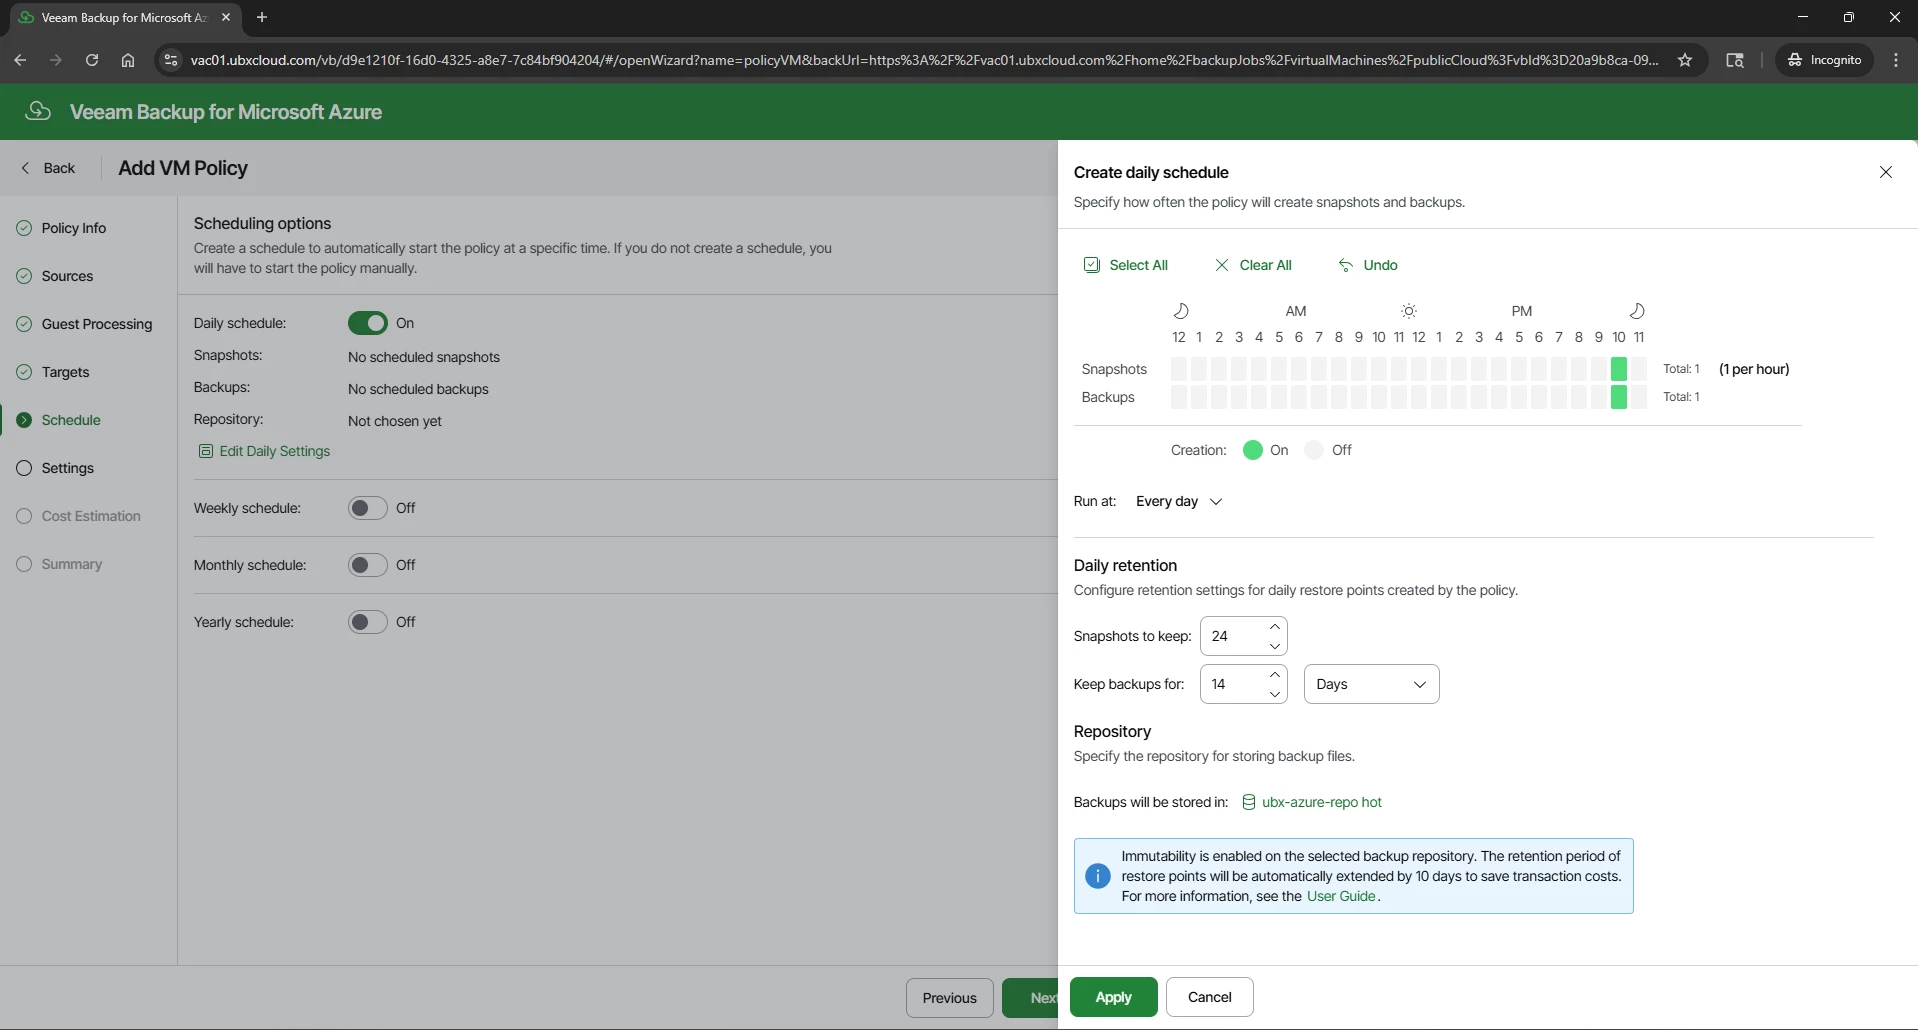
The Schedule step implements a GFS retention model. Four independent schedule levels are available: Daily, Weekly, Monthly, and Yearly. 

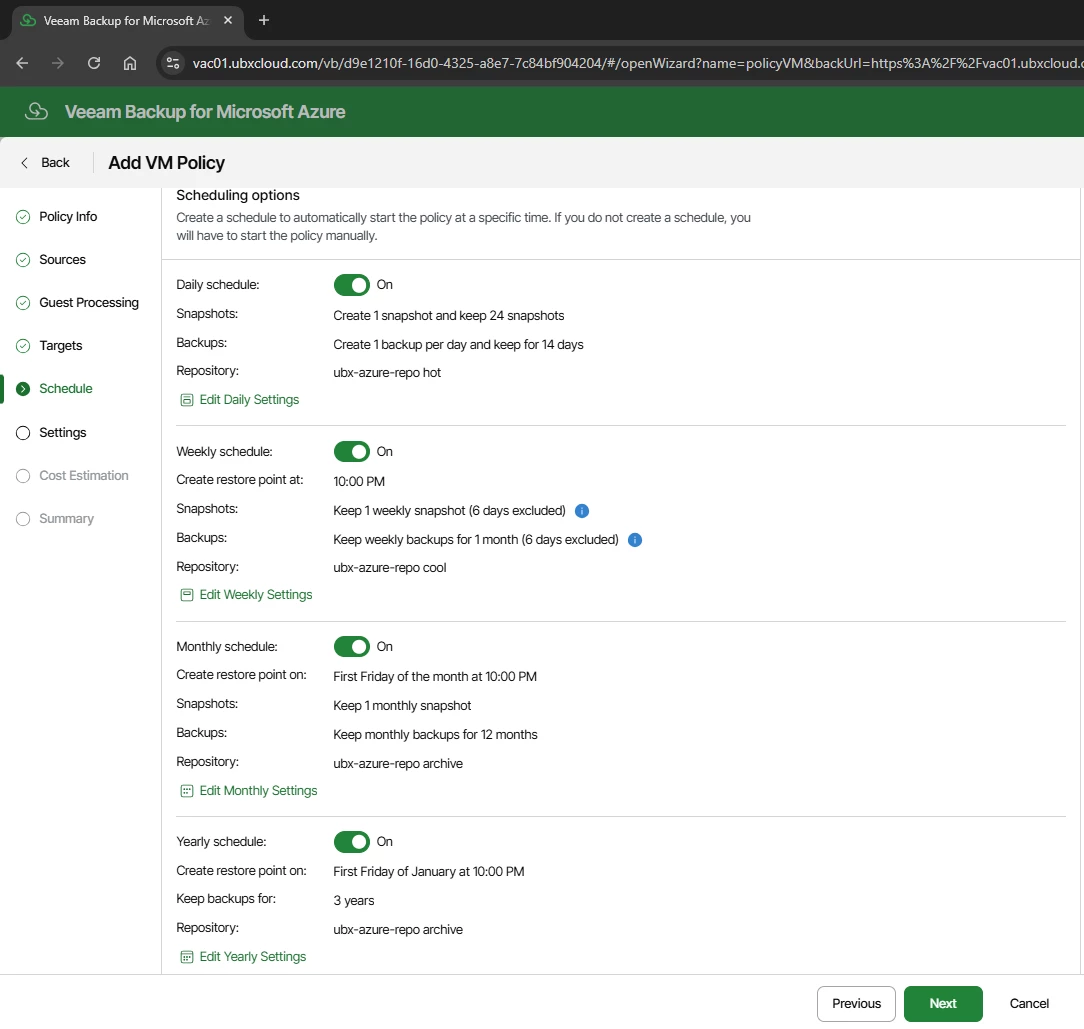
Each level has its own snapshot and backup frequency, retention period, and repository assignment. Assigning each level to the appropriate storage tier is the key to balancing protection coverage with storage cost.

One important thing to understand is that Veeam Backup for Microsoft Azure uses Azure snapshots during the backup process. Veeam cannot take Azure VM backups without creating a temporary snapshot first. When you select the backup and the snapshot will be enabled by default. 
With all four schedules configured, the Schedule page displays a complete summary of the GFS ladder.
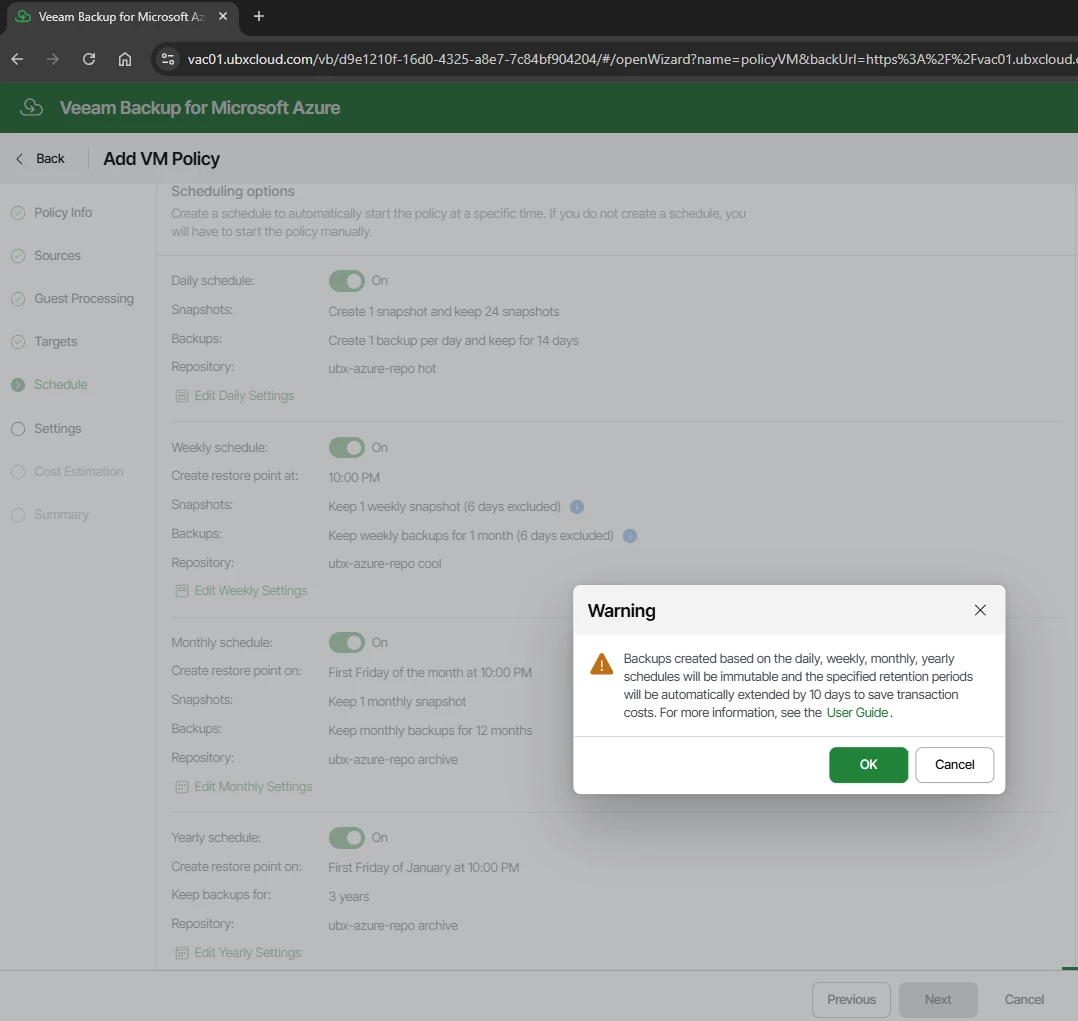
Veeam Block Generation

This extension is a deliberate cost-optimization mechanism. Azure charges a transaction fee
each time an immutability lock timestamp is updated. Rather than updating the lock
individually for every incremental backup block, Veeam groups backup blocks into generations
and applies a single shared expiration timestamp to the entire group and extended 10 days
beyond the configured retention. This significantly reduces Azure Blob Storage API calls,
metadata updates, and transaction costs while ensuring all backup data remains immutable for
the full required period.

Click OK to acknowledge and proceed.
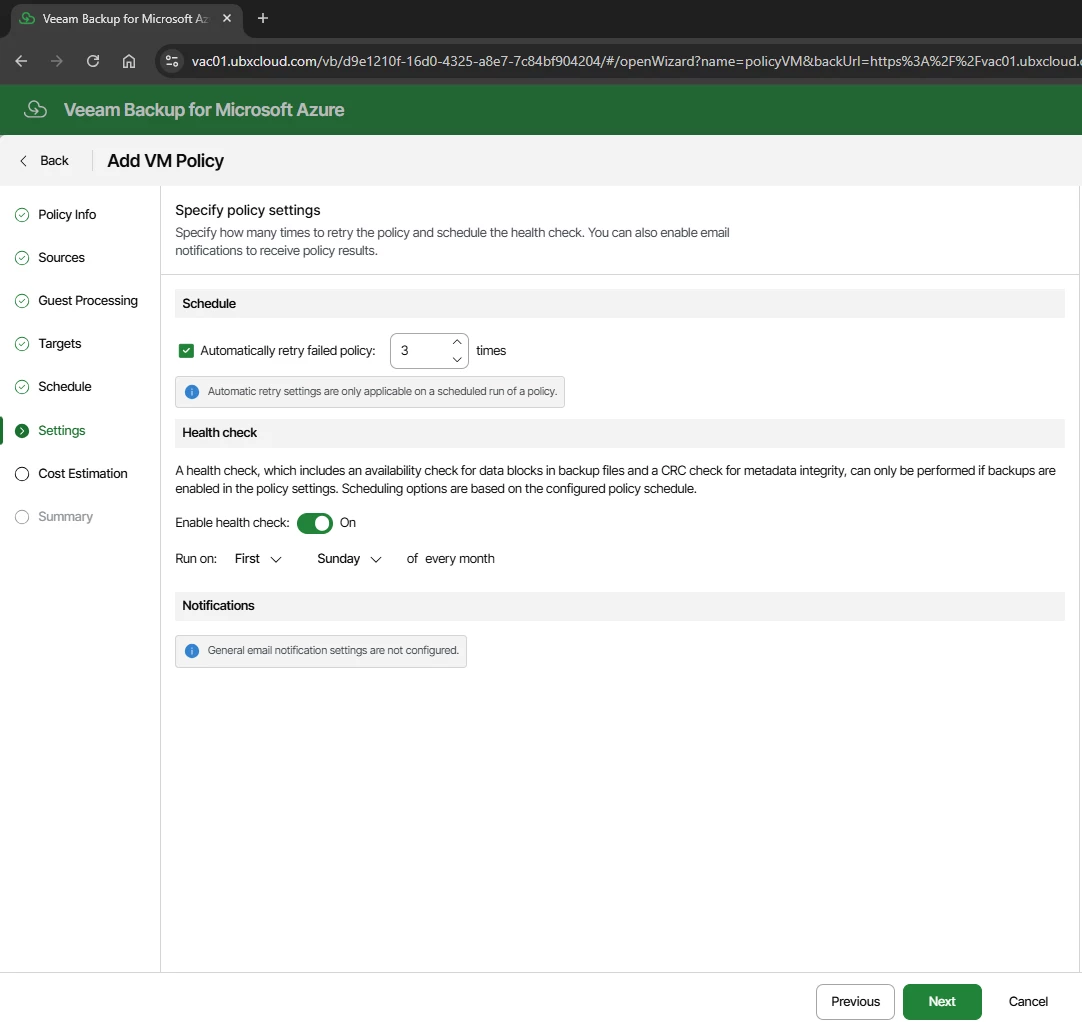
Health check: Enable and schedule for the first Sunday of every month. The health check verifies data block availability and CRC metadata integrity for all backup files. This requires backups to be enabled in the policy. Running health checks regularly ensures your backups are genuinely recoverable before you ever need them in a crisis.

Notifications: Configure email alerts for policy results if SMTP is set up in VSPC. 
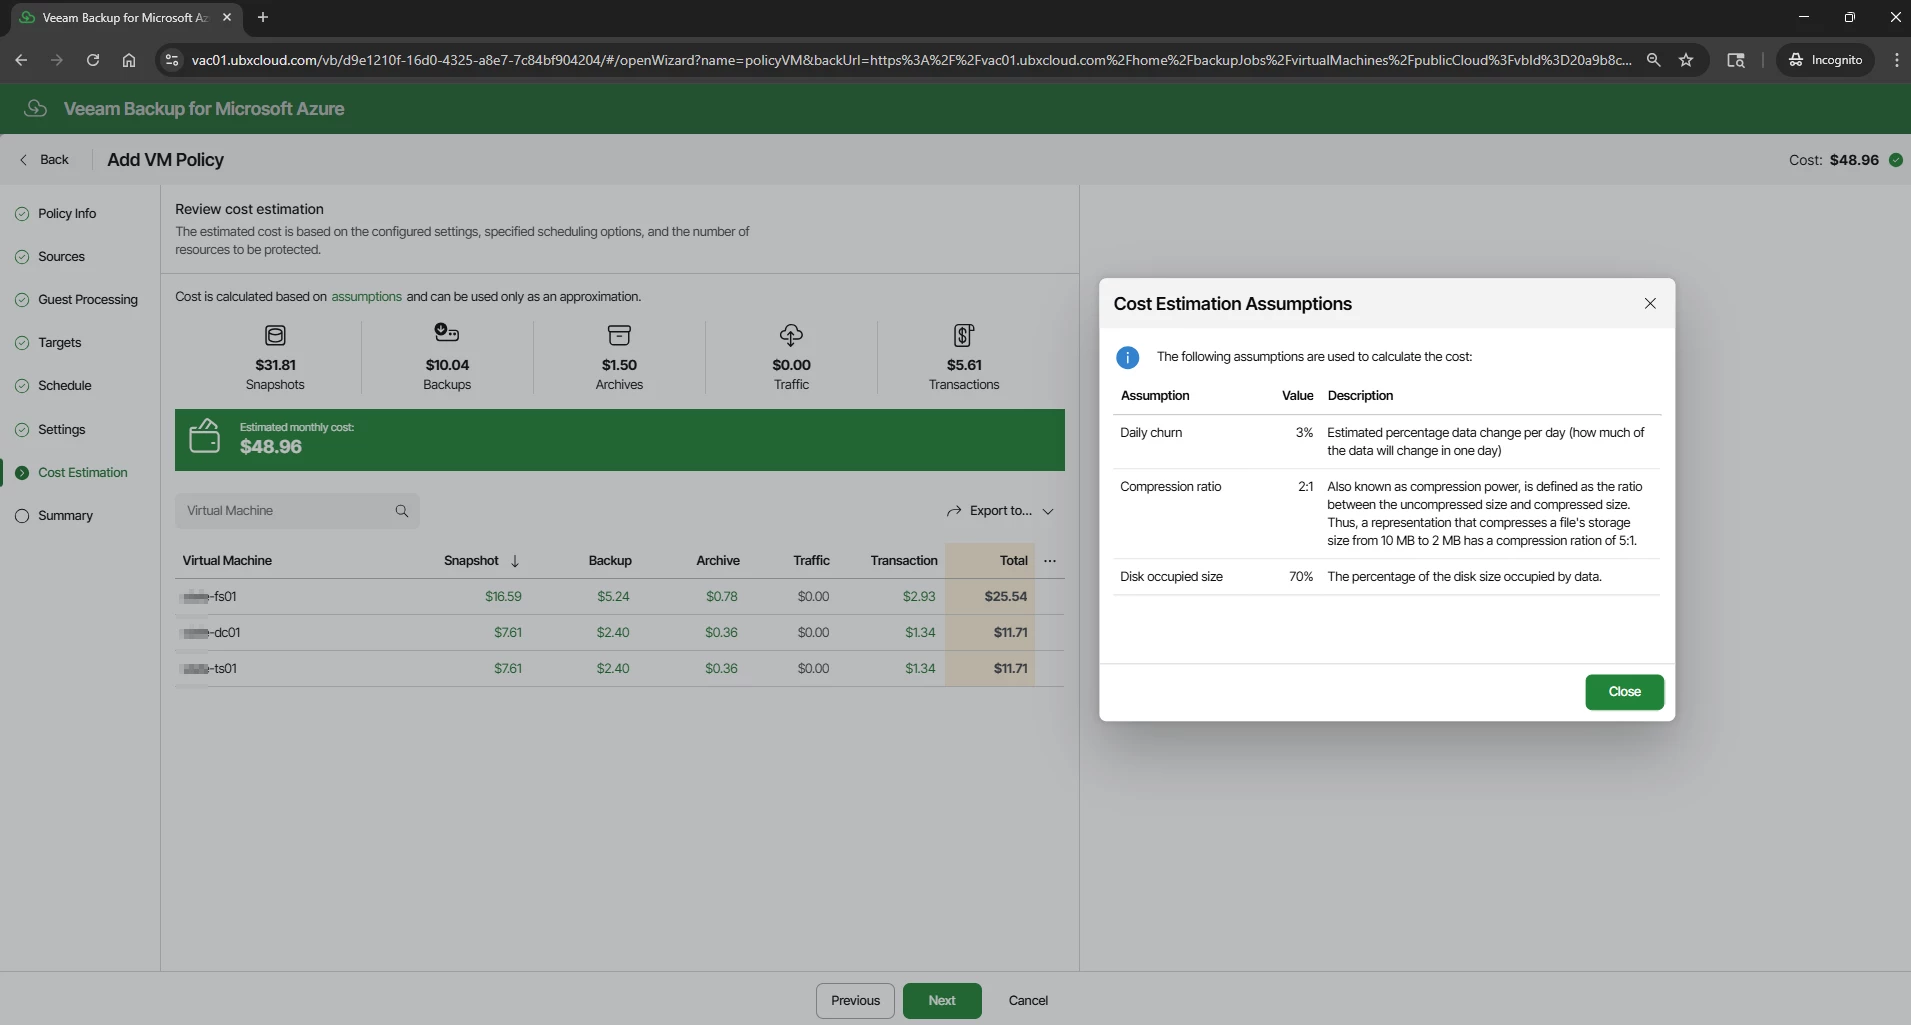
The Cost Estimation step calculates the estimated monthly cost of the policy based on the configured schedule, retention settings, and discovered VM disk sizes. The estimate is broken down across Snapshots, Backups, Archives, Traffic, and Transactions.

In this example, three VMs come to approximately $48.96 per month. Click the Assumptions link to review the model inputs: 3% daily data churn, 2:1 compression ratio, and 70% disk occupancy. Adjust these if the workload profile is significantly different.

This figure is an approximation. Actual Azure charges depend on real VM disk sizes, measured data change rate, current Microsoft pricing, and storage region. Use it as a planning reference, not a billing guarantee.
The Summary step provides a complete review of the policy configuration: general settings, snapshot configuration, snapshot schedule, backup settings, full backup schedule with repository assignments, immutability status, and general settings (retry and health check). Review all sections carefully. Click Previous to make corrections if needed, or click Finish to save the policy. The policy will activate and run at the next scheduled time.
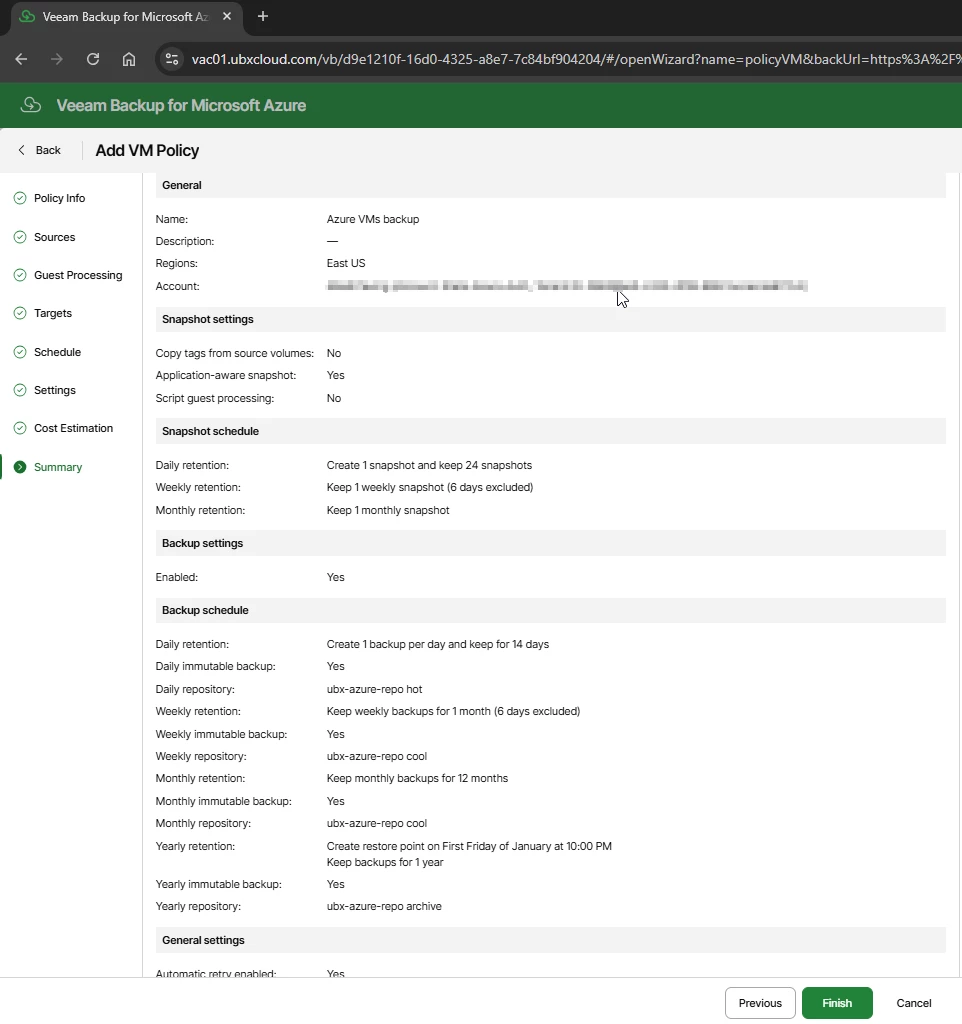
Click Finish to save the policy. The policy will activate and run at the next scheduled time.

Verifying Backup Job Status

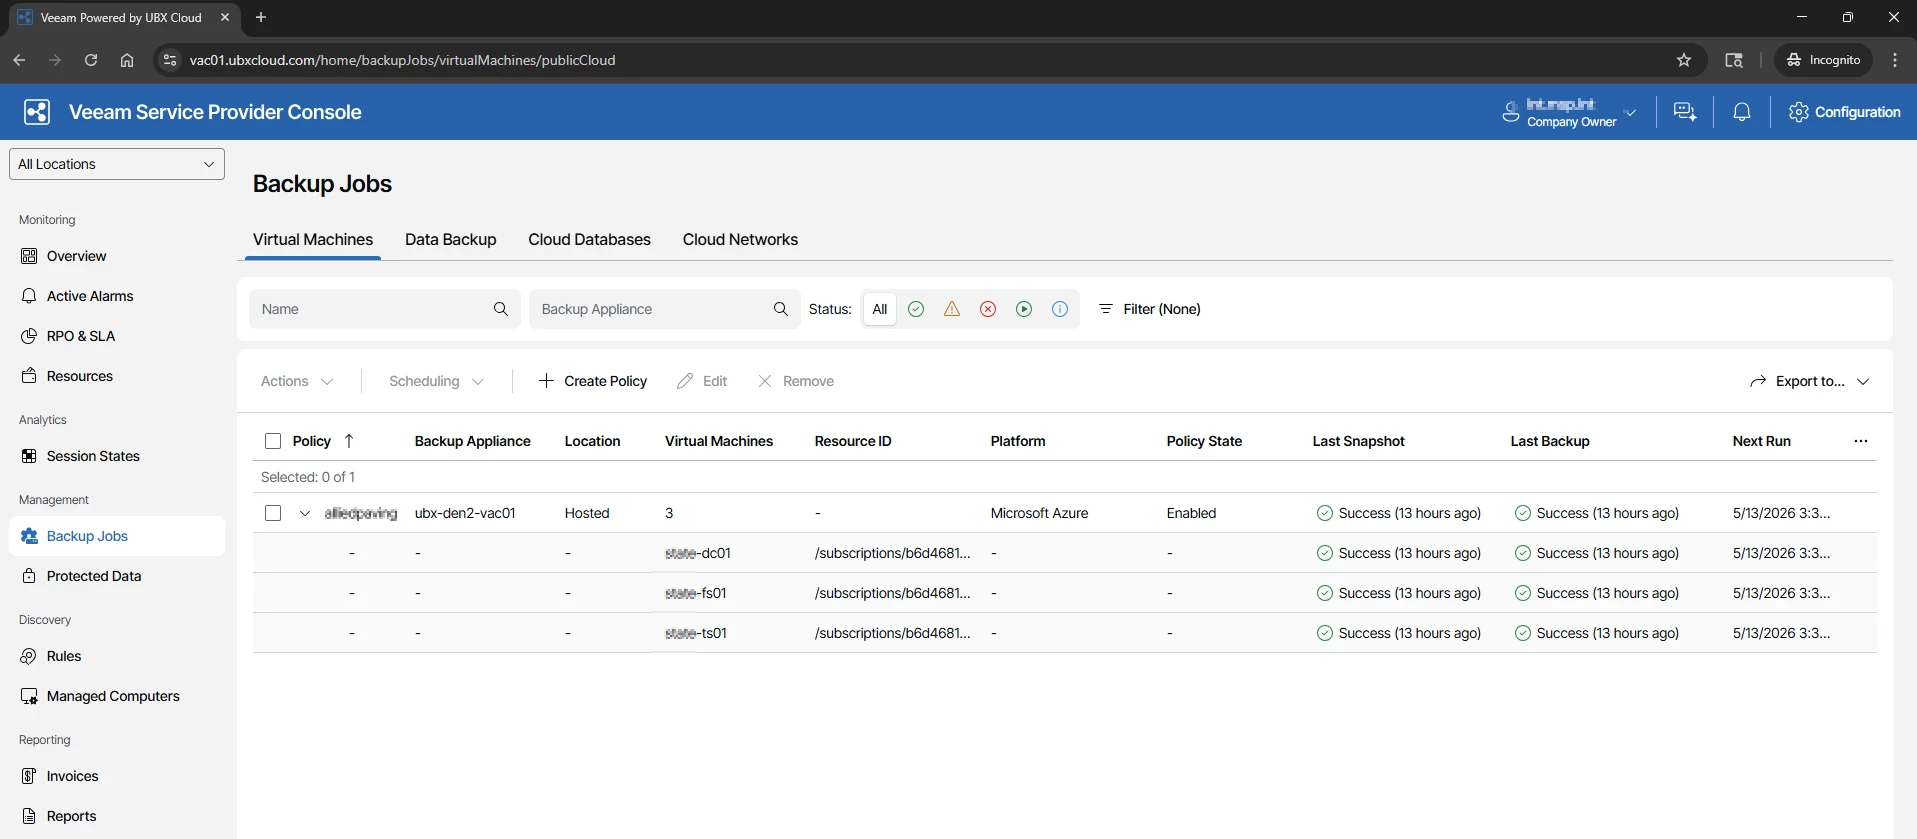
After the policy is saved and the first scheduled run completes, return to Backup Jobs → Virtual Machines in VSPC. The Last Snapshot and Last Backup columns will reflect the result of the most recent run
Reviewing Protected Data and Restore Points in VSPC

Once your backup policy has run successfully, you can review all protected VMs and their available restore points directly from the VSPC portal — without needing to open the VBR console.

Navigate to Protected Data in the left sidebar and select the Virtual Machines tab.
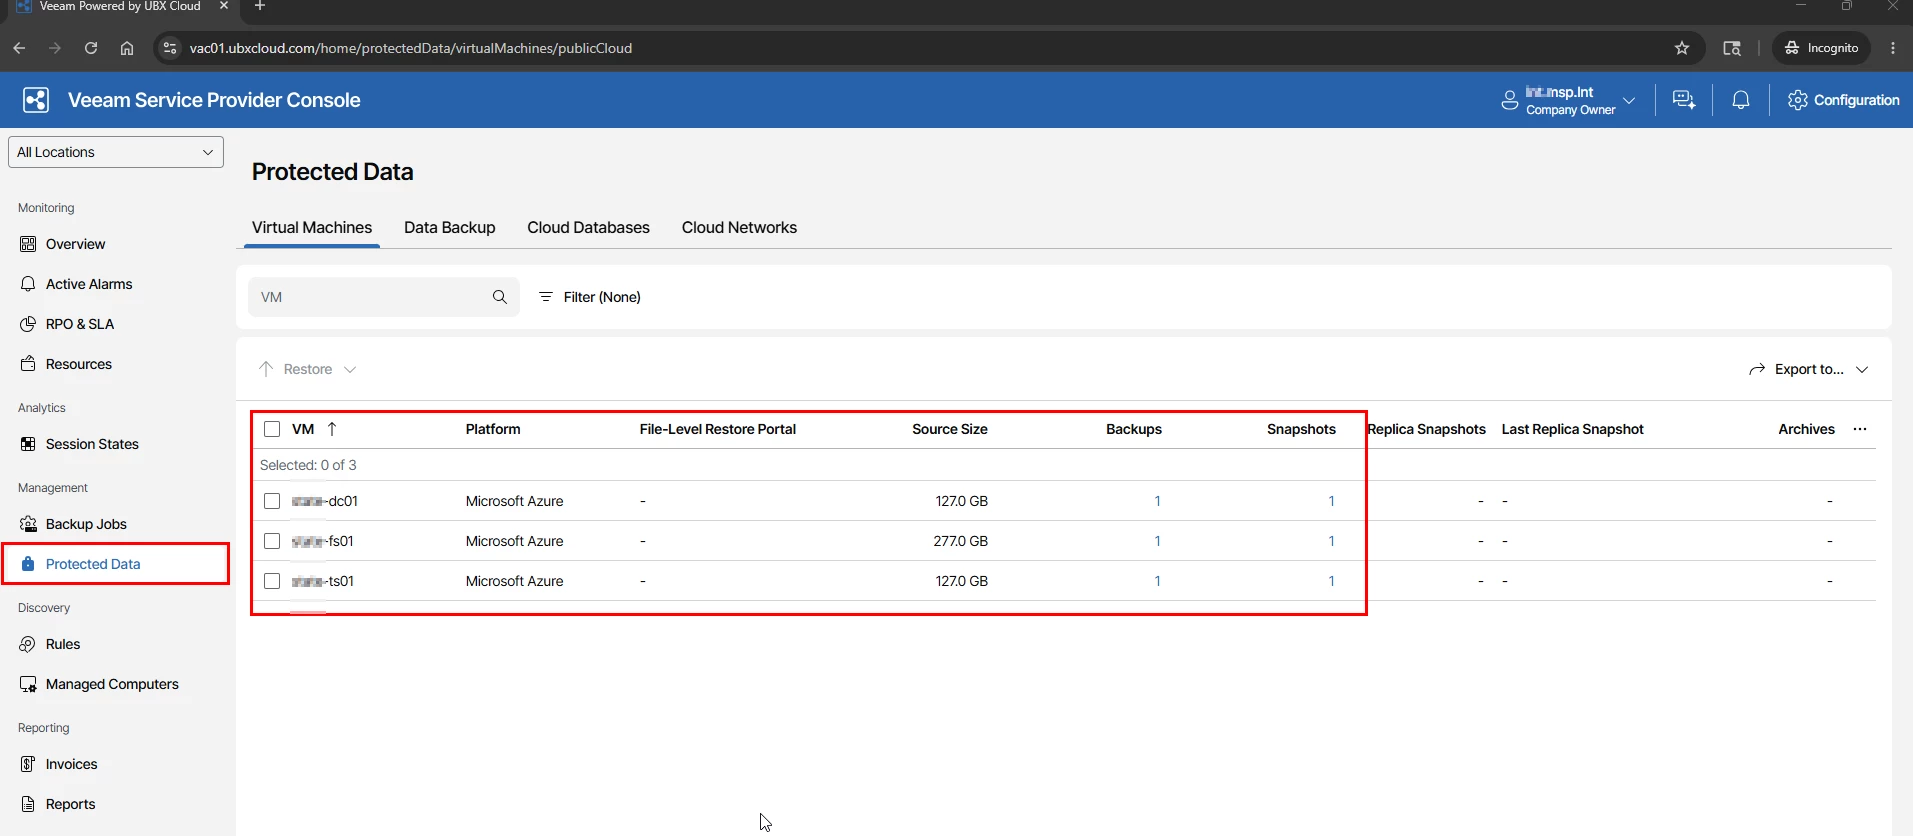
Restore Options Available from Service Provider Console 

Veeam Backup for Microsoft Azure provides multiple recovery options directly from the VSPC console.

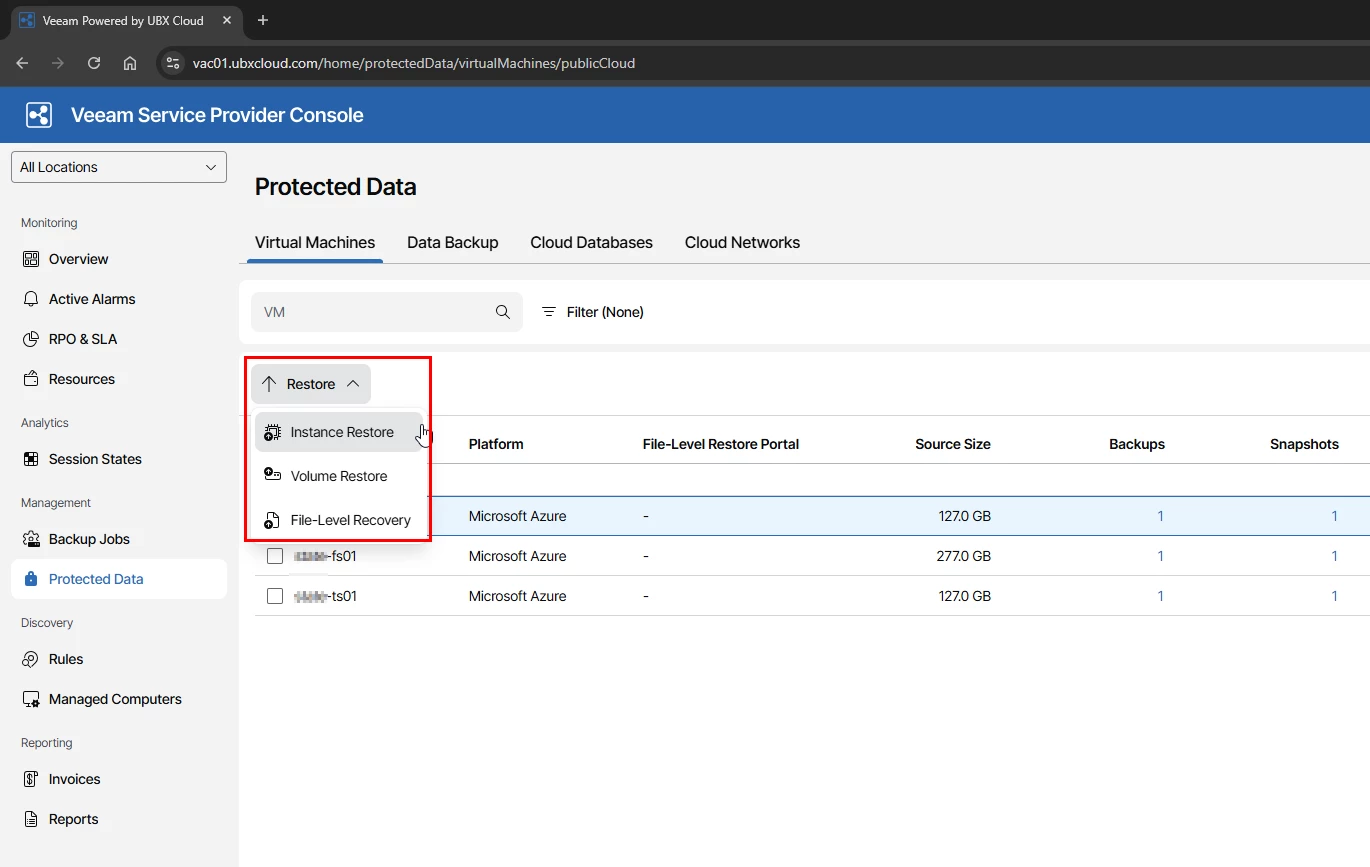
Select the protected VM and click Restore.

The following recovery options are available:

Instance Restore- Used to restore the complete virtual machine to Azure.

Volume Restore – Used to restore specific disks or volumes from the VM.

File Level Recovery – Used to recover individual files and folders without restoring the full VM.

These recovery options give administrators flexibility to perform both full VM recovery and quick file level restores depending on the situation.
I will cover these restore options in more detail in the next part of this blog series, including practical recovery scenarios and step by step restore operations using Veeam Service Provider Console.

Thanks!  ​
Streamlining License Management with Veeam Service Provider Console (VSPC) and Pulse Integration

If you’re a Veeam Cloud Service Provider (VCSP), you know the challenges of handling licenses for tenants. The old way of emailing .lic files, waiting for tenants to install them, and then verifying everything worked correctly is time consuming and prone to errors. It may work for a few customers, but as you scale, it quickly becomes unmanageable.

This is where the Veeam Service Provider Console (VSPC) changes the game. By integrating VSPC with the Veeam ProPartner Pulse portal, you can manage license distribution, usage reporting, and billing in a centralized, automated way. No more manual file exchanges and licenses are pushed directly into tenant environments with minimal effort. Think of Pulse as the master licensing database and VSPC as the control plane that brings those licenses to life in your tenants’ environments.

In this post, I’ll walk through how this works and why it’s a game-changer for service providers

  • How to connect Veeam VSPC Console to Pro Partner Pulse portal
  • how to manage your license keys (creating, assigning, revoking)
  • Company mapping (auto-map, manual, merge)
  • Install the Veeam license to tenant VBR using VSPC console. 

Prerequisites

Before this integration can work smoothly, a few conditions must be met on the tenant side:

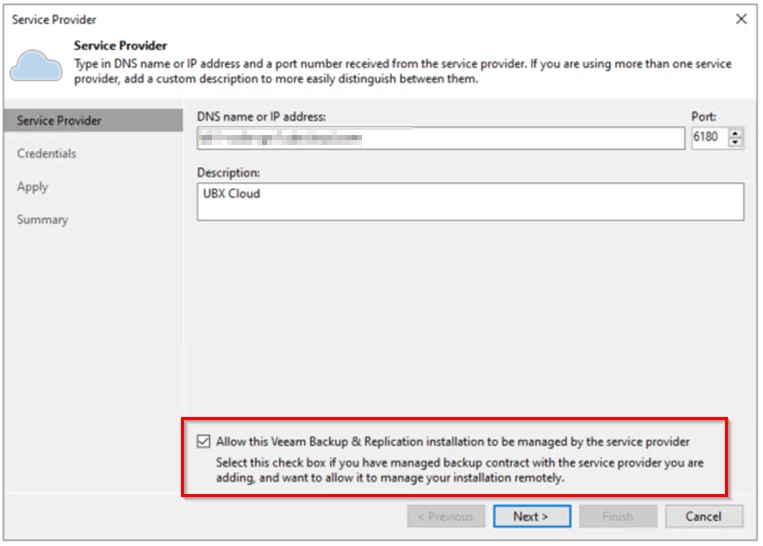
  • On the Tenant VBR side add the Cloud connect account in Veeam Service Provider
  • Enable Allow this VBR to be managed by the Service provider.
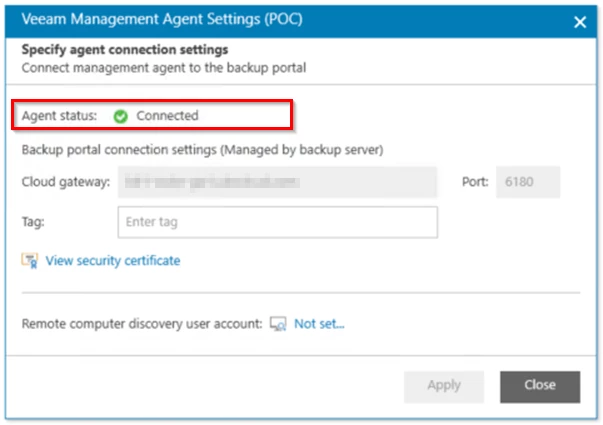
  • Once the Configuration Completed, Confirm the Veeam Management Agent is connect with Service provider gateway
  • Any SSL/TLS inspection on network security devices must be disabled for Veeam gateways to allow uninterrupted communication

These steps ensure that VSPC can fully manage the tenant’s environment and push licenses without hiccups.

Step 1: Connecting VSPC to Pulse

Pulse is part of Veeam pro partner portal where you manage licensing and submit monthly usage to your aggregator. Pulse is the central place for managing your contracts, generating licenses, and reporting usage. By default, you might log in manually, download a license, and send it off. But with VSPC integration, this entire process becomes seamless

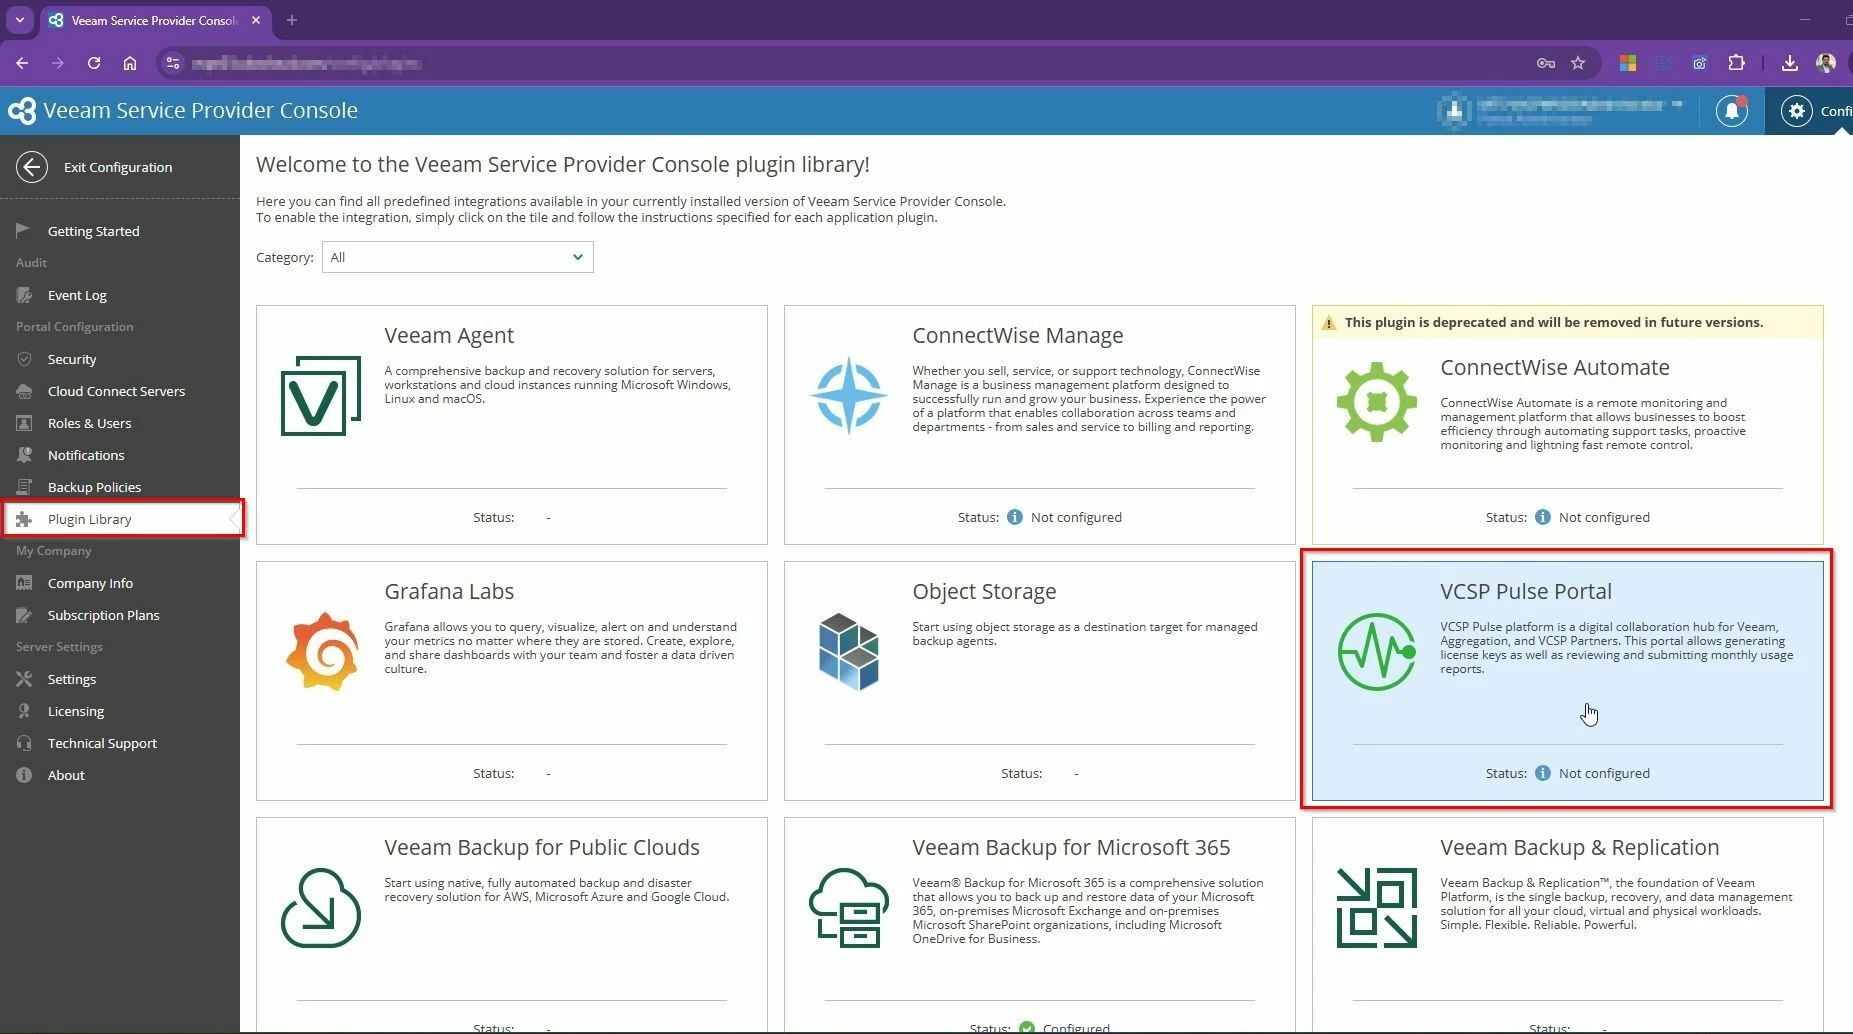
  • In VSPC, open Configuration → Plugin Library → VSPC Pulse Portal.
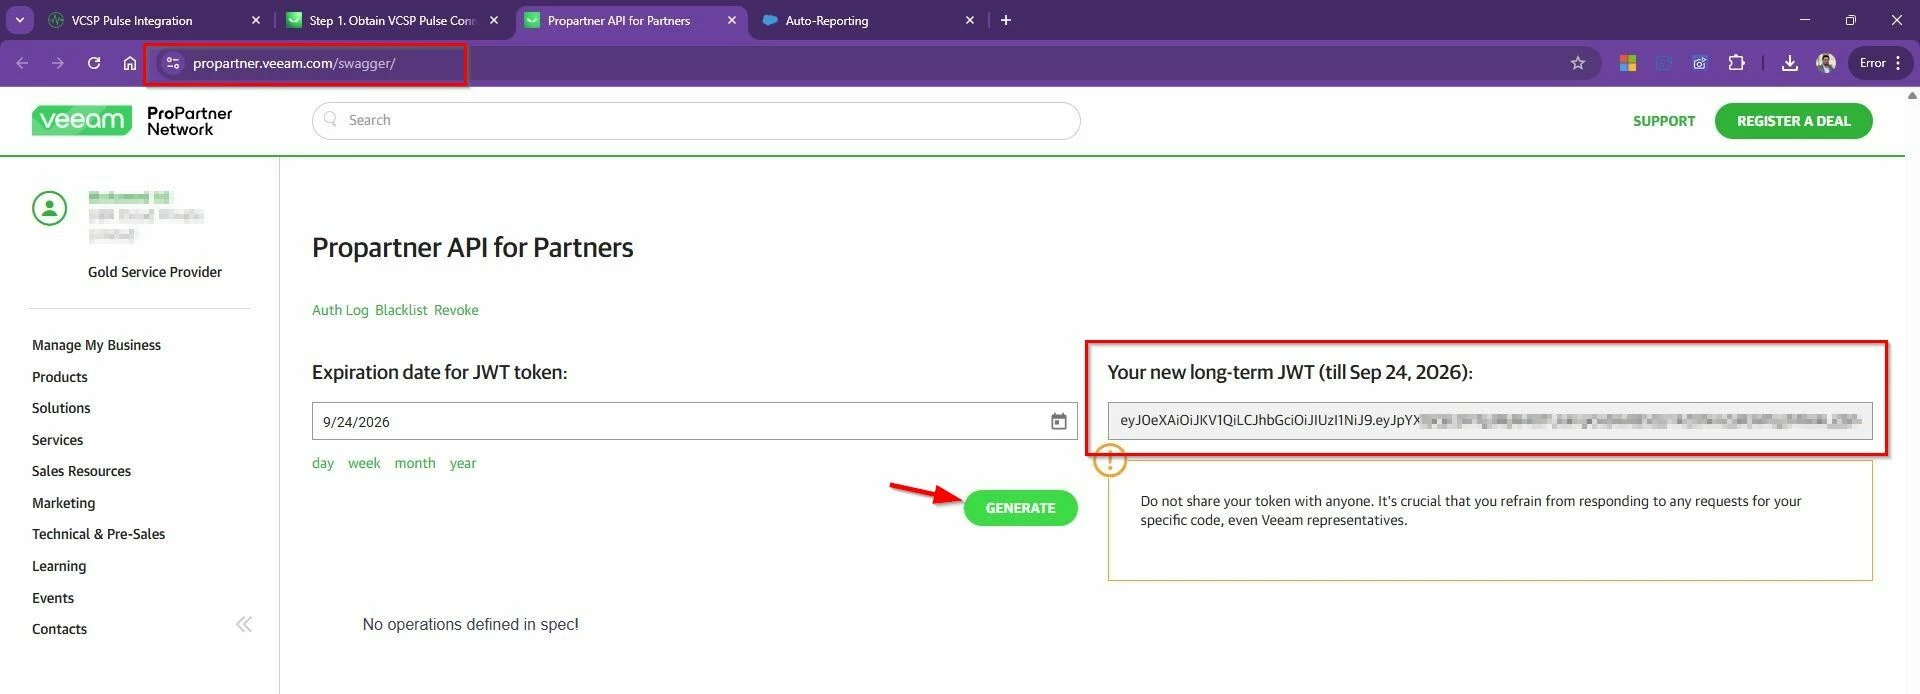
  • Generate a token in Pulse (using your Pro Partner credentials).
  • Log in to Veeam ProPartner portal. –> Open the Propartner API (https://propartner.veeam.com/swagger/) for Partners.
  • Generate API token.
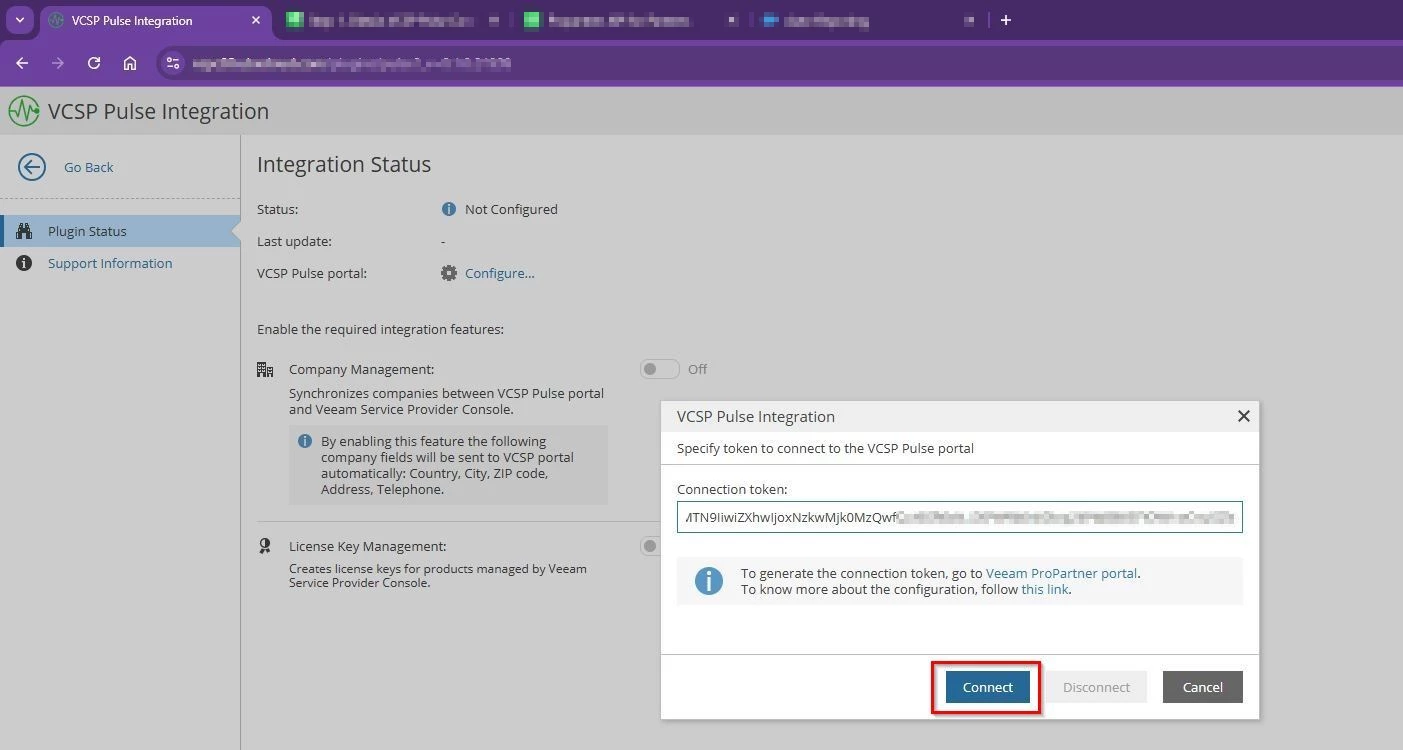
  • Copy the API token into VSPC and connect.

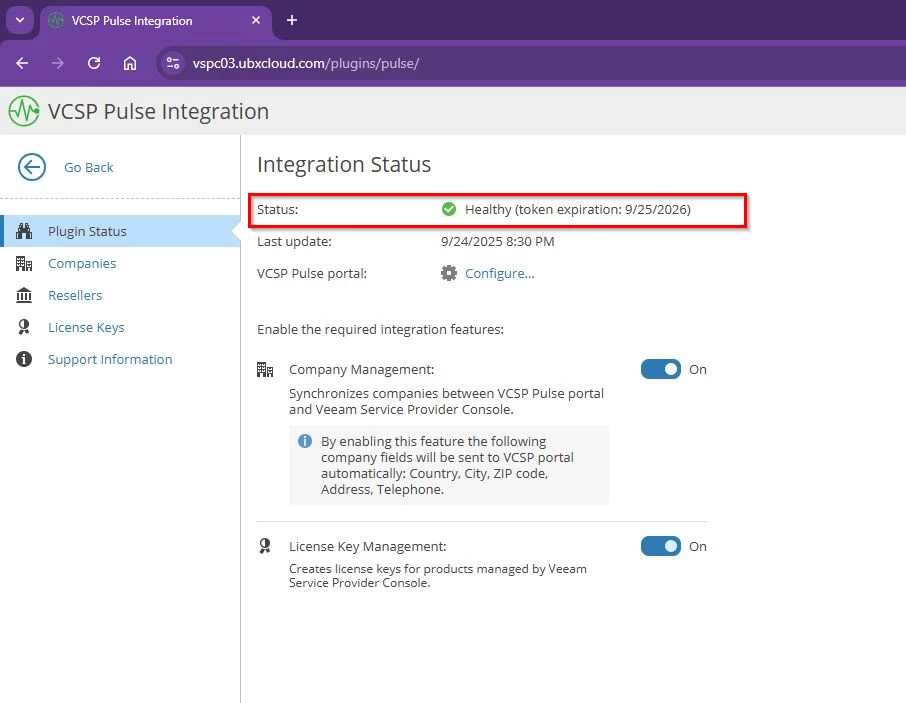
Once connected, you’ll see a green checkmark for health status. From there, you can enable pulse integration features:

  • Company Management – Map and Synchronizes companies between VCSP Pulse portal and Veeam Service Provider Console.
  • License Key Management – lets you create, assign, and push licenses from the console to the tenants.

Step 2: Company Management

Service Provider Console company is a company in the Veeam Service Provider Console (VSPC) that you manage and offer backup services to. They have a profile associated with whatever Veeam products that they may have, while the Pulse company is a way to create a license and assign it to that company. So really Pulse is just a place for you to be able to create an entry and create a key and assign it to the company in VSPC portal.

You must configure mapping in Veeam Service Provider Console and Mapping triggers synchronization of companies contact information, and enables further integration and provision the license in pulse portal. This mapping makes it painless to assign the right license to the right customer.

  • Auto-map – If customer names match or are similar in Pulse and VSPC portal, it will automatically links them in Pulse.
  • Manually map – This method when you have company already created or exist in Veeam Service Provider Console but the name in VCSP Pulse do not match then you can use this option to map the company with company already created in pulse portal
  • Merge companies – If a customer has multiple entries (head office + branches), you can consolidate them into one.
  • Create Company – If the company doesn’t exist in one system, you can create it directly

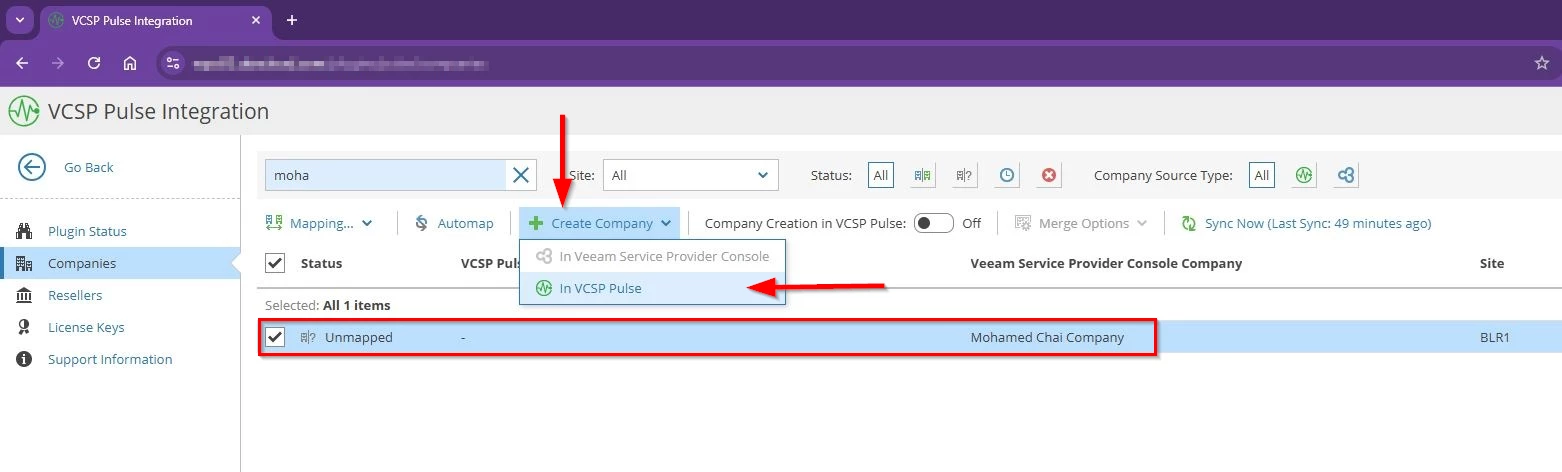
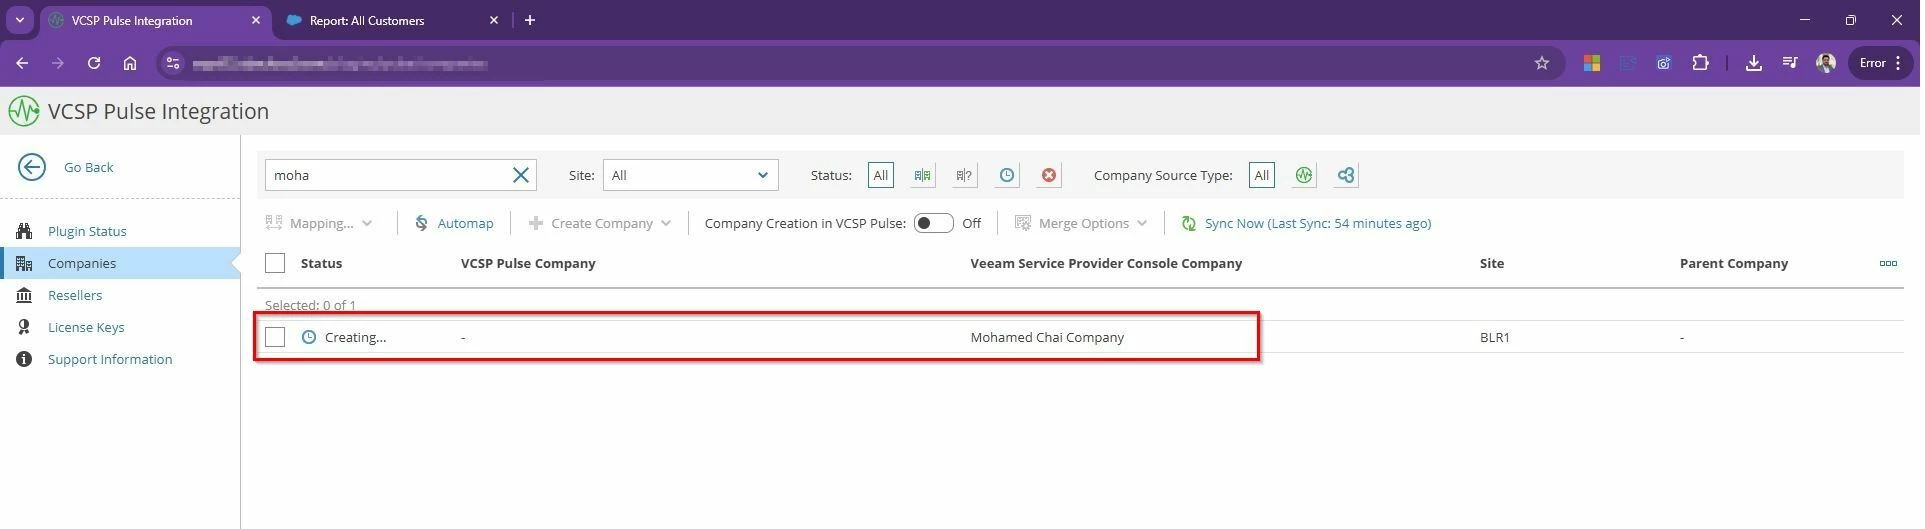
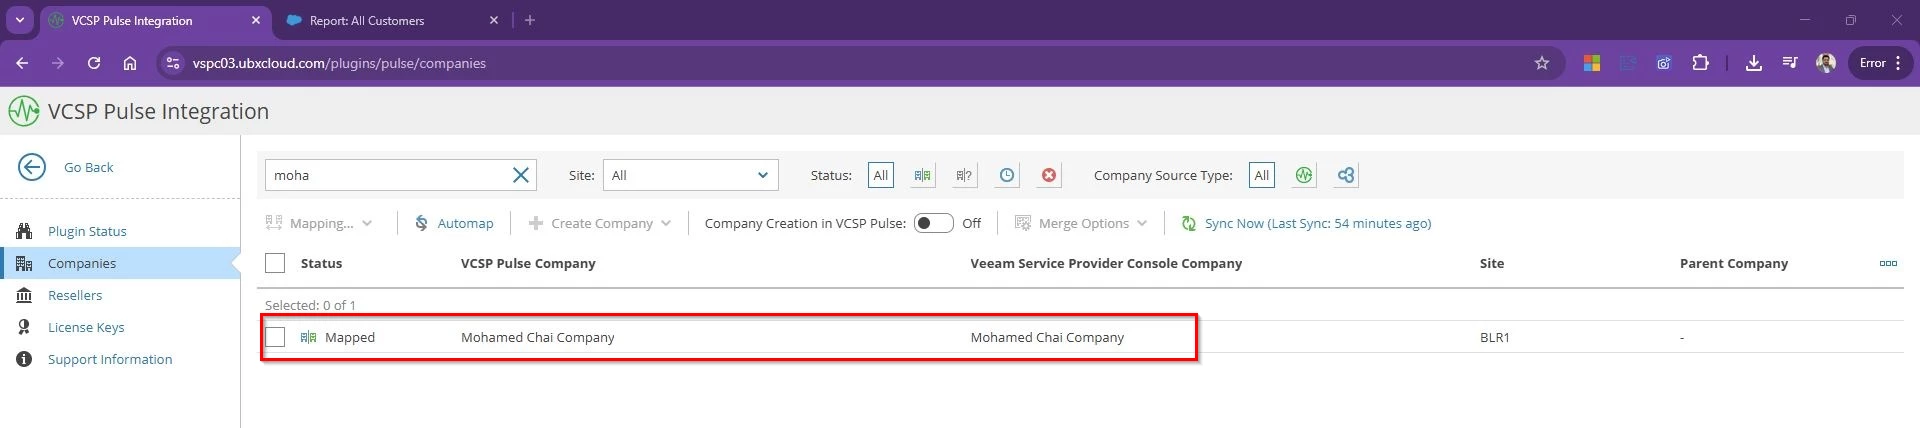
Example: In my setup, “Mohamed Chai Company” already exists in VSPC but not in Pulse. When I choose Create Company, it is created in Pulse and instantly VSPC marks it as Mapped. This mapping also generates a CRM ID in Pulse, tying the records together for reporting and licensing. The reverse is also true: if a company exists in Pulse but not in VSPC, you can create it in VSPC and the mapping is established automatically.

  • Select the Company that needs license to be assigned → Select Create Company In VCSP Pulse

Once the company created in Pulse portal you will see the status changed from unmapped to Mapped.

Without this mapping, licenses can’t be accurately assigned. With mapping, everything lines up correctly, making usage reporting effortless.

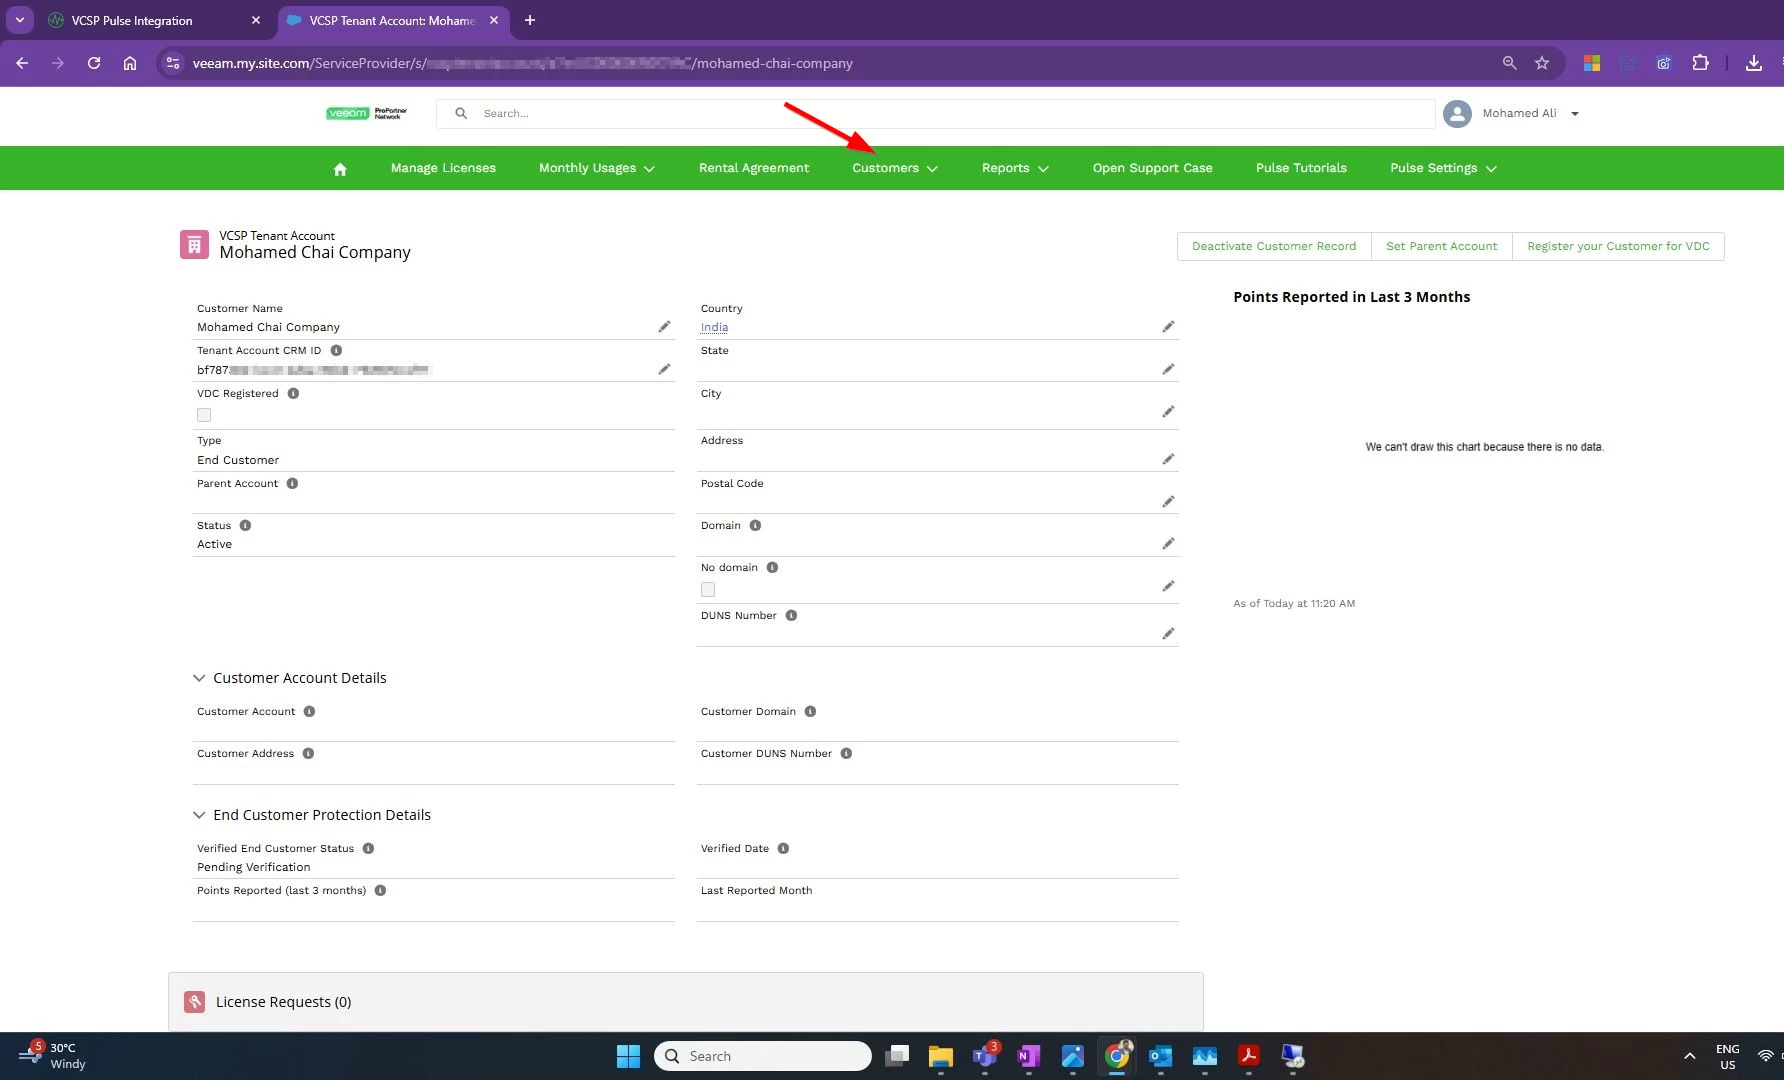
You can see the VSPC tenant account created in Pulse portal as well and got the Tenant Account CRM ID. You can access the companies from Pulse portal –> Customers –> All customers.

Step 3: Create License Keys

Once company mapping is complete, license creation is straightforward:

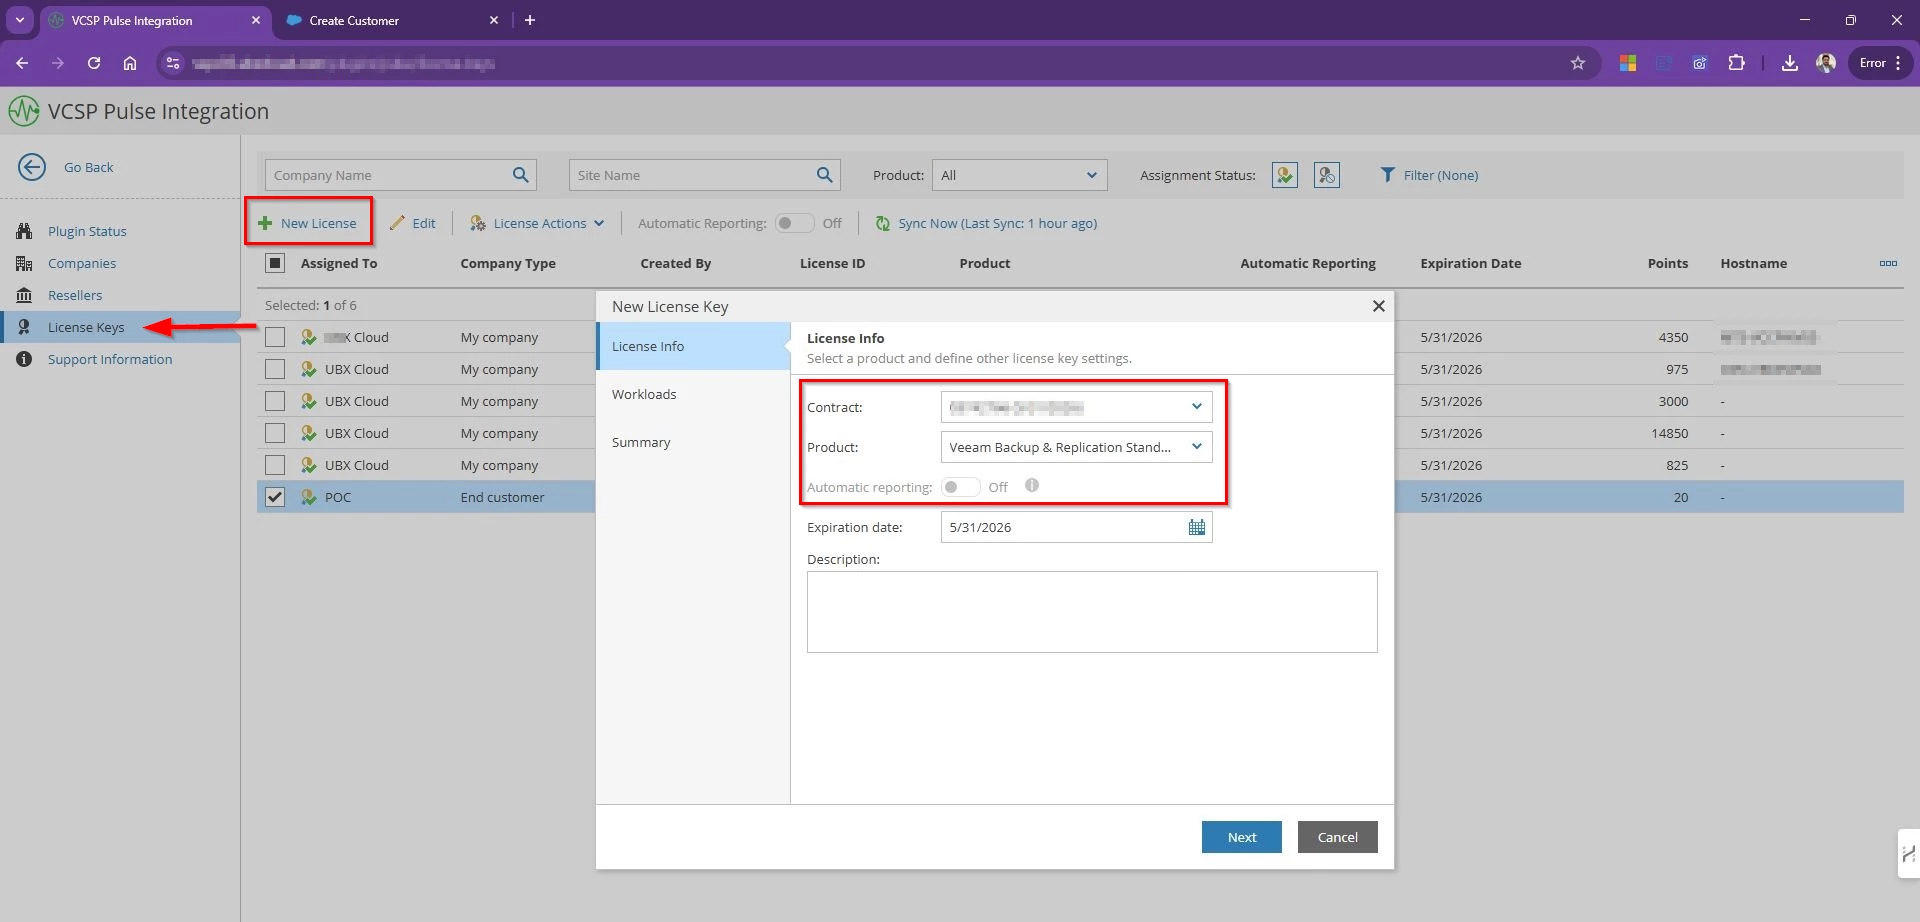
  • Go to VCSP Pulse integration page –> License keys –> New License
  • Select the contract, the product (such as VBR or Veeam Agent), and the edition.
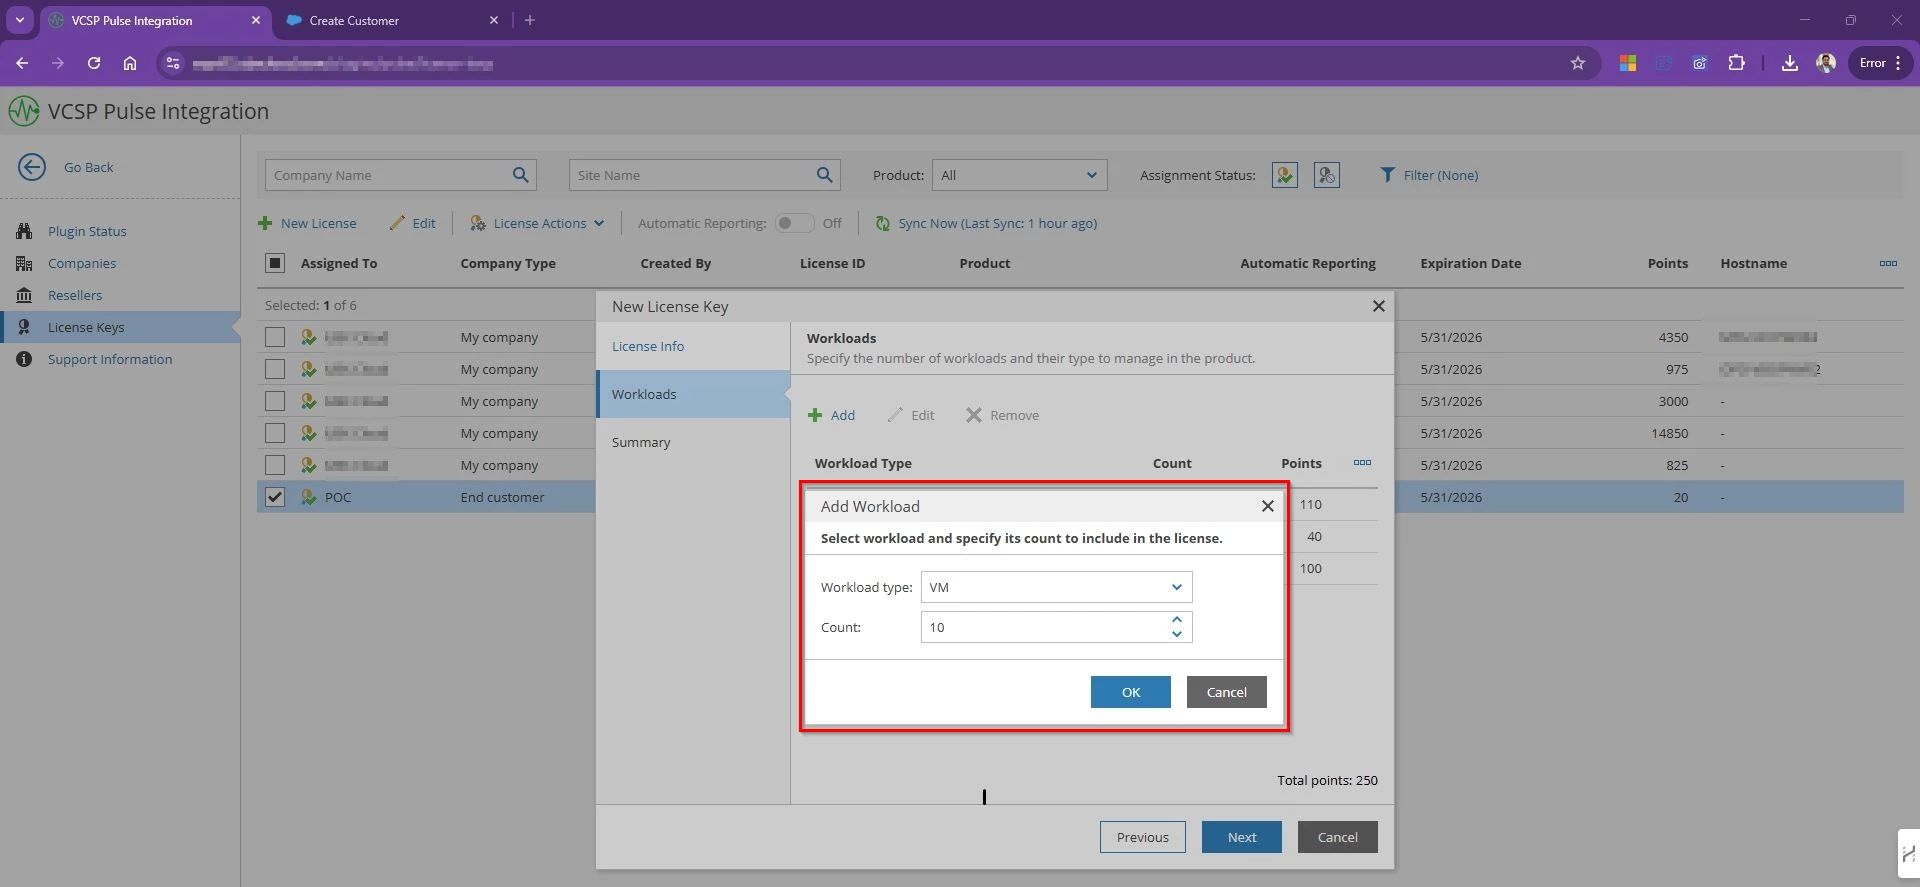
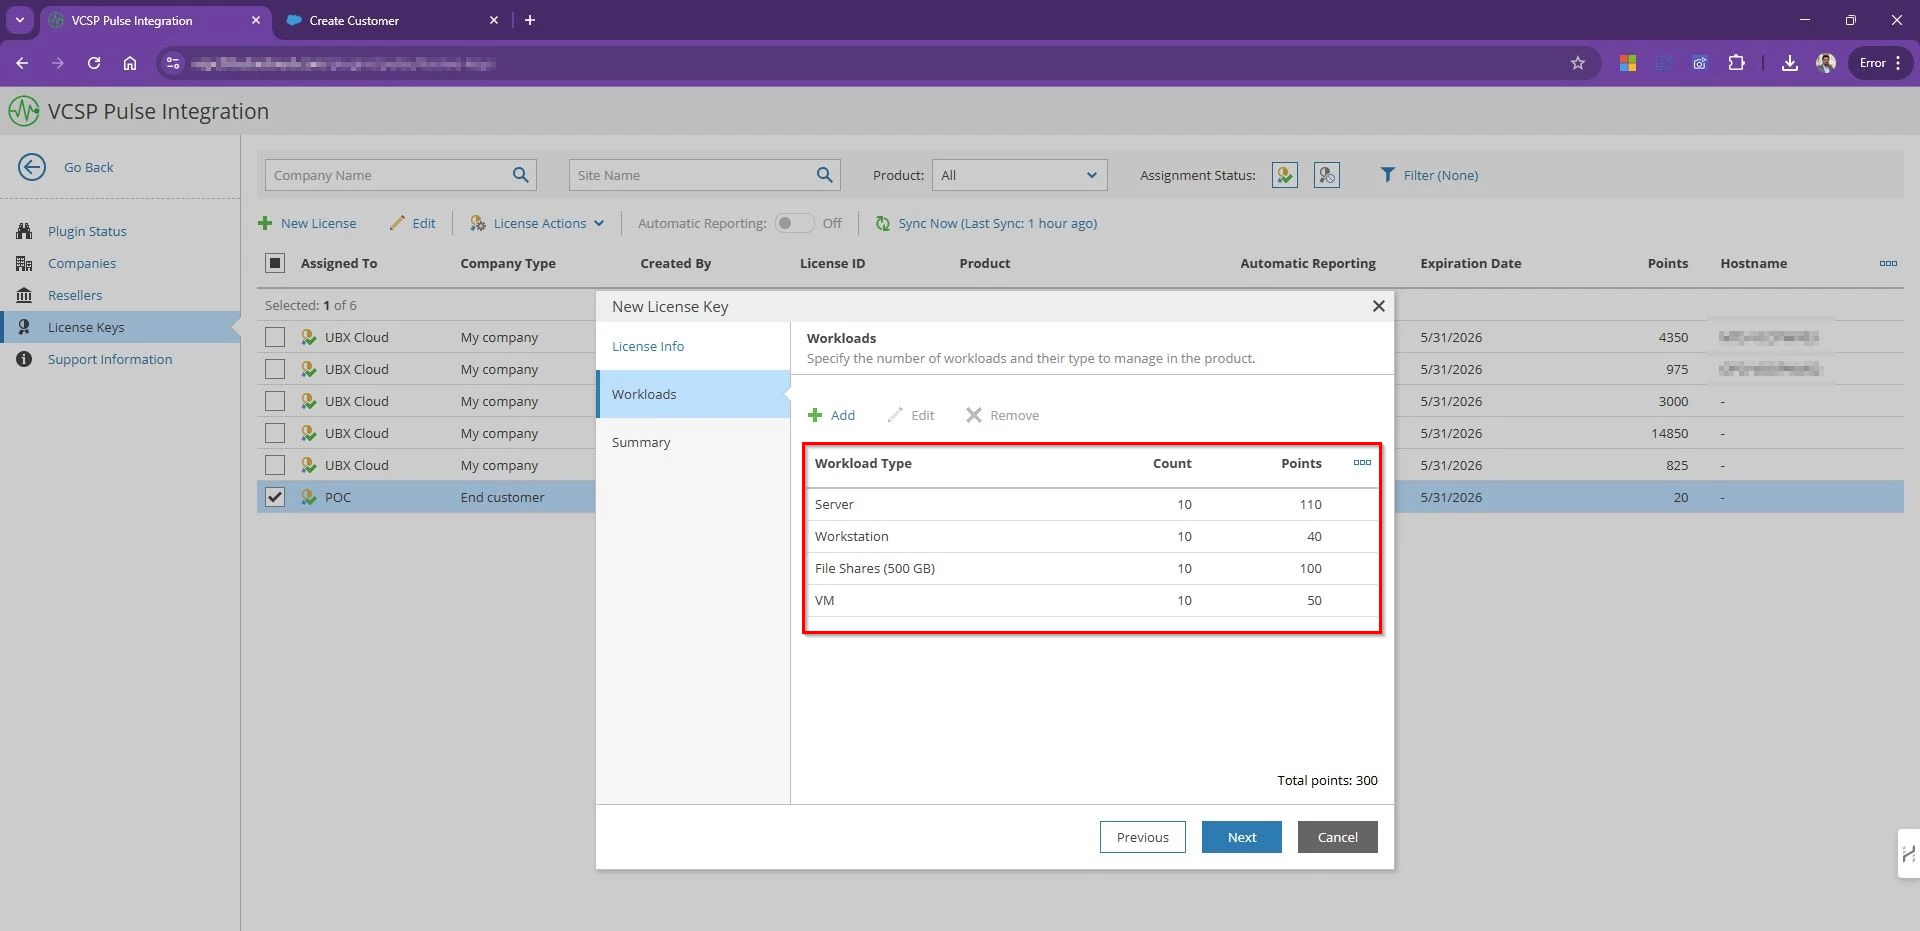
  • Choose the workload type (VMs, servers, workstations) and specify the numbers
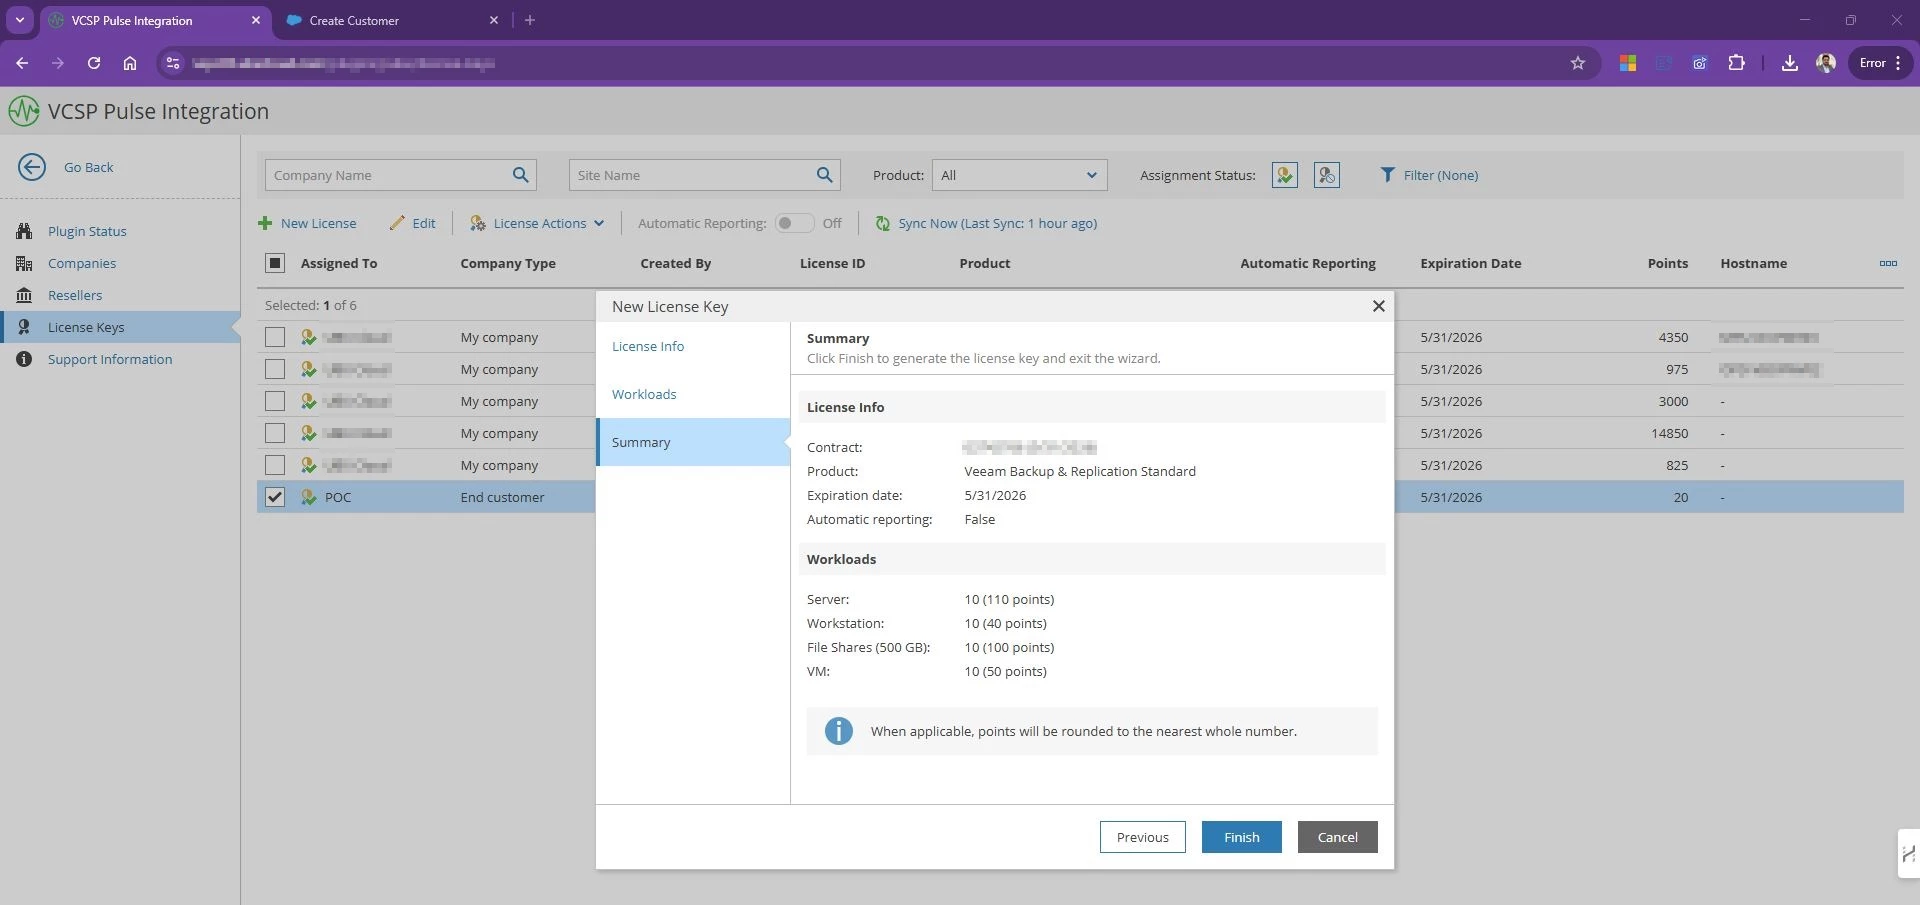
  • Review the summary and license Info and Finish to create license.
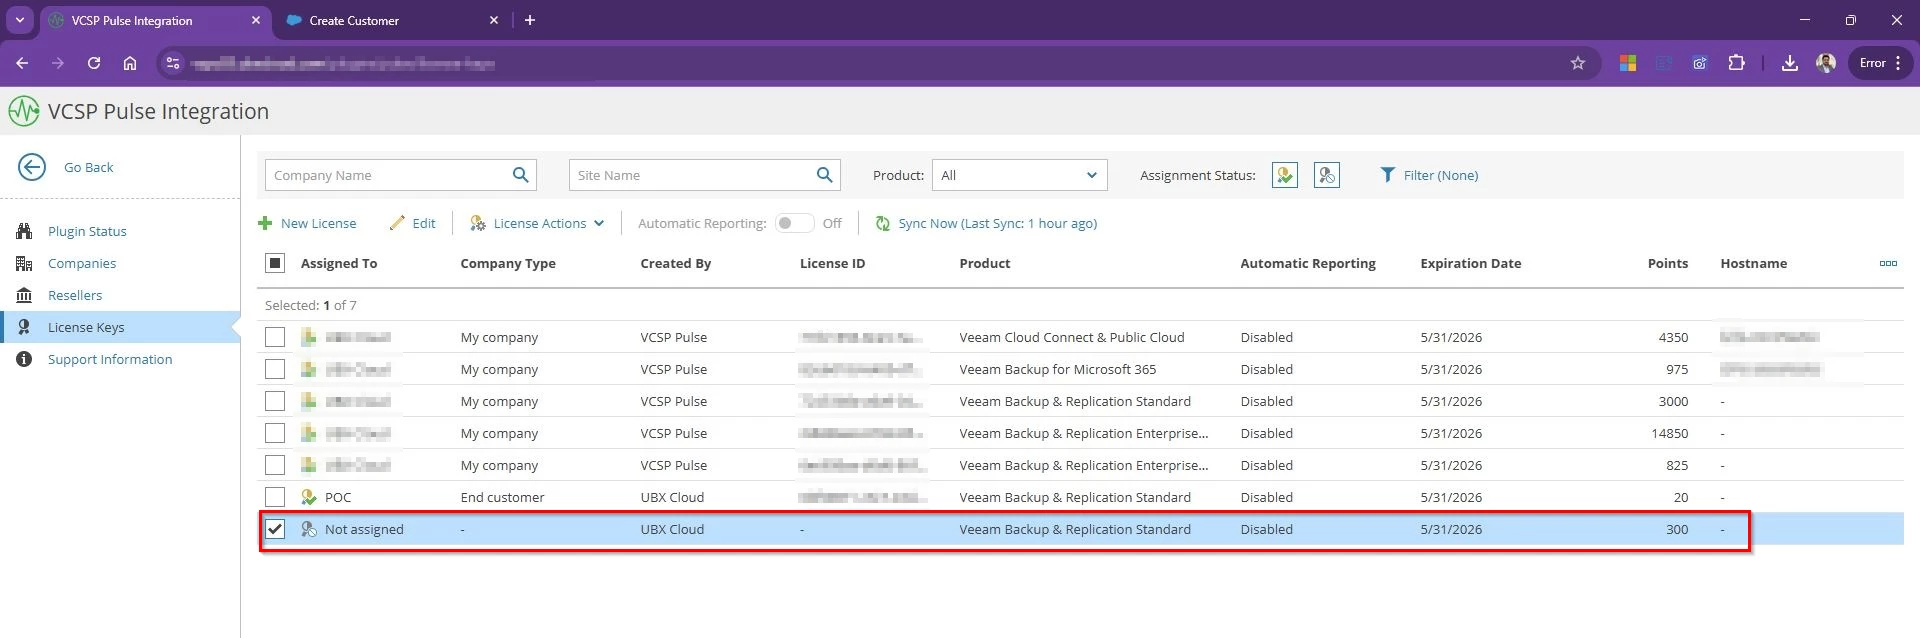
  • The new license appears in VSPC, ready for assignment.
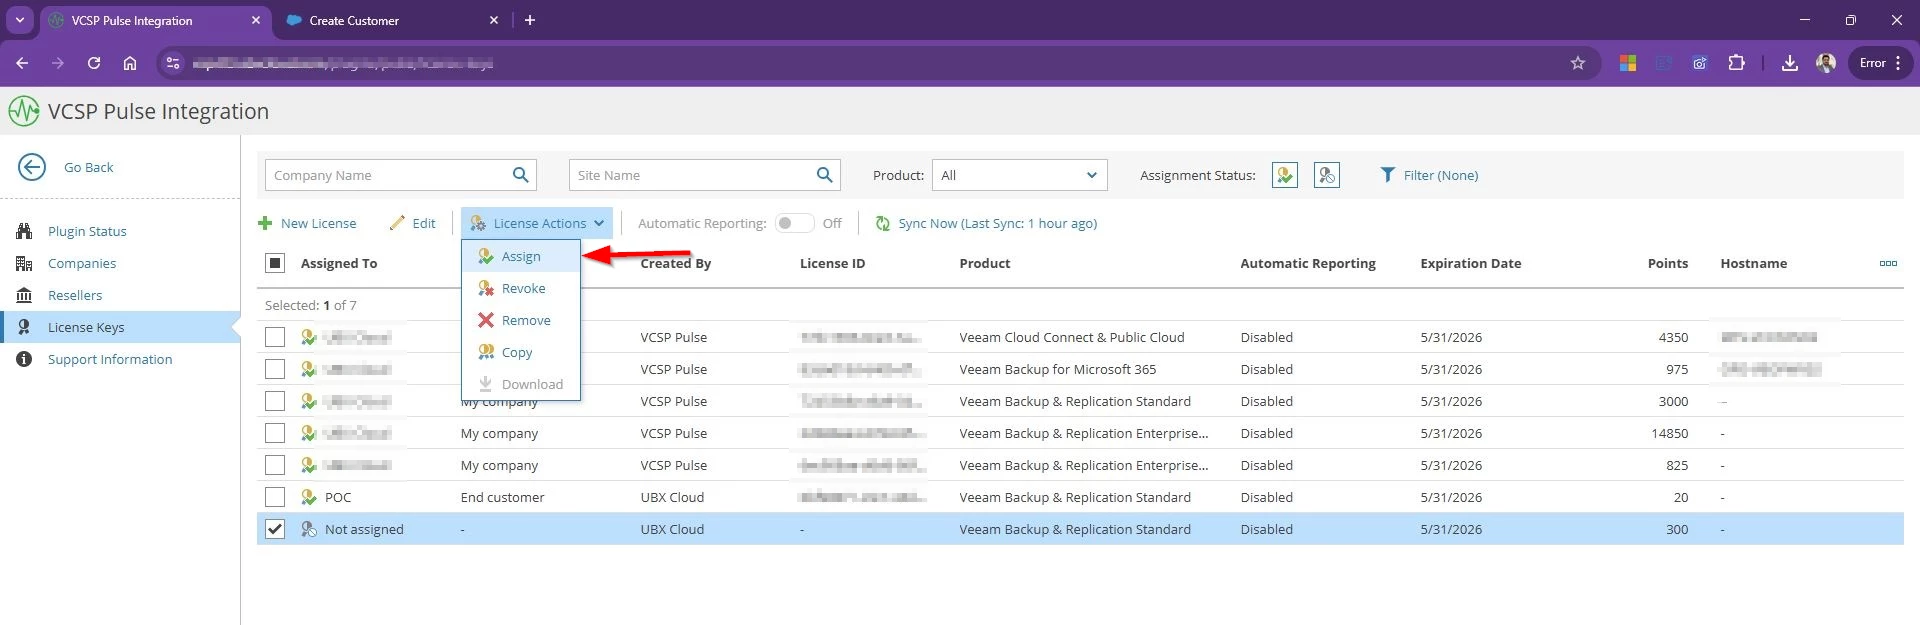
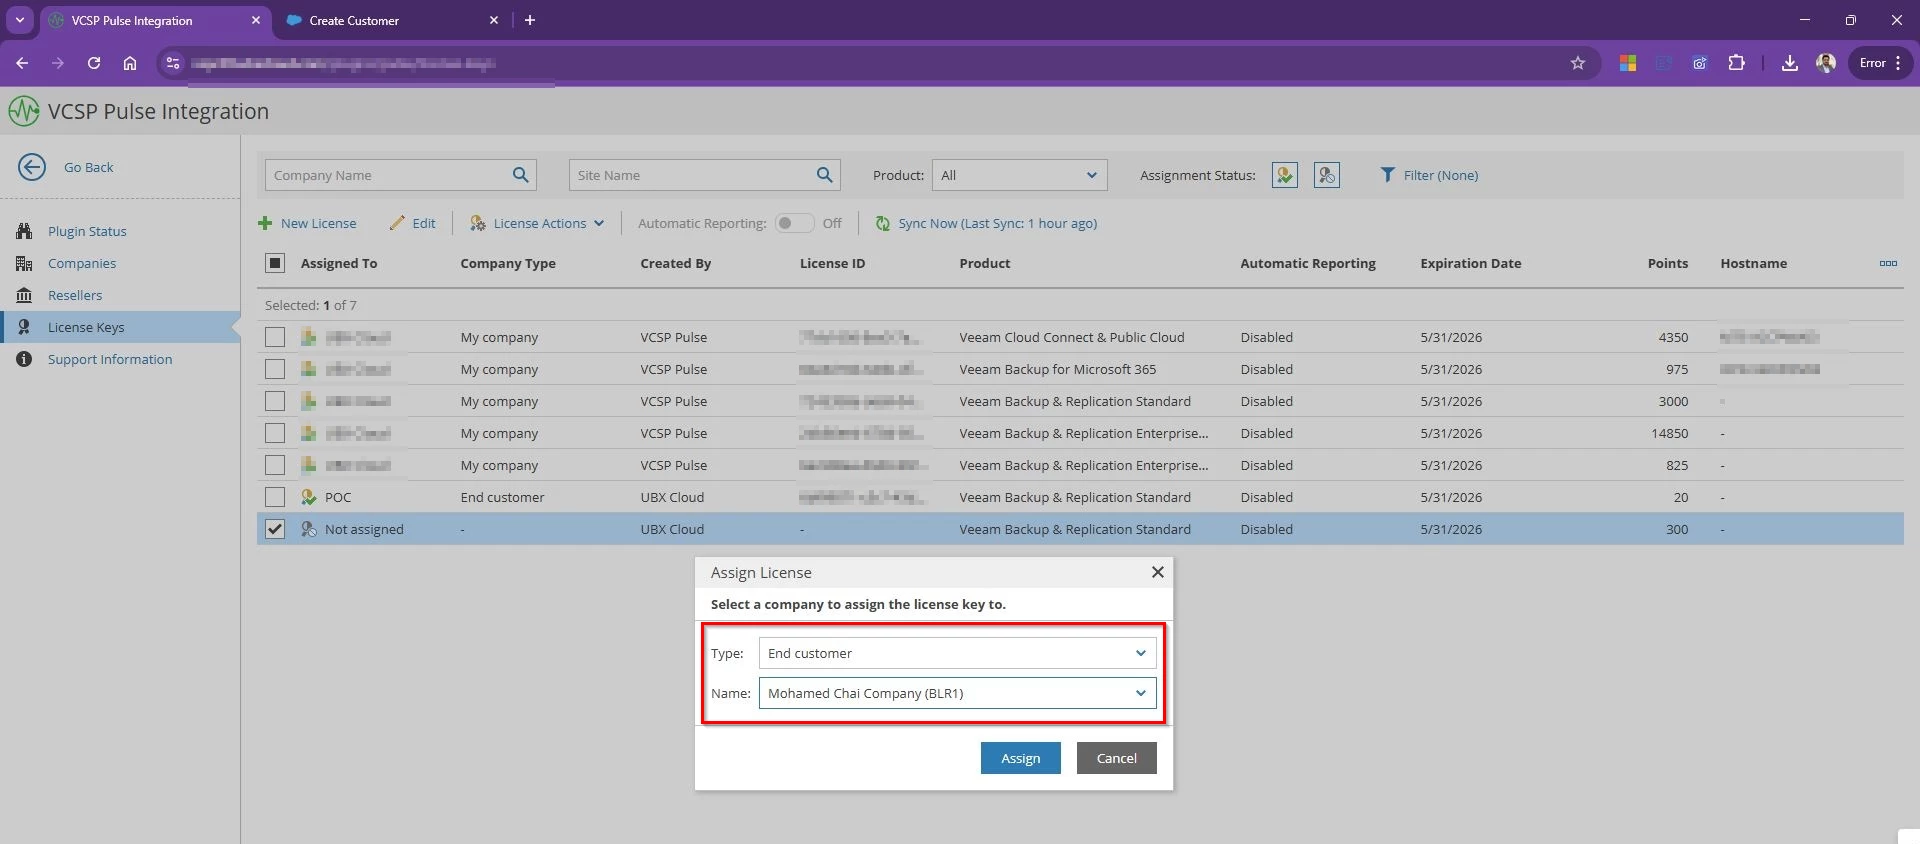
  • Select the License →  License Action →  Assign
  • Select the Type End Customer –> Choose the Company (“Mohamed Chai Company”)

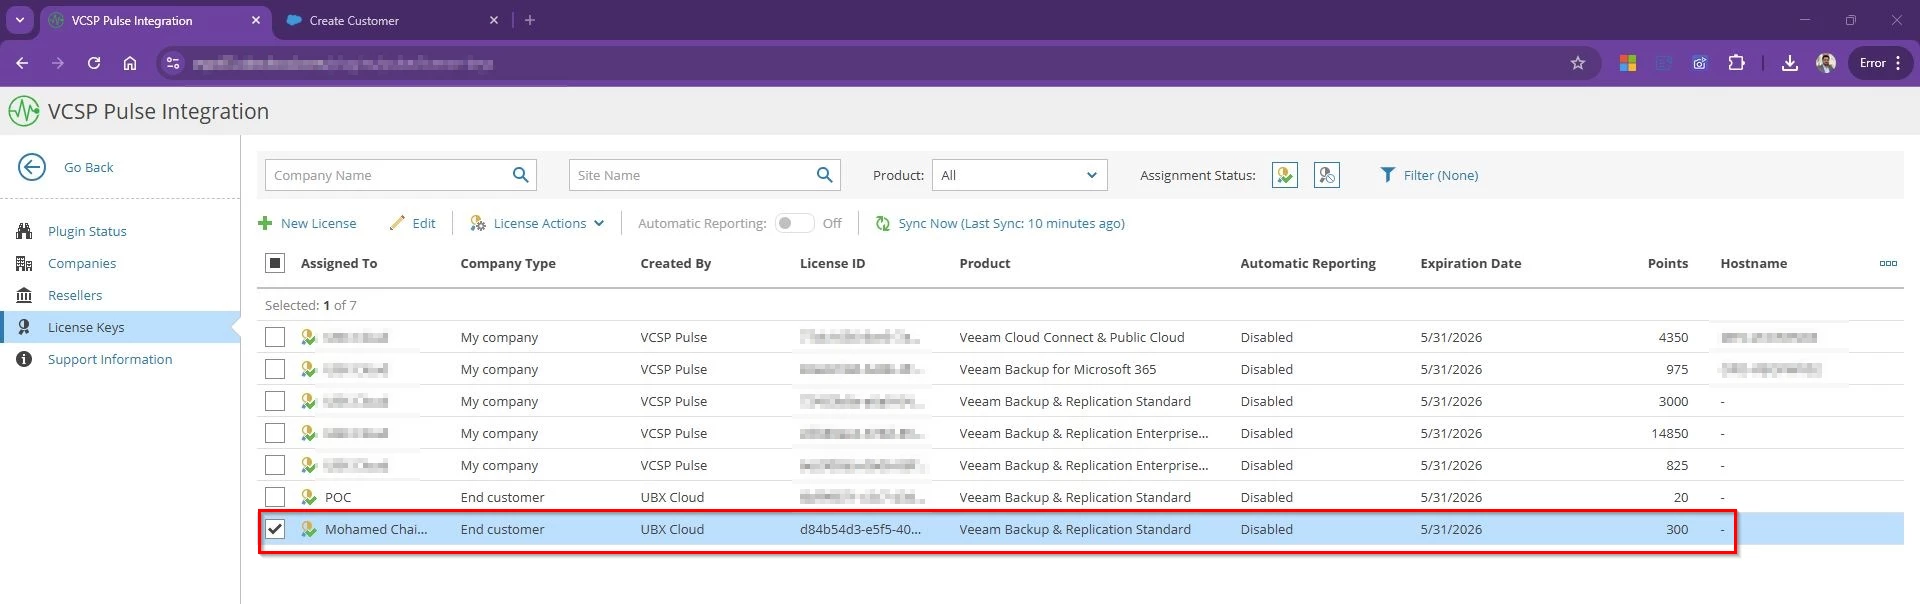
Now the license file is assigned to the company and ready to be installed. 

Step 4: Install the license keys to Tenant VBR

Once the license is assigned to a tenant, the final step is installing it on the VBR server. This is where VSPC saves you from the old copy-paste hassle. 

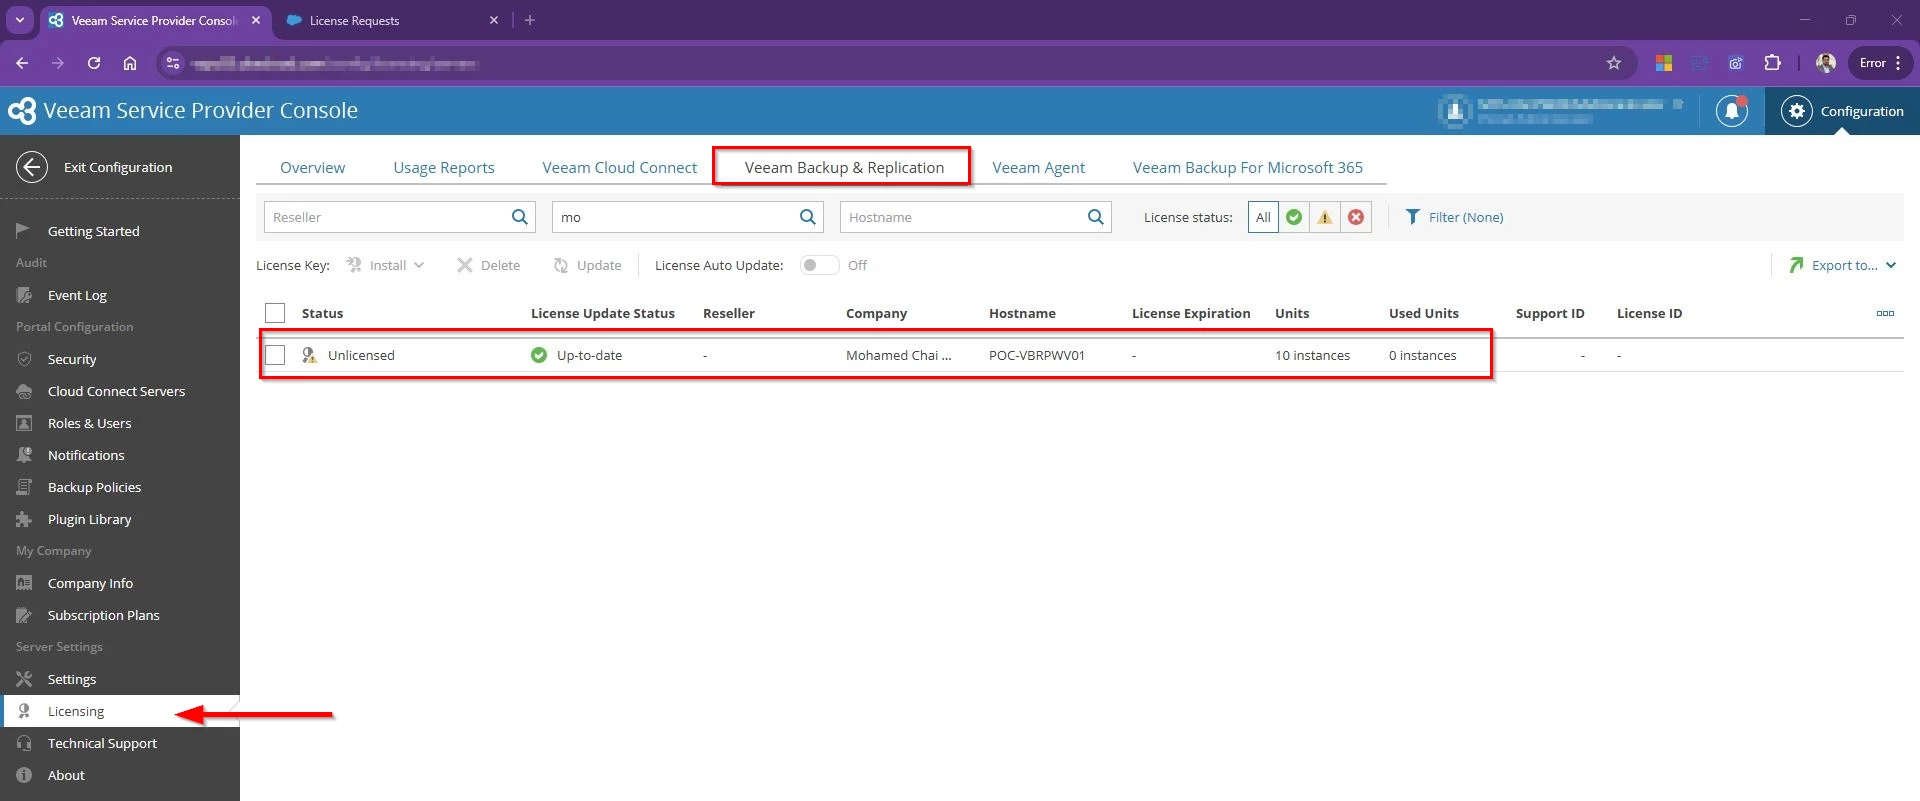
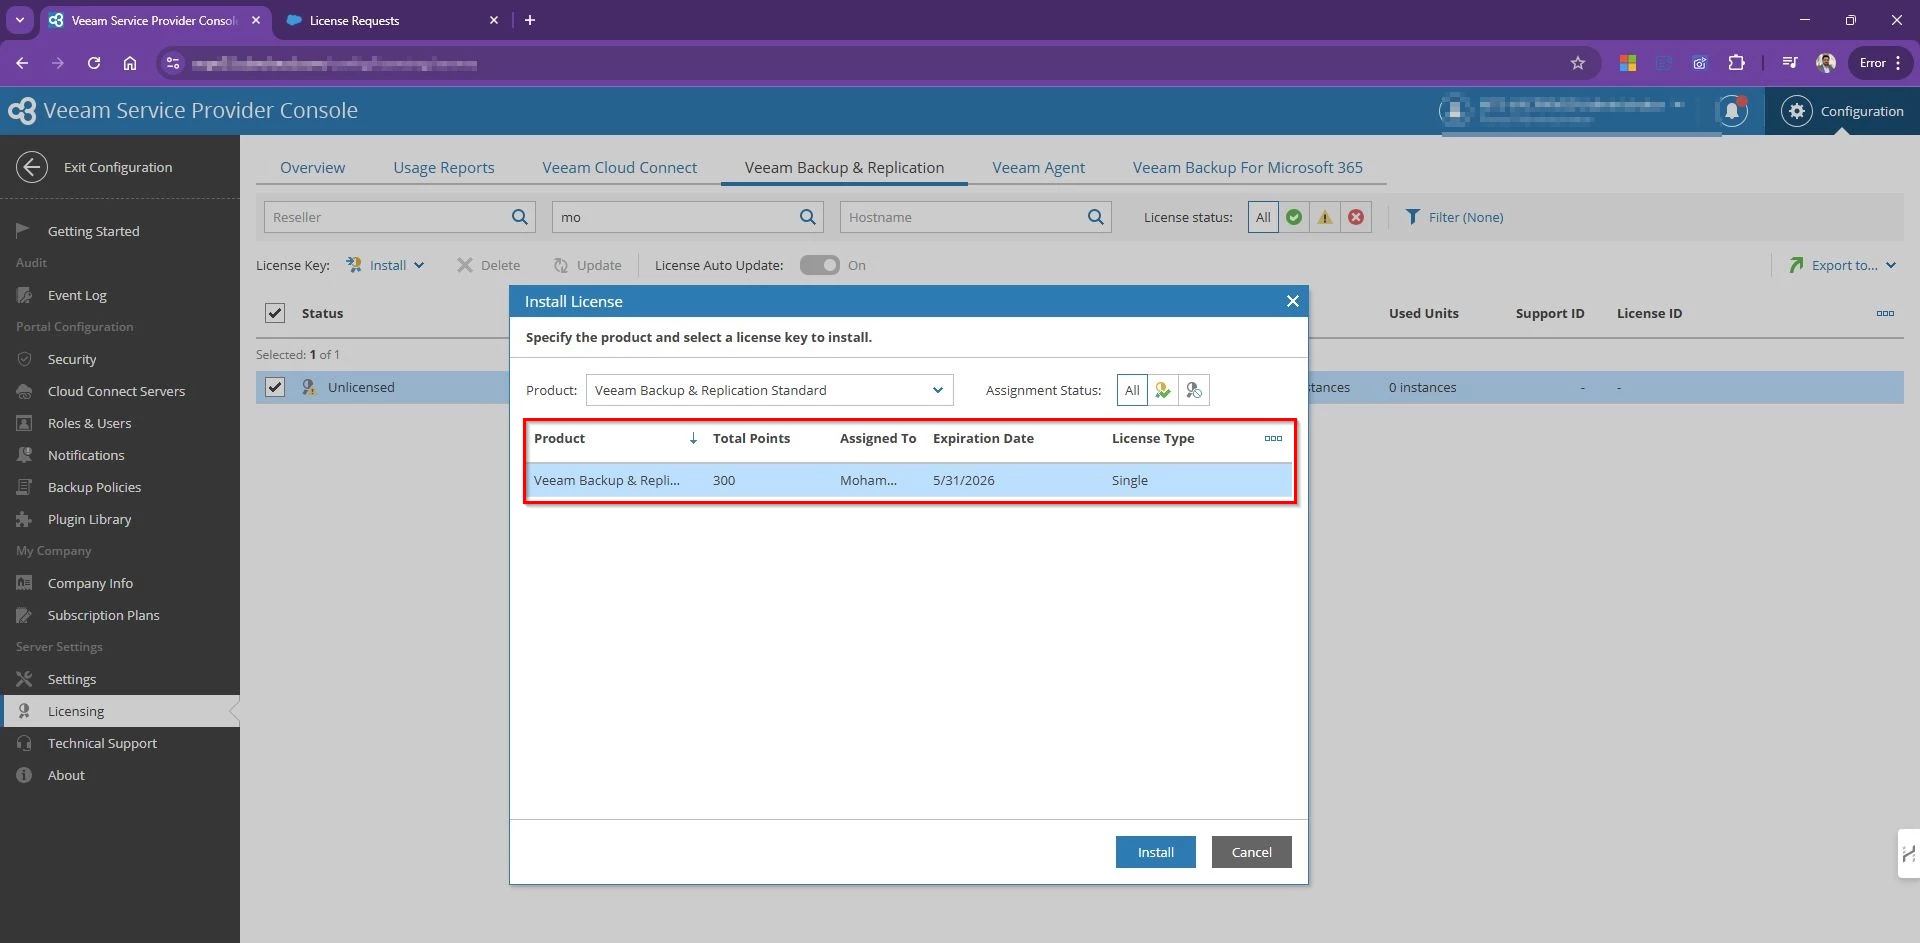
  • Go to Configuration –> Licensing –> Select Veeam Backup & Replication Tap 
  • Find the Company name which we assigned the license to and you will see the tenant’s VBR server status listed as Unlicensed.
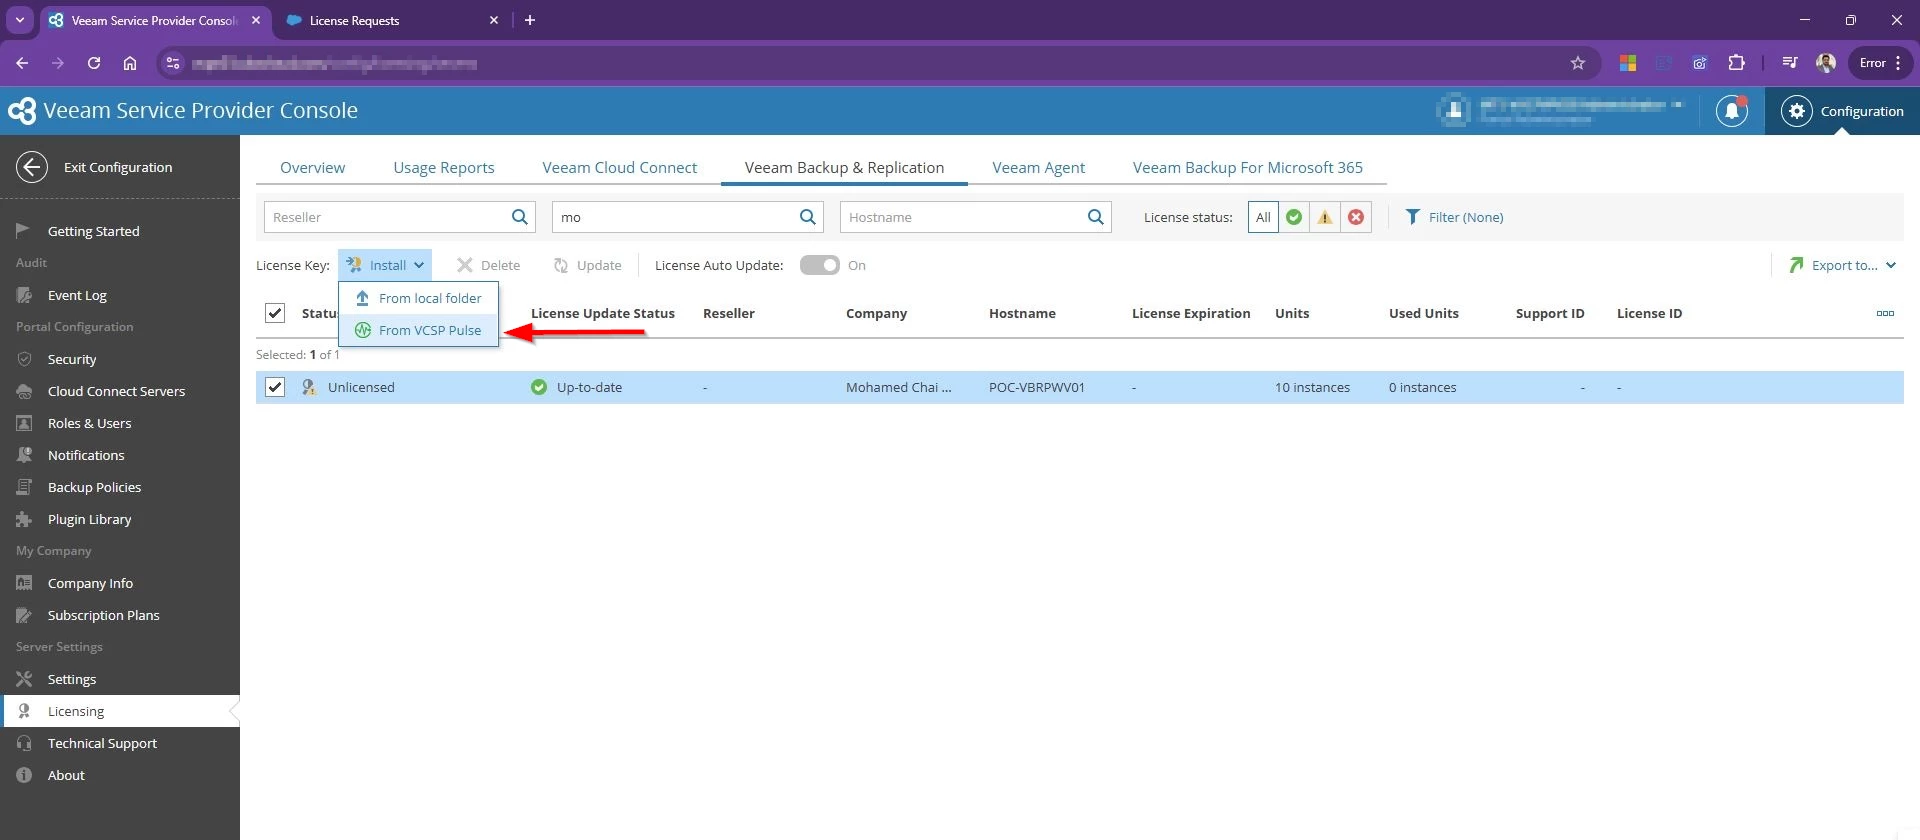
  • Choose Install license Key –> From VCSP Pulse
  • Select the Product and available license Key to install

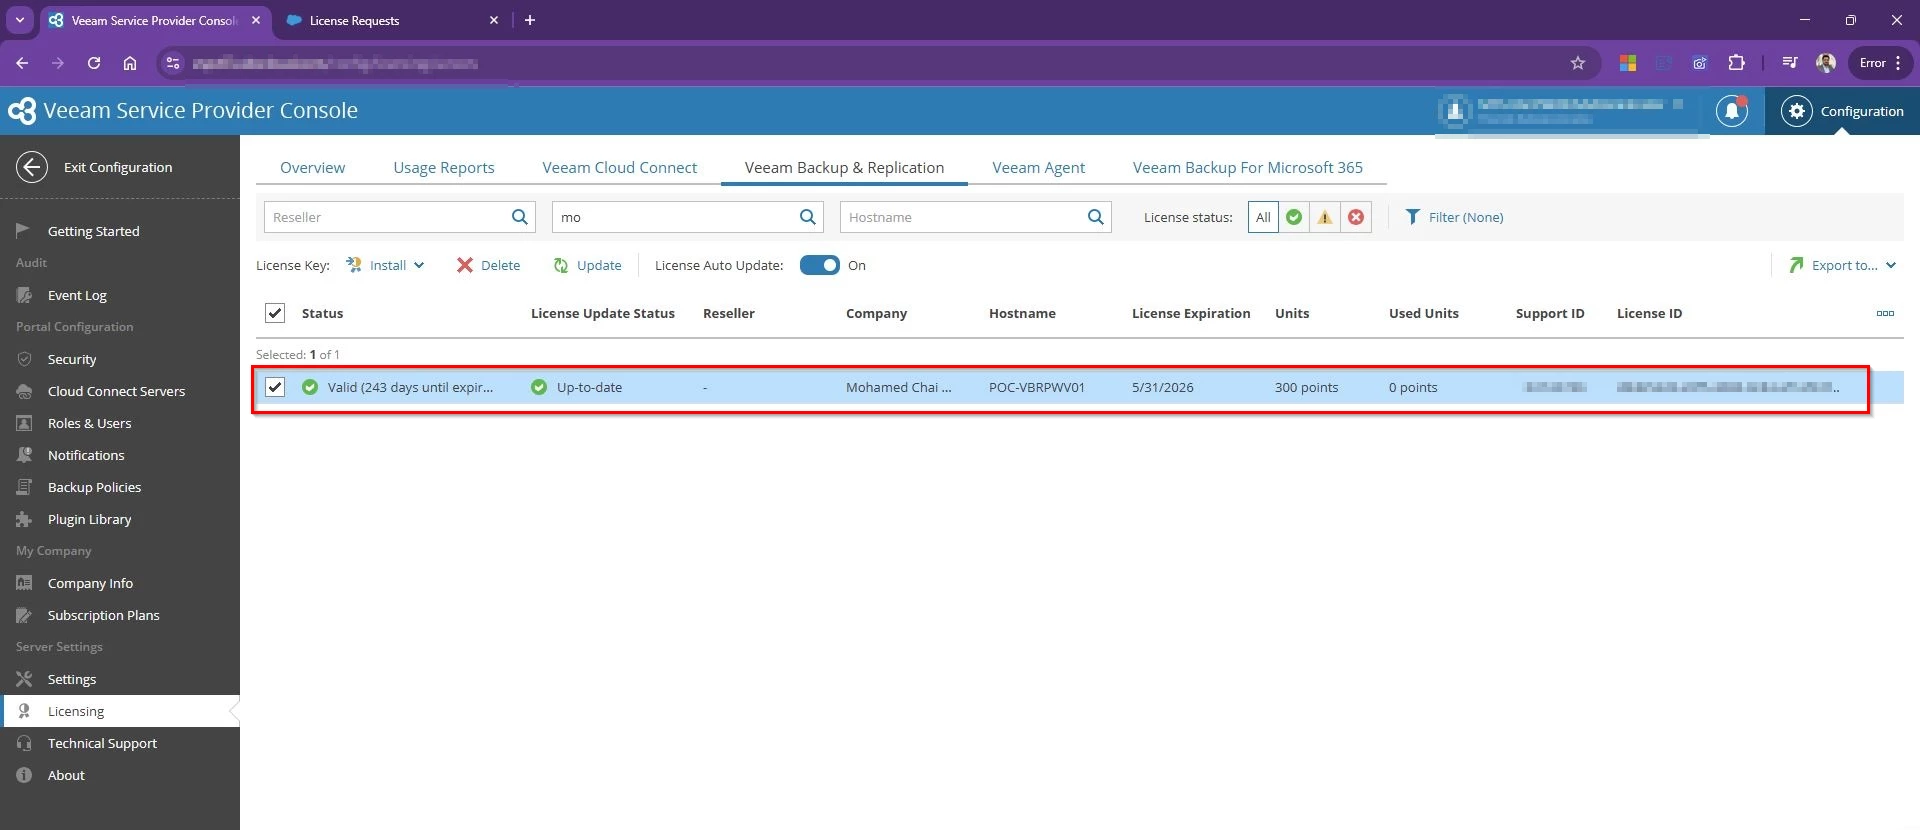
VSPC will now push the license directly to that VBR instance. No downloads, no email attachments, no jumping into RDP!
Bingo! Tenant VBR is activated now! 

If the tenant server is offline at the time, The moment it comes back online and reconnects with VSPC, the license install will complete automatically.

Veeam Cloud Connect Upgrade to V13 Step by Step Service Provider Guide

Veeam Backup and Replication v13 is now in the wild, and for service providers running Cloud Connect this is not just another point upgrade. It is a major platform refresh that touches the core backup server, gateways, explorers, agents, and the tenant facing control plane. With v13 bringing stronger security defaults, modernized components, and several legacy features finally retired, VCSP partners should plan their upgrades early so tenant adoption is smooth from day one.

I recently upgraded my Cloud Connect environment from 12.3 to v13. In this post I will walk through the upgrade flow exactly as the wizard presents it, with short practical notes at each stage. The focus is simple. What to verify, why Veeam is asking for it, and how to avoid tenant impact while moving your Cloud Connect stack cleanly onto v13.

Preparing for the upgrade

Before starting the upgrade, there are a few best practice steps you should complete across your VBR and Cloud Connect infrastructure. These include:

  1. Verify system compatibility
    Confirm supported operating systems and system requirements are met for all Cloud Connect components, including the Cloud Connect server, gateways, repositories, and database hosts.
    https://helpcenter.veeam.com/docs/vbr/userguide/system_requirements.html#backup_server_windows
  2. Take the VM snapshots with application consistent 
    Create snapshots of all critical servers such as the Cloud Connect VBR server, cloud gateways, and database servers. This is strongly recommended in production as an extra rollback layer.
  3. Back up the Veeam configuration
    Export the VBR configuration from the Cloud Connect server. This is your primary rollback safety net if anything unexpected happens.
  4. Back up the Veeam database
    Take a full backup of the VBR configuration database.
    • If using PostgreSQL, take a full pg dump.
    • If using SQL Server, take a full SQL backup.
  5. Confirm tenant version readiness
    Make sure all tenant VBR servers are on the minimum supported build compatible with Cloud Connect v13. Tenants on older builds will fail after the provider upgrade. You will also see the tenant list during the Configuration Check stage.
  6. Put Cloud Connect into maintenance mode
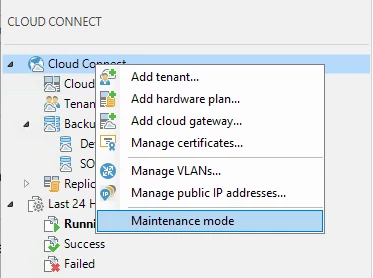
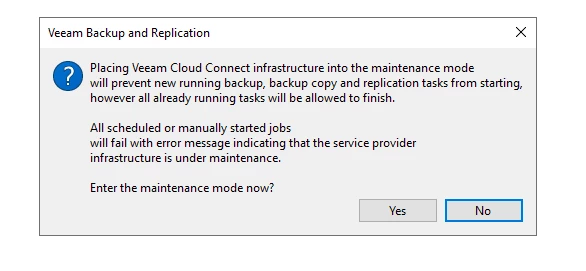
    Once preparation is complete and your maintenance window begins, put Cloud Connect into maintenance mode so tenant activity is controlled and predictable. Maintenance mode lets any in flight backup or backup copy task complete cleanly, so data already being written to cloud repositories is not cut off mid stream. After that, new tenant jobs cannot start and any new attempts fail fast with a clear maintenance message

This gives you a safe upgrade window. You avoid partial restore points, prevent new sessions from landing on services that are about to restart, and tenants see an explicit notice that the platform is under scheduled maintenance instead of random connection errors.

To enable Maintenance Mode from the VBR console Right Click on the Cloud Connect top level tree item and click on Maintenance Mode

Read the message and click Yes

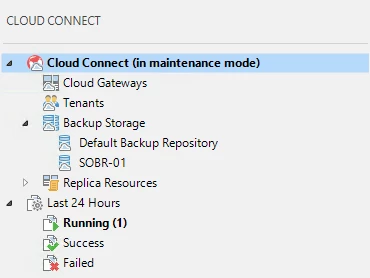
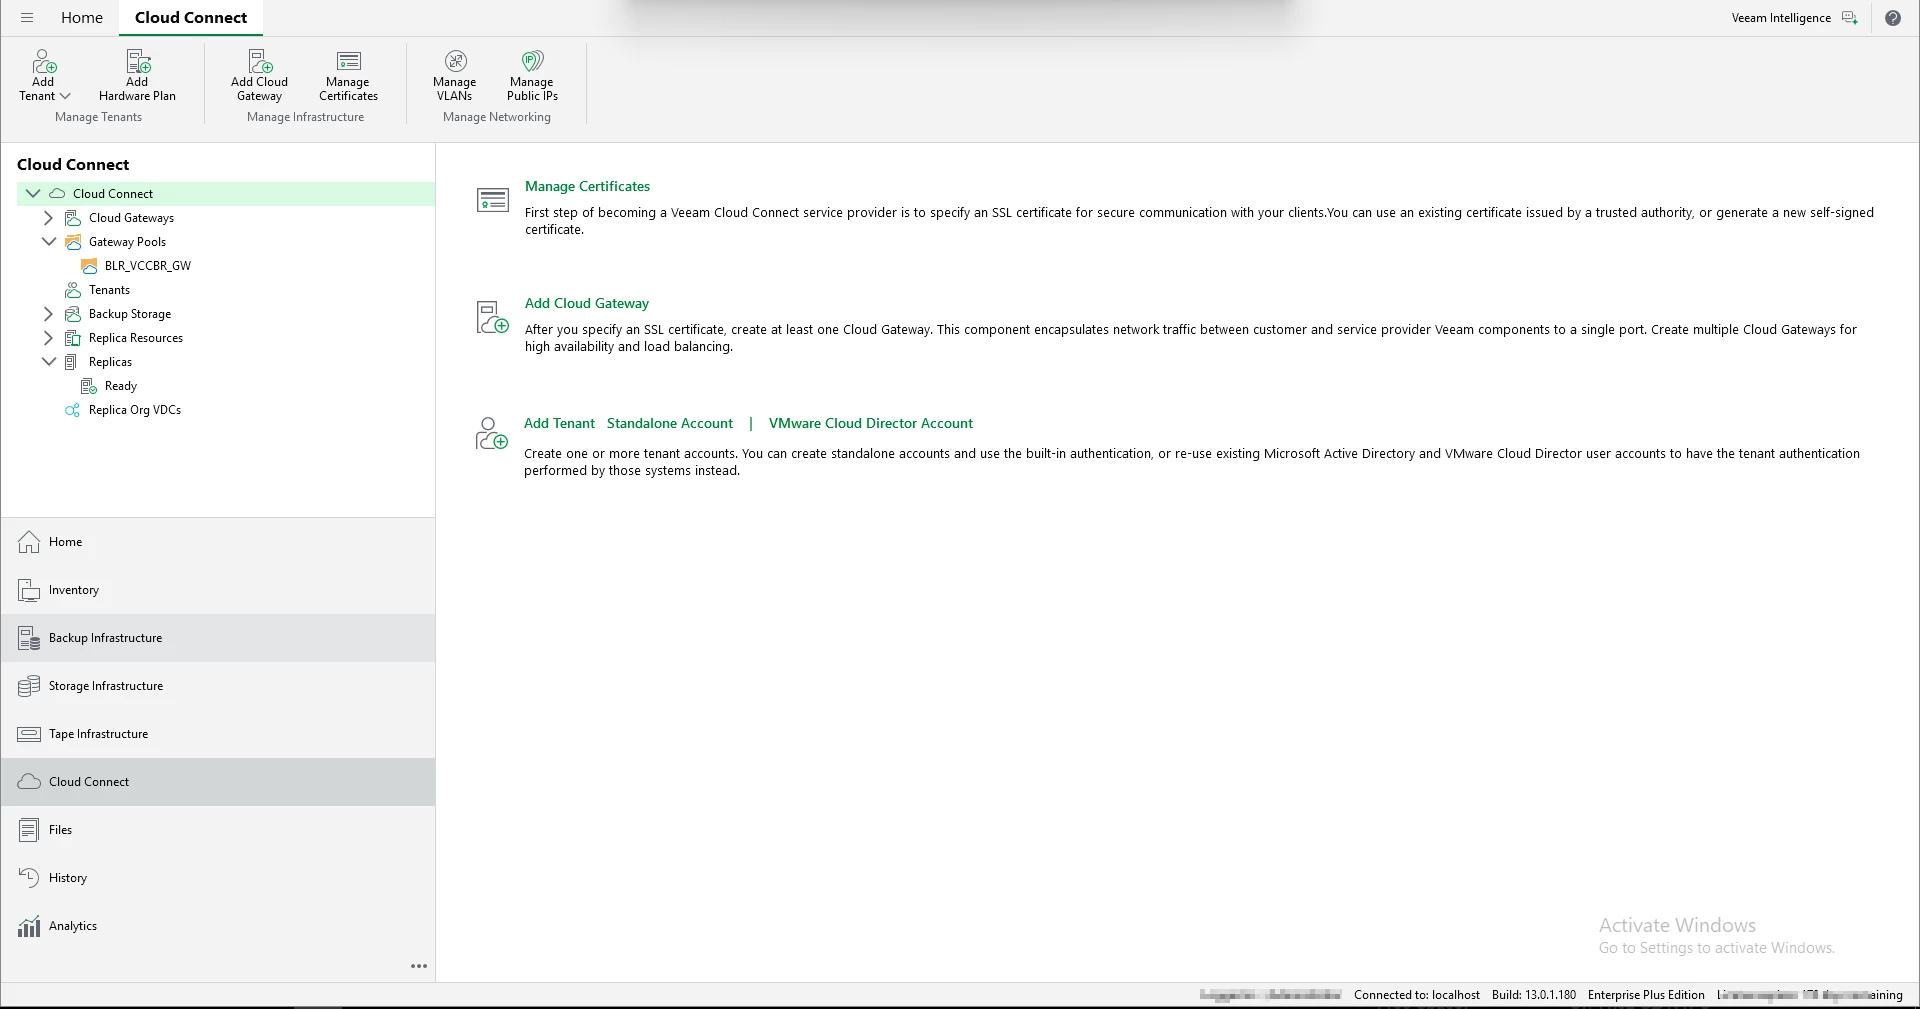
Once completed you should see the following status in the Cloud Connect menu tree

Starting the upgrade

The setup wizard prompted to update Microsoft .NET Hosting 8.0.21.

After .NET 8.0.21 installed successfully, proceeded with the upgrade.

Read and Accept License Agreement

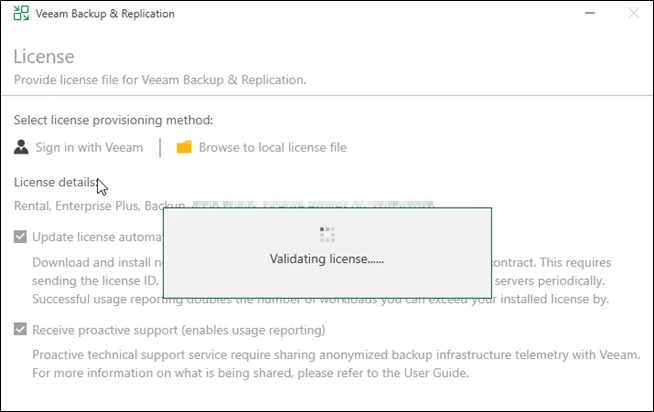
Provide License File

VBR 13 simplifies licensing during upgrade. Instead of manually downloading and uploading a license file, you can sign in to your Veeam account from the wizard and install a license directly.

You can still browse and install a local license file if required. Just ensure the license matches the correct product version.

System configuration check

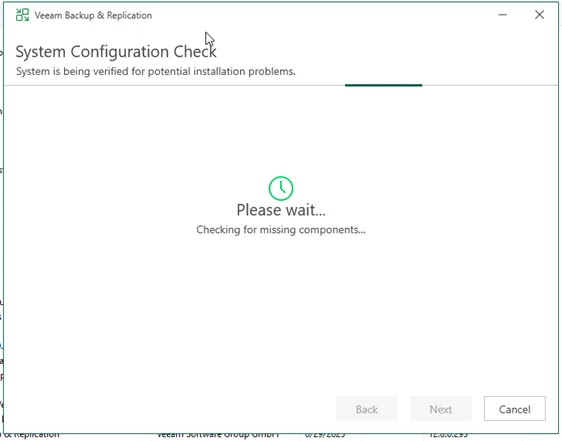
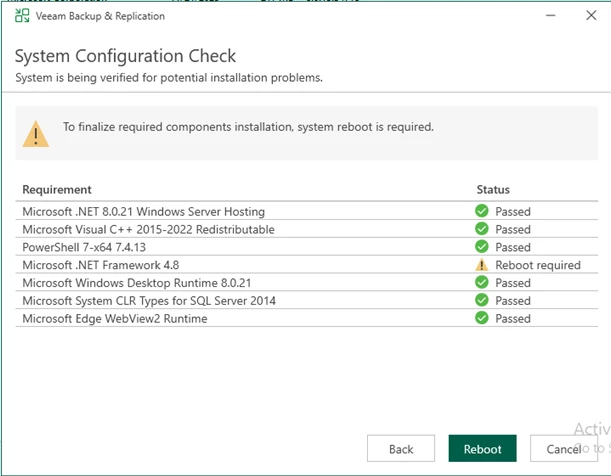
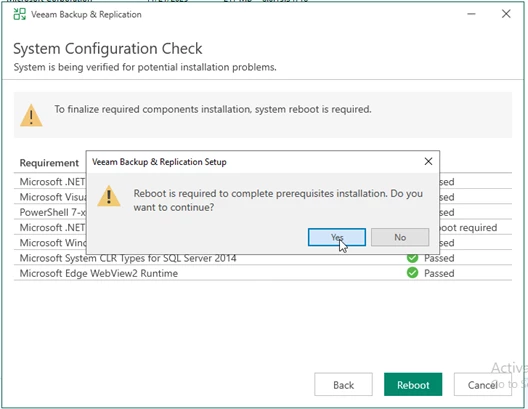
At the System Configuration Check step, the wizard verifies required software components. If anything is missing, the setup installs it automatically. After installation, a reboot may be required. Click Reboot, then restart the setup and continue.

Once the VM is rebooted and online, Start the VBR setup again, Accept the agreement -> License details -> Perform Configuration Check

Configuration Check

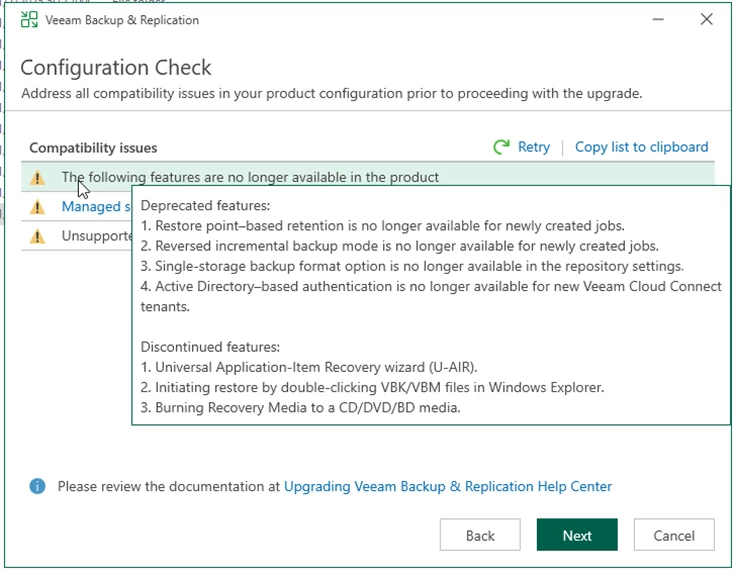
During Configuration Check, VBR scans your environment for anything that will not survive the move to v13. This helps prevent breakage after the upgrade.

Pay close attention to warnings about removed features.

Deprecated features

  • Restore point based retention
    Earlier you could set retention as “keep 30 restore points” instead of “keep 30 days.” In v13, you cannot configure restore point based retention for new jobs. New jobs must use time based retention.
  • Reversed incremental backup mode
    This mode kept the most recent backup as a full, with older restore points as incrementals. In v13, you cannot create new jobs with reversed incremental mode. Existing jobs may continue to run, but plan to migrate to forward incremental with periodic fulls.
  • Single storage backup format option
    Earlier you could choose the older single chain format at repository level. In v13, this format is no longer available for new repositories or jobs. The supported default is per machine backup chains.
  • Active Directory based authentication for new Cloud Connect tenants
    Earlier tenants could authenticate using AD users and groups. In v13, AD based authentication cannot be enabled for new tenants. New tenants must use local Veeam accounts or other supported methods. Existing AD based tenants are not forced to change immediately, but no new AD based tenants can be created.

Discontinued features

These are fully removed.

  1. Universal Application Item Recovery wizard (U AIR)
    The generic multi app item recovery wizard is removed. Use application specific recovery options instead.
  2. Starting restore by double clicking VBK or VBM in Windows Explorer
    This shortcut is removed. Restores must be initiated from the Veeam console.
  3. Burning Recovery Media to CD, DVD, or BD
    The built in burn option is removed. You can still create ISO or USB recovery media and burn using another tool if needed.

Unsupported operating systems

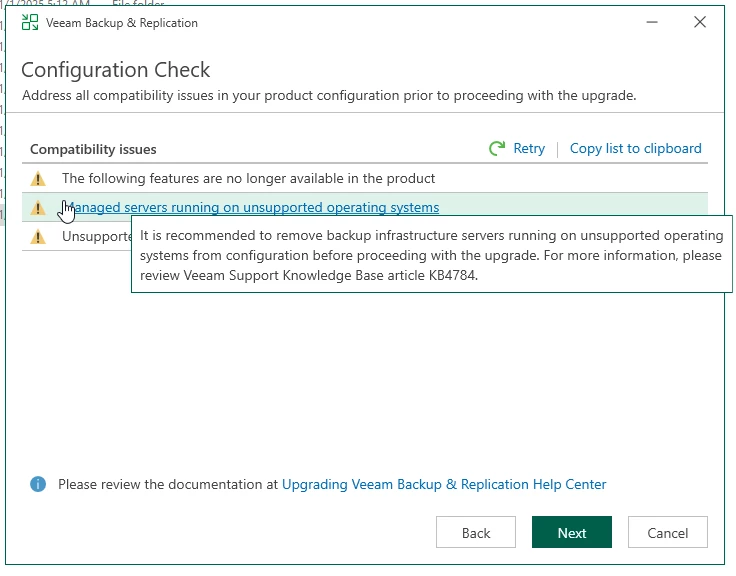
The Configuration Check also flags managed servers running unsupported Windows versions. Upgrade or remove those servers first, then click Retry to confirm everything is compliant before proceeding.

Unsupported tenant versions

Unsupported tenant version is one of the most critical checks in a Cloud Connect upgrade because it directly affects tenant backup continuity. Tenants on old builds cannot communicate with the provider once you move to v13. After the upgrade, their backup copy jobs, backup to cloud repository jobs, and restore portal operations will fail until they upgrade. This impacts all Cloud Connect traffic, including agent backups, Cloud Connect backup, and Cloud Connect replication if used.

Export or copy the tenant list and contact each tenant to confirm their current build, then schedule their VBR and agent upgrades as soon as possible.

Cloud Connect v13 is backwards compatible with the following tenant versions:

• Veeam Backup and Replication 12.3.2.3617 and later 12.3.2 builds
• Veeam Agent for Windows 6.3.2 and later
• Veeam Agent for Linux 6.3.2 and later
• Veeam Agent for Mac 2.3.1 and later


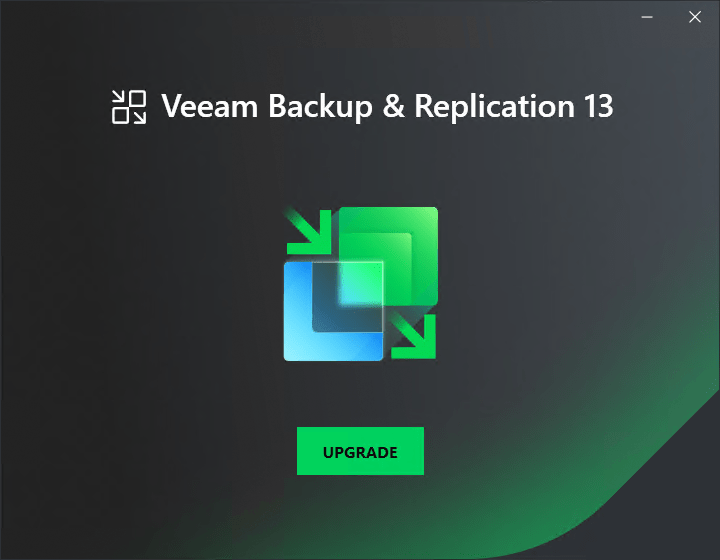
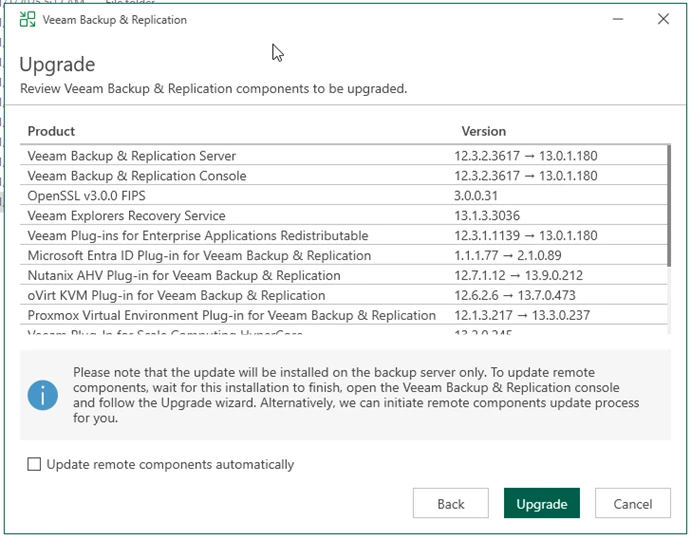
Review the list of Veeam components and plug ins that will be upgraded, then confirm before clicking Upgrade.

Select Update remote components automatically if you want gateways, proxies, and repositories upgraded automatically after the core server upgrade. Otherwise, VBR will prompt you to update them at first launch.

Upgrade execution

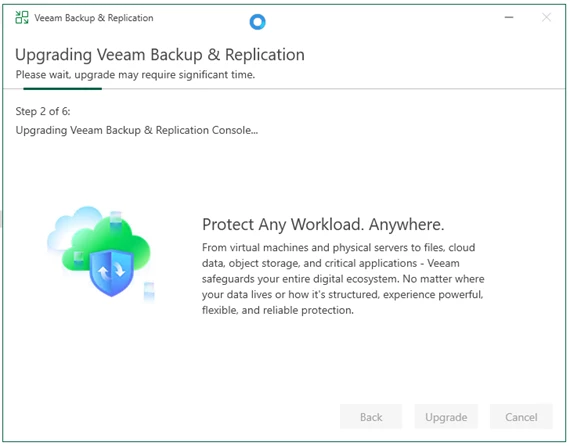
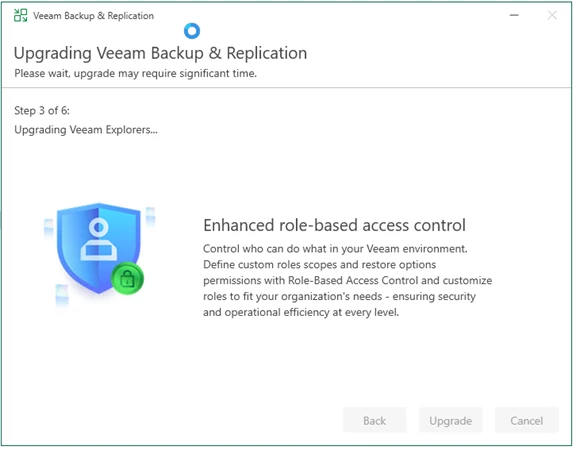
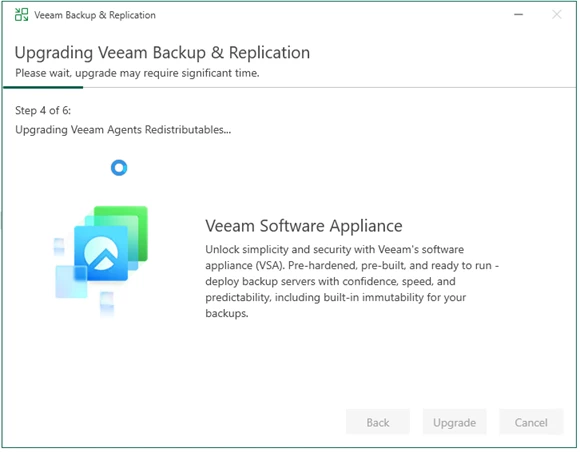
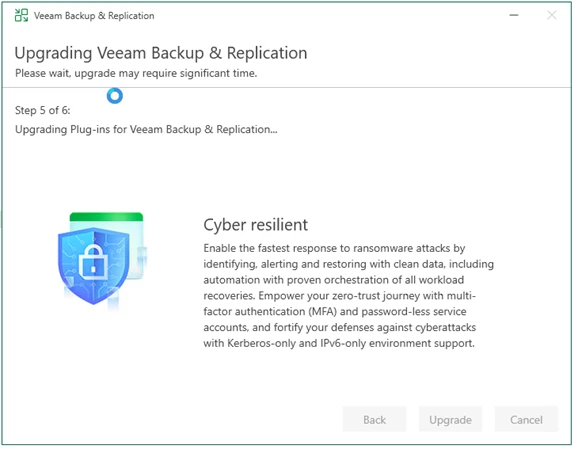
You will see the upgrade progress through six stages:

  1. Upgrading Veeam Backup and Replication Server
    Updates core VBR services, binaries, and configuration.
  2. Upgrading Veeam Backup and Replication Console
    Updates the admin console to match the server version.
  3. Upgrading Veeam Explorers
    Updates application explorers like AD, Exchange, SQL, Oracle, and SharePoint.
  4. Upgrading Veeam Agents redistributables
    Refreshes Windows and Linux agent packages available for push install.
  5. Upgrading plug ins for Veeam Backup and Replication
    Updates platform and integration plug ins such as VMware, Hyper V, Nutanix, Entra ID, and others.
  6. Finalizing installation and starting services
    Completes cleanup and restarts all Veeam services on v13.

Upgrade completed successfully.

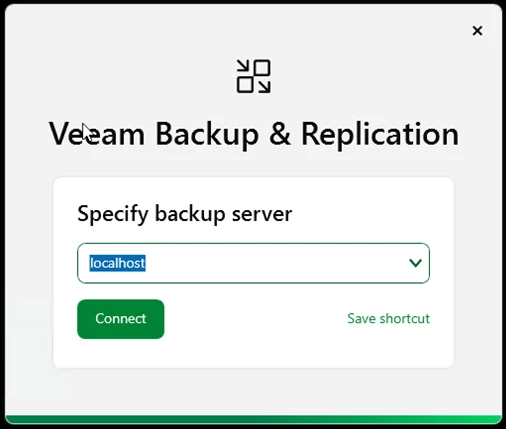
Launch the V13 console 

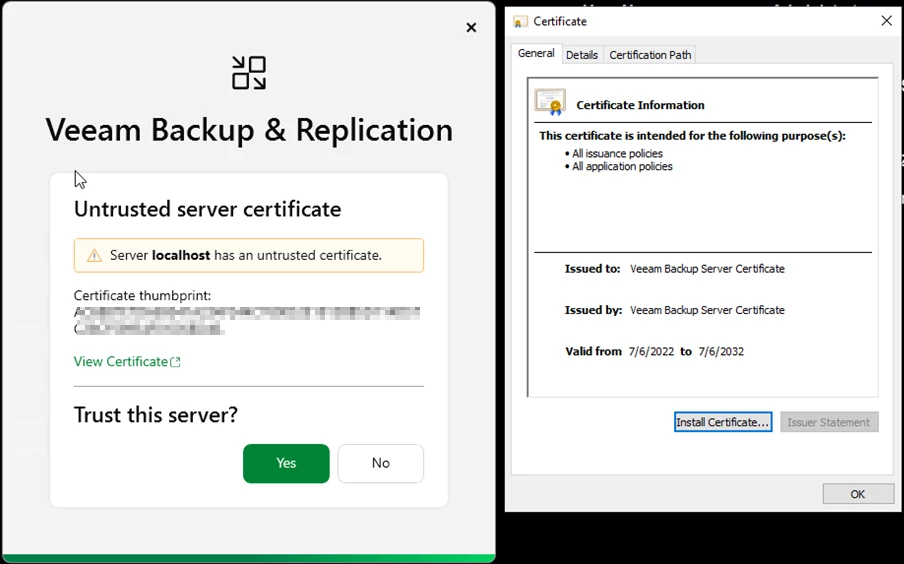
View the certificate and install them locally 

I really love the new UI look! 


Post upgrade checks

After the upgrade:

• Confirm all Veeam components, including gateways and repositories, are updated and online.
• Verify all Cloud Connect services are running.
• Disable Cloud Connect maintenance mode.
• Confirm gateways are online and listening on required ports.
• Spot check repository writes and metadata updates.
• Run a tenant backup through a gateway and confirm a new restore point is created.
• Perform a restore test from Cloud Connect backups.

Hope this walkthrough helps you plan your v13 Cloud Connect upgrade with confidence and minimal tenant impact.

Step-by-step guide to migrate Veeam Backup and Replication SQL Database to another server.

Step-by-step guide to migrate Veeam SQL Database to another server.

Before you begin: If your Veeam server running in VM you can take snapshot the VM incase if you want to revert back.

Step 1: Stop all running backup jobs, Copy jobs and replication and disable them

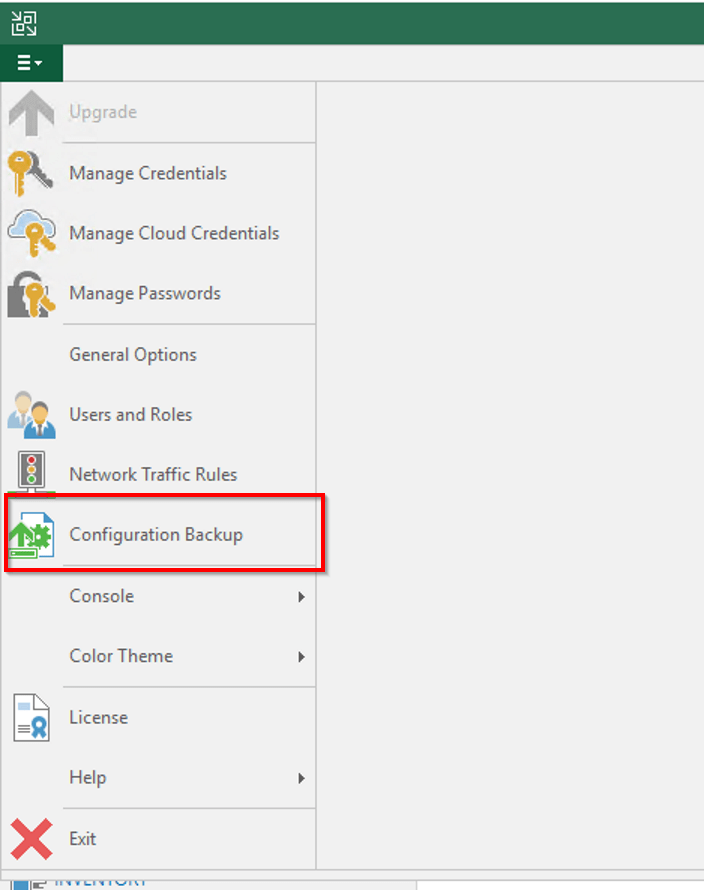
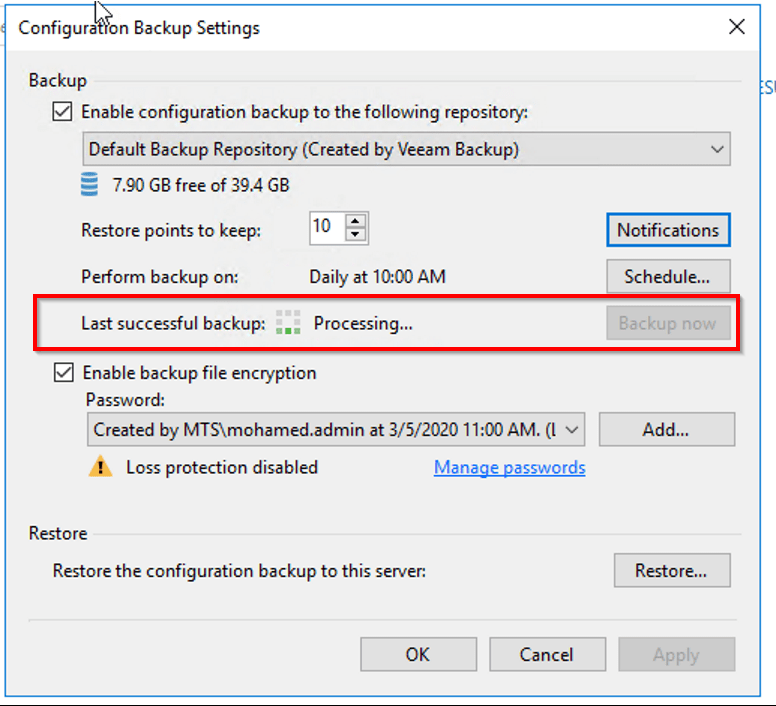
Step 2: Open Veaam Backup server ==> Options ==> Configuration Backup and take manual backup of configuration database


Enable ecryption for the configuration backup. Veeam requires that you encrypt the configuration backup if you have created at least one password in the Password Manager on the backup server.

Once backup has been completed, close the Veeam Backup and Replication console.

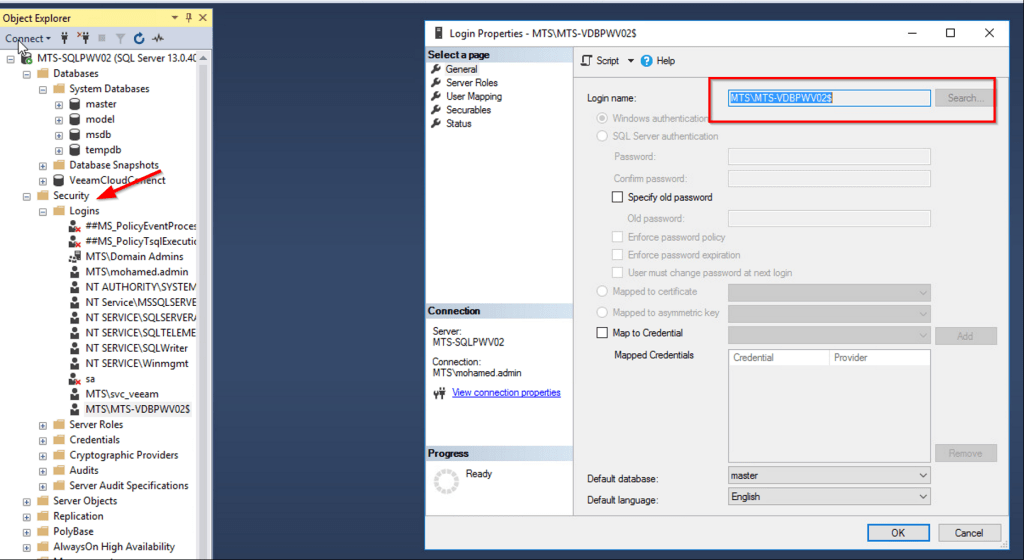
Step 3: Create empty database in new SQL server and assign permission.

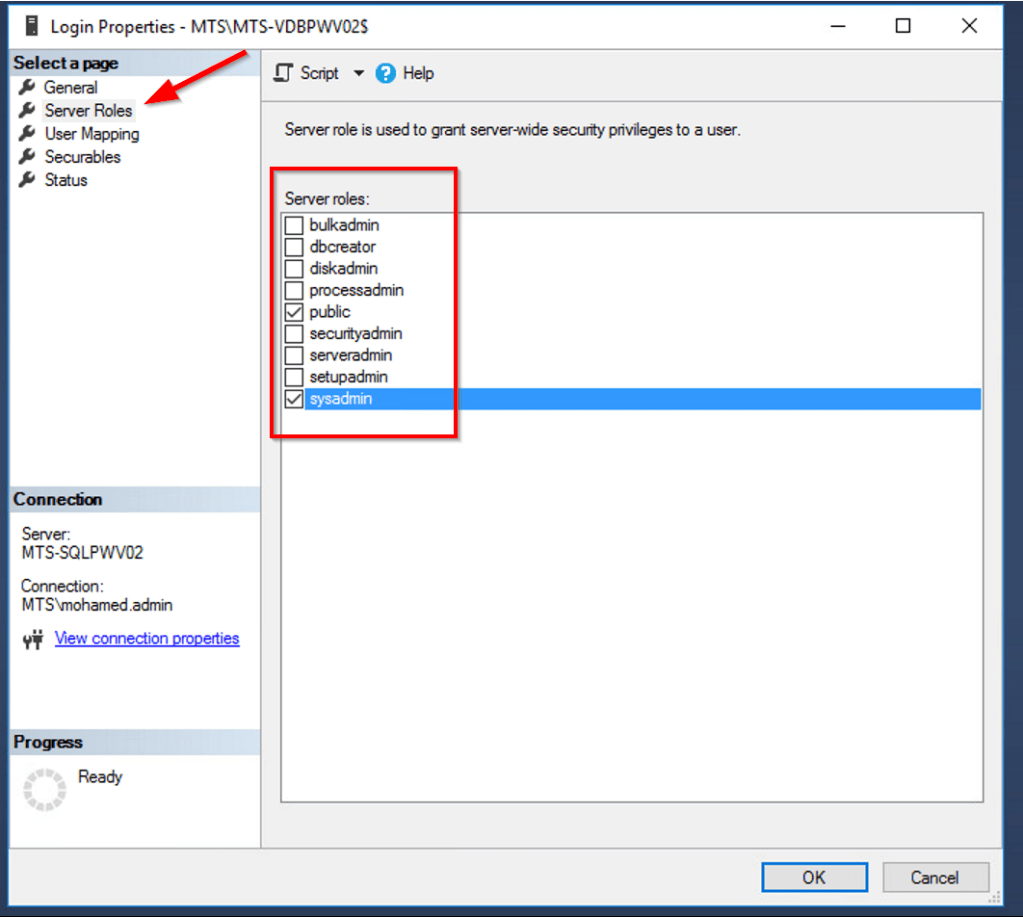
Step 4: Assign “sysadmin” permission to Veeam Backup server system account

Step 5: Open Veeam.Backup.DB.Config utility to change database connection settings.

C:\Program Files\Common Files\Veeam\Backup and Replication\DBConfig\Veeam.Backup.DBConfig

Machine generated alternative text:
User Account Control 
Do you want to allow this app to make 
changes to your device? 
Veeam.Backup.DBConfig 
Verified publisher: Veeam Software Group GmbH 
File origin: Hard drive on this computer 
Show more details 
Yes 
No

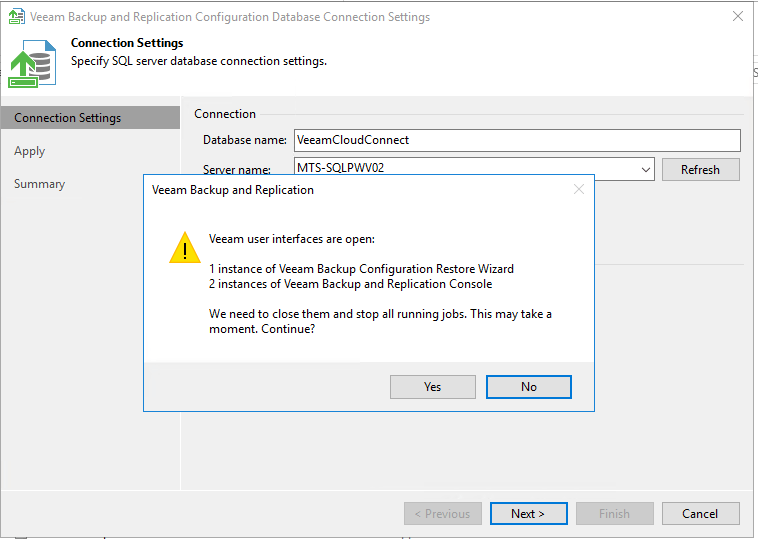
Step 6: Enter Database Name and SQL Server name

Select “Yes

Wait some time to finish the process and click “Next” and “Finish

Step 7: Restore the Configuration backup to new SQL Database

Open Configuration backup ==> Restore ==> Select Migrate

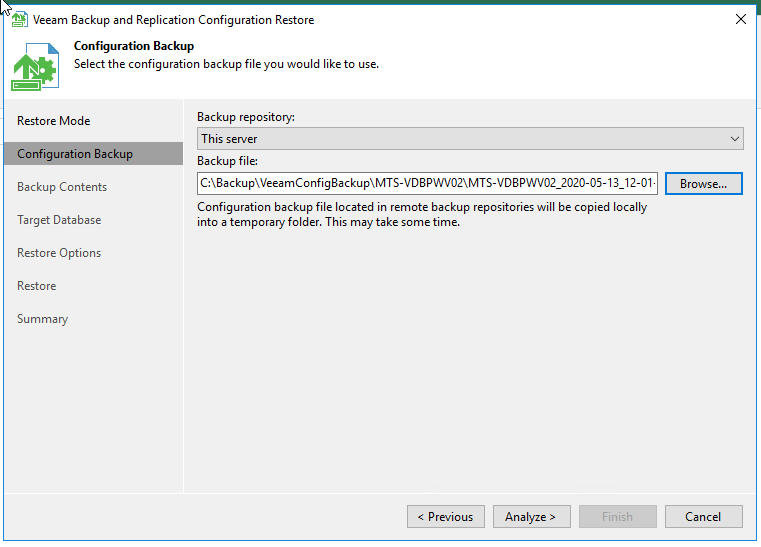
Step 8: Browse and Select the Configuration Database Backup file and Click Analyze

Click “Next” to proceed

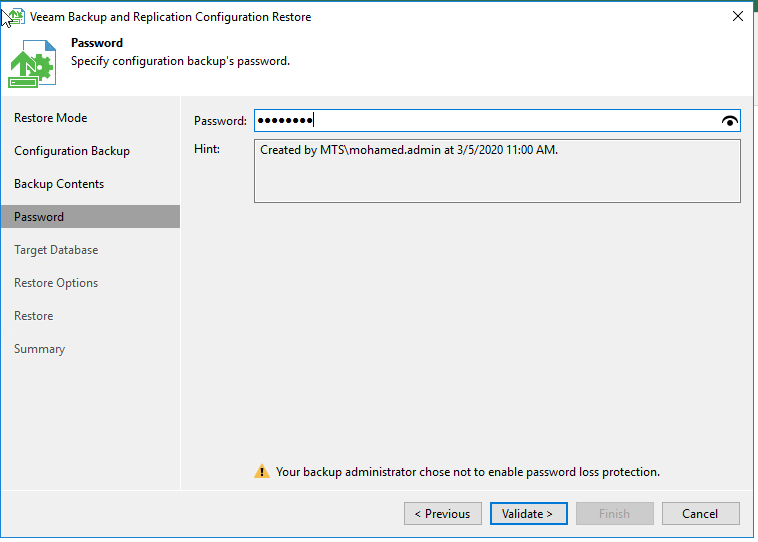
Enter the Configuration backup password and click Validate

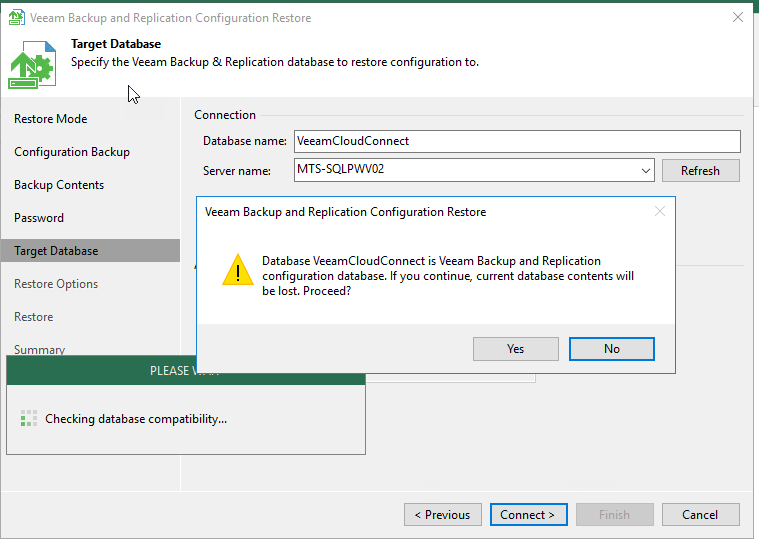
Step 9: Enter the Target Database name and SQL server name and Click Connect

Click “Yes” and “Connect” to proceed

Click “Restore

Now the Database restore will start and wait until it completes

Click Next and verify the credentials and update if any credentials has changed

Migration has been completed successfully. Click Finish and launch Veeam Backup console

Post migration, Resume the Backup jobs, Copy jobs and replication jobs

Reschedule Veeam configuration database backup and make sure configuration backup encryption enabled